
I have been having so much fun making this hand crafted flowers, I just had to share with you how I do it! For these flowers I used Heartfelt Creations Innoscents Flowers 1 and 2, and Spellbinders Blossom 2 Nestbilities. I just bought some cheap white satin at Walmart for $1/yard.
You will want to stamp a couple of each flower size onto the satin using Staz-on inks.

After you have all of your flowers stamped out, cut them with your nestabilities. I have found if you are trying to cut fabric, it works much better if you put a layer of cardstock underneath it. It gives the die a little more to grab onto.

You may still have to trim just a little, if it doesn't cut all the way through.

You can choose any color to make your flower just by spraying them with Glimmer Mist. I used Fully Purple and Dewberry.
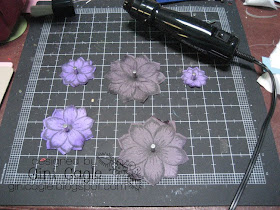
To speed the drying, I use my heat gun. I love laying out my flowers on my magnetic precision mat and holding them in place with magnets to dry. This keeps me from burning my fingers.

Next, you are going to melt the edges of all the flowers over a candle flame. You don't have to get it too near, or you will have some little fires to tend to!

Sometimes I will curl the petal as I melt it to help shape it.

For some of the top layers, I cut away the bottom flower layer - or sometimes cut into the petal to make it deeper. You can play around with it for different effects.

Here are all of the flowers shaped by the flame. I also cut some plain bronze organza and melted the edges of that for a different layer.

You are going to sew the layers together, but cut a little square of felt to put between the layers to space them.

Add beads or a button to the center of the flower.

After my flower was assembled, I painted a thin layer of Platinum Stickles over the top.

Here is another variation of my flower, using real fresh water pearls for the center.
I hope you will try these out - I'd love to see what you come up with!


