Saturday, January 25, 2014

Faux Mosaic Tile Background Video Tutorial with Art Anthology

I have been having so much fun experimenting with  mixed media techniques and have found a great way to use those samples to make a bigger project - Faux Mosaic Tiles.  This technique lets you combine lots of experiments (if you like) - or just a couple to create a background for canvases.

So come watch my video - and try several new background techniques.


Here are more detail shots of the 12 x 12 canvas.


  I also decided to create this for the Creative Embellishments January inspiration challenge -
I made this canvas very sparkly and glittery, but also wrote my goals for 2014 around the edges of the canvas to go along with the wishes, hopes and dreams 2014 theme.


Wednesday, January 22, 2014

Heartfelt Creations Inspiration


Heartfelt Creations Products and Products Carried by HC 
HCDP1 239 Majestic Morning Paper Collection
HCD 742 Majestic Blooms Die
HCD 735 Gift Ensemble Die
HCD 732 Decorative Flower Pot Die
HCD 729 Decorative Blossom Corner Die
HCPC 3578 Majestic Morning Background PreCut Set

1259723 Art Institute Glue (Dries Clear)
Paper Blossoms Molding Mat
Paper Blossoms Tool Kit 
Sparklets
Other Products Used 
May Arts Ribbon  - Twine SM-17
Tsukineko Ink: Memento - Tuxedo Black; VersaMagic - Purple Hydrangea
Copic Markers - RV17, RV19, YR16

Stickles- Orange
Xyron Mega Runner, Teresa Collins Foam Adhesives
WorldWin Cardstock

Cut a 6 x 6 card base and cut a patterned 6" square from the paper collection for the card front.  Layer a slightly smaller printed panel over the base, and glue with foam adhesives. Stamp the Majestic Morning flowers using Memento ink and cut with the corresponding die. Color the blossoms using Copic markers. Shape the flowers and add a Sparklet to the center.  Die cut the vines from the Gift Ensemble die and glue as shown.  Die cut the printed tag using the matching die from the Decorative Flower Pot Die set.  Cut a large Decorative Blossom corner die from the same cardstock as the card base.  Glue to the upper right corner.   

Monday, January 20, 2014

JustRite Color Challenge


JustRite Friday Challenges are back with their first challenge of the year!  And this time, the challenge was a color/inspiration challenge.


I have to admit, I was a little skeptical about the Peach Puff color with this - but I just went with it - and used the exact Copic colors- and it turned out great! My cardstock was a little too bright peach - so instead I used WorldWin Papers Kromekote Pearl, and added a little Peach Gelato- and it was the perfect shade.


So, here is  my list of everything that was layered on this card!

May Arts - WM22
Copic Markers
Iced Enamels Relique- Raspberry
Xyron Mega Runner

Friday, January 17, 2014

Mosaic Backgrounds for Mixed Media Video Tutorial


I've been experimenting with some Mixed Media canvases that were inspired by Gustav Klimt - and this is the second in the series (but actually the first that I'm sharing on my blog).  So this was a great project for the challenge at Design Memory Craft/ Faber-Castell, which was to make a piece inspired by a piece of art. 

I also used Lindy's Stamp Gang January Color Challenge to pick this soft palette. I didn't use the exact colors that they suggested, but I used Cocklebells Coral, Southshore Sand, Gag Me With a Spoon Gray, Geranium Coral Blush and Queen Sheeba's Silver 
and thought that I matched up pretty close.

 The Art Deco lady was a vintage black and white photo that I printed onto silk and colored with Pan Pastels.
 But there are lots of really fun techniques that I've shared, on a new video.

I hope you will take a few minutes to watch - and let me know what you think!

 
I'd love for you to follow my YouTube channel and invite your friends!

So now....Here's the video!

Wednesday, January 15, 2014

Heartfelt Creations Inspiration


Heartfelt Creations Products and Products Carried by HC 
HCDP1 239 Majestic Morning Paper Collection
HCD 742 Majestic Blooms Die
HCPC 3578 Majestic Morning Background PreCut Set
HCPC 3582 Majestic Morning Bouquet PreCut Set
1259723 Art Institute Glue (Dries Clear)
Paper Blossoms Molding Mat
Paper Blossoms Tool Kit
Other Products Used 
May Arts Ribbon 3/4" Chevron Twill
Want2Scrap Pearls
Faber Castell Gelatos(pink, orange, yellow)
Tsukineko Ink: VersaMark
Wow Embossing Powder
Stickles- Orange
Xyron Mega Runner, Teresa Collins Foam Adhesives
WorldWin Cardstock

Cut a 6 x 6 card base and cut a patterned 6" square from the paper collection for the card front.  Stamp the Majestic Morning Bouquet on a green patterned paper and  cut out. Apply to  the printed rectangle from the paper collection using foam adhesives. Stamp a second image with the same stamp. Color the blossoms using gelatos, and use foam adhesives to layer over the leaf layer.   Stamp, cut and shape a large flower using the Majestic Morning Background .  Color using the gelatos and brush on stickles.  Add ribbon and a bow, and tie the love tag cut from the patterned paper to finish.

Wednesday, January 8, 2014

Heartfelt Creations New Release - Majestic Morning

We are pleased to debut our first collection of 2014, the Majestic Morning Collection! This collection includes a Majestic Morning die which cuts out 12 different flowers at a time. How's that for value? The paper collection includes card fronts, 6x6 and 12x12 pages that come in vibrant pinks and oranges with rich greens and yellows. This collection also has a wonderful selection of floral stamps to choose from. For a very limited time we will be offering a card kit with this collection. See it Here
Win All 2014 Product CollectionsPurchase the Majestic Morning I Want It All Collection (IWIA 142) from January 8th - 15th 2014, and you will be entered to win all products we release in 2014. (2 random winners will be selected, prize valued at approx. $2,000.00)
Win the entire release: Leave a comment on the Heartfelt Creations blog by January 14th and you will be eligible to win the entire release valued at $180.00. The winner will be announced on January 15th on the Heartfelt Creations blog.


Heartfelt Creations Products and Products Carried by HC 

HCDP1 239 Majestic Morning Paper Collection
HCD 742 Majestic Blooms Die
HCD Classic Leaf Die
HCPC 3578 Majestic Morning Background PreCut Set
HCPC 3577 Vintage Morning Background PreCut Set
HCPC 3580 Majestic Morning Blooms PreCut Set
HCPC 3545 Open Leaf PreCut Set
1259723 Art Institute Glue (Dries Clear)
Rose Metallic 3D Stamp Paint 
Moss Green Metallic 3D Stamp Paint

Paper Blossoms Molding Mat
Paper Blossoms Tool Kit
Other Products Used 
Zva Creative Bling - Swirls (CRW-05CB-156); Rhinestones (CRW-04CB-133); Pearls (PEW-03CB-122)
12" Chipboard Cross (Hobby Lobby)
Faber Castell Gelatos
Tsukineko Ink: VersaMagic - Purple Hydrangea, Spring Pansy
Stickles- Dark Blue
Xyron Mega Runner, Teresa Collins Foam Adhesives, Xyron Creatopia

Cover 12" chipboard cross with patterned paper. Sand the edges as needed, then ink the edges. Stamp the Majestic Morning Blooms above and below where the flower cluster will be.  Color the flowers with a mix of chalk ink, and 3D Metallic Stamp paint.  Stamp, cut and shape a mix of flowers using the Majestic Morning Background and the  Vintage Morning Background stamp sets.  Color using the gelatos. Adhere to the cross.  Stamp the leaves using the 3D Metallic Paint, and cut with the corresponding die.  Nestle the leaves with the flowers.  Add bling to finish the design.


Tuesday, January 7, 2014

Happy Times With You

Hi! I've got a mixed media layout to share with you today - and it really goes to show how easy it is to introduce mixed media techniques into your everyday projects. I've used Art Anthology Colorations mists and the Sorbet  and Velvet dimensional paints.

Here, you get a glimpse of techniques -mists were used to distress the edges of the papers, a wooden butterfly  has been embossed and misted, resist papers  have been colored with spray, and stenciled texture paste has been sponged with the Colorations.

Here is a close-up of the wooden butterfly.  It was misted first, then embossed, and then misted again.  It really creates a ton of texture.

This piece of paper was stamped, then a stencil was laid over the top, and texture paste was applied.  After it was completely dry, the Colorations were sponged on.  You will also notice that the photo has been rubbed down along the edges with the Velvet paint.(I just finger painted this on).

Finally, I added highlights to this silk flower by brushing on the Sorbet paint.  It really added some highlights to the flower, as well as drawing in the main colors of the layout.

I hope you give some of these quick and easy techniques a go.  I will be back on the Art Anthology Blog on January 25 with a really fun video to create a faux mosaic background.

Sorbet - Viridian
Velvet- Aloha Zva Creative
Orange Crystals CRW-03CB-146
Large Crystals CRW-05CA-169
Large Flower FL-04CA-107
Small Bling Flourish  CR-07CA-121
Bling Flourish CRB-07CA-108
Small Pearl Flourish CRW-07CA113
Pink Paislee
Hope Chest Patterned Paper
StencilGirl
  Damask, Crackle
 Spellbinders
 Blooms One,  Blooms Three
Susan Lenart Kazmer
Iced Enamels  Relique Chartreuse
Xyron
Mega Runner, Teresa Collins Foam Adhesives

Wednesday, January 1, 2014

Starting the New Year with Heartfelt Creations


Heartfelt Creations Products and Products Carried by HC 

HCDP1 238 Floral Key Paper Collection
HCDP1 237 Antiquity Paper Collection
HCPC 3569 Burnished Key PreCut Set
HCPC 3574 Journey of Love Keys PreCut Set
HCPC 3533 Sun Kissed Fleur PreCut Set
HCPC 3507 Timeless Amour PreCut Set

HCD  741 Burnished Key Die
HCD 728 Timeless Amour Die
HCD 735 Gift Ensemble Die

HCD 734 Sun Kissed Fleur Die
1259723 Art Institute Glue (Dries Clear)
Paper Blossoms Molding Mat
Paper Blossoms Tool Kit 
Crystal Sparklets

Other Products Used
Tsukineko Ink:VersaMark - Watermark Ink; VersaMagic - Perfect Plumeria; Memento- Tuxedo Black
Ranger Distress Ink - Frayed Burlap
Lindy's Stamp Gang Embossing Powder - Desert Moon/Copper Pine
PanPastels
Zva Creative Bling
1 1/2"  May Arts Ribbon  QM16; Jute SM-17
WorldWin Papers Cardstock
Xyron Mega Runner, Teresa Collins Foam Adhesives


Cut a dark purple cardstock base from dark purple paper for a 5" x 7" card.  Cut the base layer from the patterned paper 1/4" smaller around than the card.  Color the edges of the paper with PanPastels and distress the edges.  Use a lightly colored patterned paper, cut to 4" x 6" and stamp the background stamp with watermark ink and heat emboss.  Color the edges with PanPastels and distress.  Add ribbon to the right side, and adhere this piece to the base using foam adhesives.  Stamp the Hourney of Love Keys (heart image) using the Plumeria ink.  Cut with the corresponding die.  Color the leaves with colored pencil, and ink over the whole image using Distress Ink. Cut a contrasting lacey heart using the same die, and glue both to the card as shown.  Use the Gift Ensemble die to cut two pieces of greenery and add to the card.  Stamp, cut and shape layers for a large Sun Kissed flower and color with PanPastels.  Add a sparklet to the center and attach as shown.  Stamp and cut a small key using the Burnished Key stamp and die.  Add to the bottom of the heart with pink jute. Use small flowers from the Sun Kissed set to add to the top greenery.  Add bling to the flower centers.  Hand cut the ticket from the patterned paper and tuck behind the flower to finish the card.

Tuesday, December 31, 2013

The Last Card of 2013


Can you believe that 2014 is almost here?!! This is another year that has flown by - but I wanted to thank all of my blog readers for stopping by and visiting me throughout the year.   I know winter is just getting ready to kick in full gear, so I figured a nice bright flower card would be a great way to end the year.  May you have many blessings for 2014!

 I used this color inspiration from Lindy's Stamp Gang December Challenge for the inspiration for my card.  The colors were brighter than what I normally work with, but I still managed to shabby-chic them up a bit.


 After I shaped my flowers, I embossed them using HollyHock/Scarlet Plum EP.  I also added the dots to my Hellebore flower using Twilight Blue Slate.

 I built up many layers of powder for this architectural element using Aurora Amethyst and Silver Moon Turquoise


I used a Sizzix folder to emboss the wood planks for my background with a bright blue paper and painted it with watered down gesso.  I added in some washi tape for texture and spritzed some Blue Hawaiian Blue Starburst spray over the top.  I kept layering the mist and the gesso, and added a little bit of the Silver Moon Turquoise and Hydrangea Blue Mauve embossing powders over the raised areas.  I really love how the background turned out.

I'll see you back in 2014~  Have a Happy New Year!

Monday, December 30, 2013

Zva Creative December DT Blog Hop


Happy holidays to you! Zva Creative and our talented NEW 2014 Design Team welcome you to our December blog hop where we officially welcome many of our new team members to our monthly hops! We are very excited about this year’s team and are sure that you will be inspired by and love their work. Are you ready to hop along and get to know them better?

And as a bonus— today’s hop is EXTRA special because you will get a sneak peek of Zva’s newest products which are set to be released at the next CHA tradeshow!

The hop begins at Zva Creative’s blog! Be sure head on over to check it out! You will also find a complete list of all the participating blogs there (in case there is a glitch along the way). 

As you know, Zva offers many beautiful color groupings for pearls, flowers and crystals.  If you like what you see along the hop you can find a list of stores and online retailers that sell Zva HERE

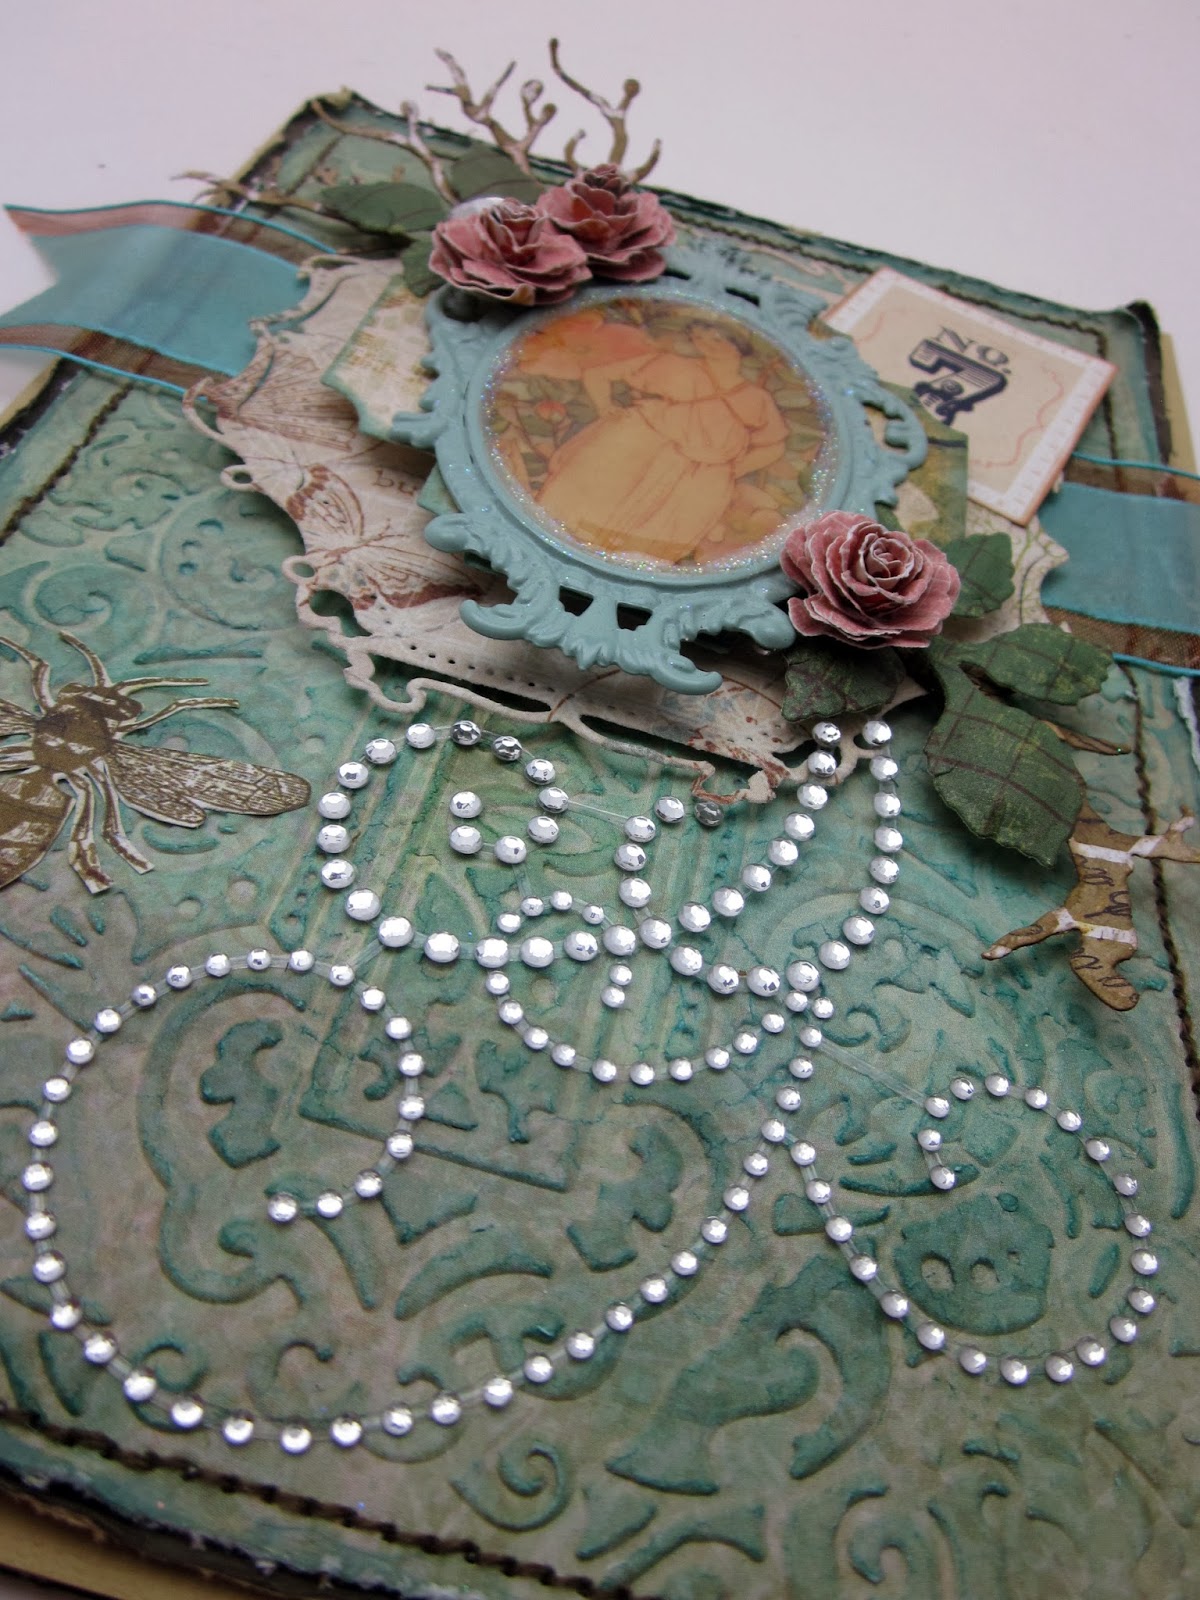
I'm really excited to be hopping along for my first time as a member of the Zva Creative team! I hope you enjoy the card that I have to share with yo today.  I have featured one of our new crystal swirls - CR-07CA-114.  It is the perfect size to make a statement on a card.


 I also got a chance to play with the set of PanPastels that I got for Christmas.  After I embossed my patterned paper, I brought out the raised areas using the pastels.


 The roses were made from patterned paper and die cut with Spellbinders Bitty Blossoms.  I also tucked a large Zva Creative Crystal ( CRW-05CA-169) into my floral cluster.


If you would like to play along with our design team, just follow along the blog path.  I am linking to one of the Zva designers and that designer is linking to the next and so on. Be prepared to be inspired along the way!
The Blog Hop starts today, December 30th and runs through midnight US Eastern Standard Time on Tuesday, December 31st.
***Prizes***
Hidden on FIVE of the designer’s blogs is a Zva Creative prize package! Winners will be randomly chosen after the hop is over. All you need to do is leave a comment on this Blog Hop post... you do not need to leave a comment on each and every designer's blog post to qualify. However, the more times you comment along the blog hop path, the more chances you will have to win.

The 5 winners will be announced on Wednesday, January 1st on Zva Creative’s blog. We will do our best to notify each winner, but it's best if you can pop in to Zva’s blog on Wednesday to see if you are a winner!

We also thought it would be more fun to add even more chances to win our blog hop prize!  To increase your chances of winning:
* Comment to let us know that you posted on your Facebook page about our hop (link to any of the blog hop posts)
* Comment to let us know that you "tweeted" about our hop (link to any of the blog hop posts)
* Comment to let us know that you asked your local store to carry Zva creative products.  If they already do, that's fantastic, maybe you can suggest other products that they don't carry.
*Hop over to Zva’s facebook page and “like” our page or leave a comment there to tell us that you stopped by if you already like follow us there!

 The blog hop begins here at Zva Creative’s blog. Your next stop is Carole Maurin. Enjoy!

Thank you for joining us!
 
P.S. Mark your calendar to join us again on January 27th for our next Zva blog hop!