Be
sure and check out both company blogs starting today, July 8th, and continuing
throughout the week to not only find out how to make this project and many more.
Don't forget to check back each day and leave comments for a chance to win some
great prizes.
Sunday, July 8, 2012
Coming this week.... Scor-Pal and Really Reasonble Ribbon
Scor-pal and their designers are excited to announce that they
are teaming up with Really Reasonable Ribbon for
a fun and inspiring week on both the Scor-pal blog and the Really Reasonable Ribbon
Blog.
The other Scor-pal designers and I have some exciting projects to share. Here's
just a peek at what I have created for the event.
Thursday, July 5, 2012
Popcorn! Popcorn!
I saw the cutest popcorn popper on Pinterest, and was inspired to make this gift container. This popcorn cart turned out pretty big ( 11" h x 8"w x 7"d) - so, I was popping corn all afternoon!
There are so many fun things arriving at Scrap-Mart everyday, so get your shopping list ready!
DCWV - Carnival Stack
WorldWin Papers Cardstock
May Arts Ribbon
Wow Embossing Powder - Suzy West Bubblegum
Scor-pal
Scor-tape
Challenges;
JustRite Friday Challenges: Stars and Stripes
Tuesday, July 3, 2012
Wishing Well
I am so blessed to have the best sister in the world! I found this picture of us sitting on a Wishing Well, when we were little, and decided it was time to be scrapped!
I added the Houndstooth embossing using a Crafter's Workshop Stencil. I sprinkled Wow Suzy West Earthtone Paprika over most of the circle, and finished up the rest with the Earthtone Honey. Then I added just a little Sierra Sunrise across the whole thing to give it a little glimmer.
I made a dimensional Wishing Well to embellish my page. I stamped the bricks and embossed them with Wow Opaque Bright White. I further embellished it with die cut flowers and vines. The bottom of the well is open to accomodate an envelope, that stores my hidden journaling.
DCWV Playtime Stack
Cheery Lynn Designs Dies
May Arts Ribbon: Satin/Grosgrain Double Band
Crafter's Workshop Template
Penny Black Stamp: Brick Wall
American Crafts Thickers
Want2Scrap Pearls
Challenges:
Once Upon a Sketch: Sketch/Friends
Monday, July 2, 2012
It's a Party!
This weekend was my sister's birthday, and I just wanted to invite you to join me for a little peek into the party decor I created.
This is a collage photo to give you a better feel for the whole party atmosphere. I used DCWV's Lemon Flower Stack, and repeating elements (Judy's Blooms) to create continuity throughout my decor.
Every party has to start with an invitation. I used flowers created with Cheery Lynn Designs Judy's Blooms. My sentiment layer is framed with the French Lattice Large. Behind that layer is the Oval Doliy Stacker One. A scalloped border was added along the bottom patterned paper panel using the Tiffany Border.
For my cupcake tower, I created pennant flags for the toppers, and one showy rosette for the top cupcake. I bought lollipop sticks from the baking section of a craft store, and used those to glue the toppers. On the pennants, I used the Cheery Lynn Designs Pennant Die and cut it apart, leaving pairs of triangles. Then, I folded the pair in half, over the lollipop stick, and glued the two sides together. This made my decoration cute from either side. I used the Miniature rose and a pearl to finish each one off. The top rosette was embellished with a flower and greenery from Judy's Blooms and the Mini Fanciful Flourish.
My chalkboard was so easy to make! I took a wooden frame, and covered it with my patterned paper, and then used the DCWV All Chalked Up paper, and just glued it into the opening. I added more Judy's Blooms flowers, and the Pair of Ferns for my greenery.
A couple of years ago, I bought a party centerpiece from Target, that coordinated with their current line of paper plates. It was so easy to transform this "vase" to match my new decor, by just covering the pieces with my patterned paper, adding some May Arts ribbon, and more Judy's Blooms flowers and leaves.
My placesetting was finished off with a placemat from the Mega Tea Party Die and napkin rings made with the Judy's Blooms.
I hope I have given you some inspiration on new ways to use some of your favorite dies! If you throw a party, don't forget to invite me!
The new challenge this week in Christmas in July - be sure to play along for your chance to win a $20 gift certificate to Cheery Lynn Designs!
Labels:
altered,
Cheery Lynn Designs,
DCWV,
May Arts Ribbon
Here's a Give-Away For You!
***Winner is Donna Coughlin! Congratulations! Email me to claim your prize!
Sound like fun? I thought so! If you would like a chance to win, just leave a comment on this post, and we will pick a winner on July 16th (the opening day of the Summer CHA)
Saturday, June 30, 2012
Momenta Shaped Wing-Fold Card with Scor-Pal
Today I will be sharing my project that was featured on the Scor-pal blog as part of this
week's Scor-pal and Momenta blog week. Of course, if you missed this project or
any of the other great projects from the Scor-pal team you'll want to hop on
over there and see what's been going on this week. Be sure to leave comments on
each post from this week for a chance to win some great prizes. Entry deadline
in 8am Monday, July 2, so there's still time.
I recently saw a
tutorial for a very cool Shaped/ Folded card and have been waiting for just the
right moment to try it out. The tutorial
that I used was from Marianne
Skjelstad’s blog. She didn’t have a name for this fold, but I thought that
a wing-fold shaped card was a good description. The Scor-pal Design Team got to play
with products from Momenta this week – and I used the BFG Pyramid Pad.
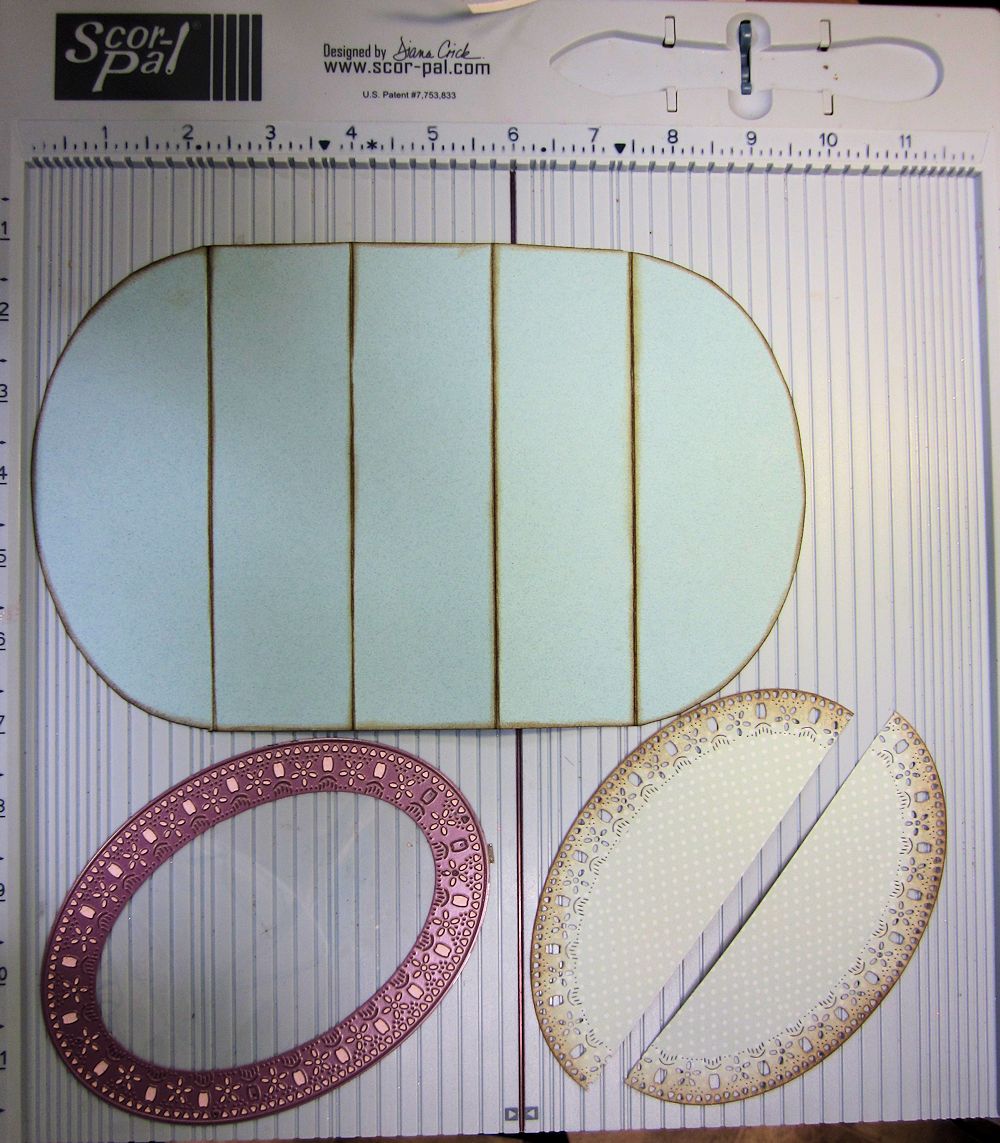
First, cut your paper
6” x 11 ¾”. Using your Scor-pal,
score at 3 ¼”, 5”, 6 ¾”, and 8 ½”. Fold
as shown.
Trace the shape that
you want to use for your wing on the two outer panels of the card, and cut to
shape. For my card, I traced the outside
of my Cheery
Lynn Designs Oval Doily Stacker One die, so that it would be slightly
larger than my die cut. Ink the edges
and add decorative die cuts, and patterned paper panels.
I used a smaller die
from the same set for my front panel and decorated it with matching stickers
from Momenta. This is the card folded into closed position.
![]() |
| Side View |
![]() |
| Closed View |
Labels:
Cheery Lynn Designs,
Fancy Fold,
Momenta,
tutorial
Wednesday, June 27, 2012
Grow With Love
I wanted to play in the challenge at JustRite Friday Challenge - and this week it was a color challenge. I really kept feeling stumped by these colors, and thought they just weren't "my" colors - until I got ready to post this card, and started laughing when I saw the card I posted right before this one, used almost the exact same colors! Kind of funny.
JustRite Stampers Seeds Of Summer Clear Stamp Set
May Arts Ribbon
Webster's Pages Pins
Basic Grey Patterned Papers, Chipboard
Challenges:
JustRite: Color Challenge
Labels:
Basic Grey,
justrite,
May Arts Ribbon,
Scrap-Mart,
Want2Scrap,
Webster's Pages
Tuesday, June 26, 2012
Seek Joy
Time for more inspiration featuring the gorgeous stamps from Hampton Art.
Supply List:
Hampton Art Stamps: Butterfly
Banner #PS0527; Carpe Diem #LE-5549M
Clearsnap:
Colorbox Archival Dye: Wicked Black
Colorbox Chalk Ink: Creamy Brown
Authentique Paterned Paper: Gathering
Worldwin Cardstock: ColorMates
Mist
Cheery Lynn Designs Die:
French Flair Doily Stacker, Lace Corner Deco H
May Arts Lace
American Crafts Ribbon
Faber Castell Gelatos
Tools: Grand Callibur, paint brush
Adhesives: GlueArts Glue Glider Pro – Perma Tac; U Cut It
Dimensional Adhesive
Art Glitter Dries Clear Adhesive
Designer Notes:
1. Stamp the Butterfly
Banner on white cardstock, using Wicked Black.
Use the Seek Joy sentiment from the Carpe Diem set, to stamp onto the
blank banner.
2. Use gelatos
and a paintbrush to watercolor the stamp.
3. Ink the
edges of all papers with Creamy Brown.
4. Assemble
the card as shown.
Monday, June 25, 2012
Blessed Beyond Measure
There is a small country church, not too far from where I live - and I've always thought it was so picturesque. My sister and I took my nephew over there, and got some of my all time favorite photographs. I just think this picture is so sweet.
I love adding the stamens from the Build- A-Flower Set to all of my existing flower dies - it gives them a whole new look.
The Doily Stacker Circle also adds a whole new dimension to the center of the Mega Tea Party Doily.
There's a new challenge at the CLD Challenge blog - and this week we want to see Wedding/ Anniversary projects. We hope you will play along with us!
Cheery Lynn Designs Dies
Labels:
Cheery Lynn Designs,
DCWV,
layout,
May Arts Ribbon
Tuesday, June 19, 2012
Party Time with Hampton Art
Supply List:
Hampton Art Stamps: Party
Time IC0157
Clearsnap:
Colorbox Archival Dye: Tree Frog, Wicked Black
Colorbox Chalk Ink:
Lime Pastel, Blush Rose
Fairy Dust Glitter: Pralines and Cream
Glue Gloss
Echo Park papers: Victoria
Garden
Bazzill Cardstock
Cheery Lynn Designs Dies: French Pastry, Border Carnivale
Copic Markers
Sakura Crystal Lacquer
Tools: Spellbinder’s Grand Calibur
Adhesives: GlueArts Glue Glider Pro – Perma Tac; U Cut It
Dimensional Adhesive
Designer Notes:
1. Stamp the cake
image using the Tree Frog ink and color with various Copic markers.
2. Cut the
image.
3. Apply Glue
Gloss liquid glue on the “frosting” areas of the cake, and sprinkle with
Pralines and Cream glitter.
4. Add Crystal
Lacquer to “chocolate” areas of the cake to appear like a chocolate glaze.
5. Ink all
pieces of patterned paper using the Blush Rose and Lime Pastel (on the green
patterned paper only).
6. Stamp the
party banner with Wicked black and fussy cut the image.
7. Use foam
adhesive to attach the layers of the card.
Subscribe to:
Posts (Atom)