Friday, October 18, 2013

Inspired By Stamping and WorldWin Papers Blog Hop

Hi there crafty friends and thank you for joining us in this Holiday blog hop. Inspired By Stamping and WorldWin Papers has teamed up to offer you over 15 inspiring Christmas projects to jump start your holiday season. We hope that you’ll find just the right inspiration for your next Christmas themed project.
Christmas season is all about gift giving, and this hop is no exception. We have planned a very sweet giveaway for a lucky winner. To be eligible for the giveaway, please visit each blog in the list, grabbing the “letter” code as you go. Once you’ve landed on our last blog, which is the Inspired by Stamping blog, you will leave a comment with the secret phrase created by putting together all of those letters that you collected from each blog. Winners of the giveaway will be announced on October 23rd on both the WorldWin Papers and Inspired by Stamping blogs.
The designers have worked hard to produce all of these fantastic creations, and we would like to invite you to leave some comments on their individual blogs as well.
So what are you waiting for…let the hopping begin!

Welcome to my blog, I'm glad you stopped by today.  My letter for you to collect is "H". I've made two Christmas cards for you.....


WorldWin Papers - 
Inspired By Stamping Clear Stamps
May Arts Ribbon
Spellbinders
M-Bossabilities folder


WorldWin Papers:
Kromekote Dark Red
Inspired By Stamping Clear Stamps
Holiday Sentiments
Spellbinders Dies
May Arts Ribbon 
1.5" Crochet Ribbon
Want2Scrap Pearls
Xyron
Mega Runner, Creatopia

Now that you have collected your letter (and hopefully left a little love), hop on to Katrina Hunt's blog, and check out her adorable projects! 

Here is the whole hop, in case you jumped in somewhere in the middle!
Worldwin

Inspired by Stamping

Wednesday, October 16, 2013

May Arts Halloween Hop


Today is the third day in the May Arts Ribbonista Halloween Blog Hop! I'm sure you have been getting some great ideas to get you ready to spook!  Remember to leave comments on the posts - the more you leave the greater your chances for winning your choice of 3 spools of ribbon from our Halloween category!


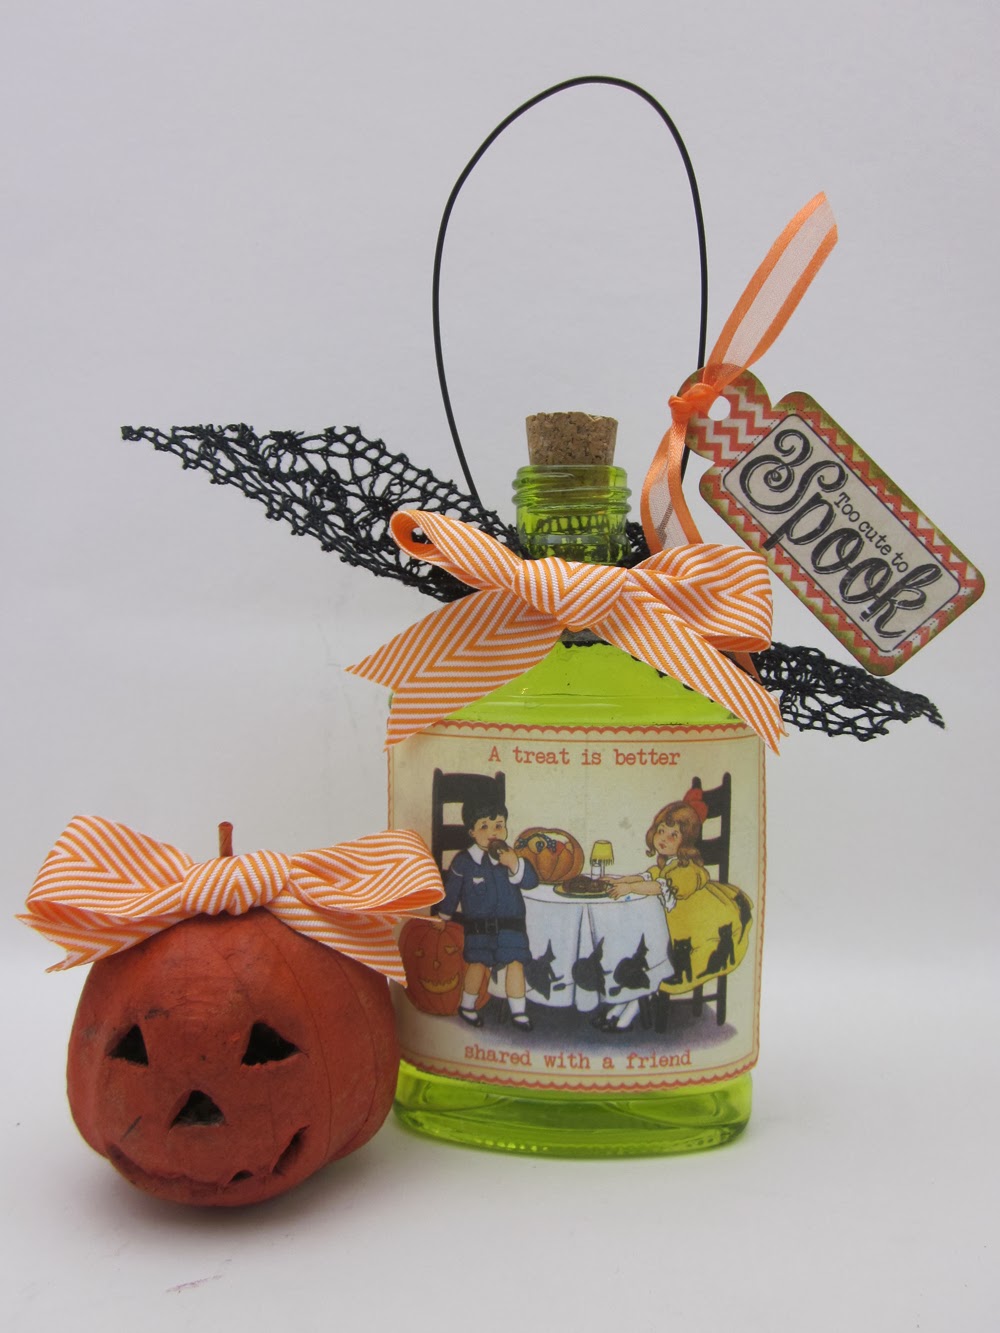
It's fun to tuck little decorations in nooks and crannies around the house, and I thought this embellished bottle and pumpkin would be so cute nestled on a shelf.  I used Authentique's Thrilling paper collection, and adhered it to the bottle using the Xyron 5" Creative Station.  I added some of my favorite ribbons and that was it!  The paper mache pumpkin was colored with Art Anthology's Honey Bee Colorations, and then I just added a bow (she is too cute to spook!)

May Arts Ribbons

Partners in Crafts Supplies

Other
Paper Mache Pumpkin
Glass Bottle
Monday
Tuesday
Wednesday

Thursday

Friday

Heartfelt Creations Layout


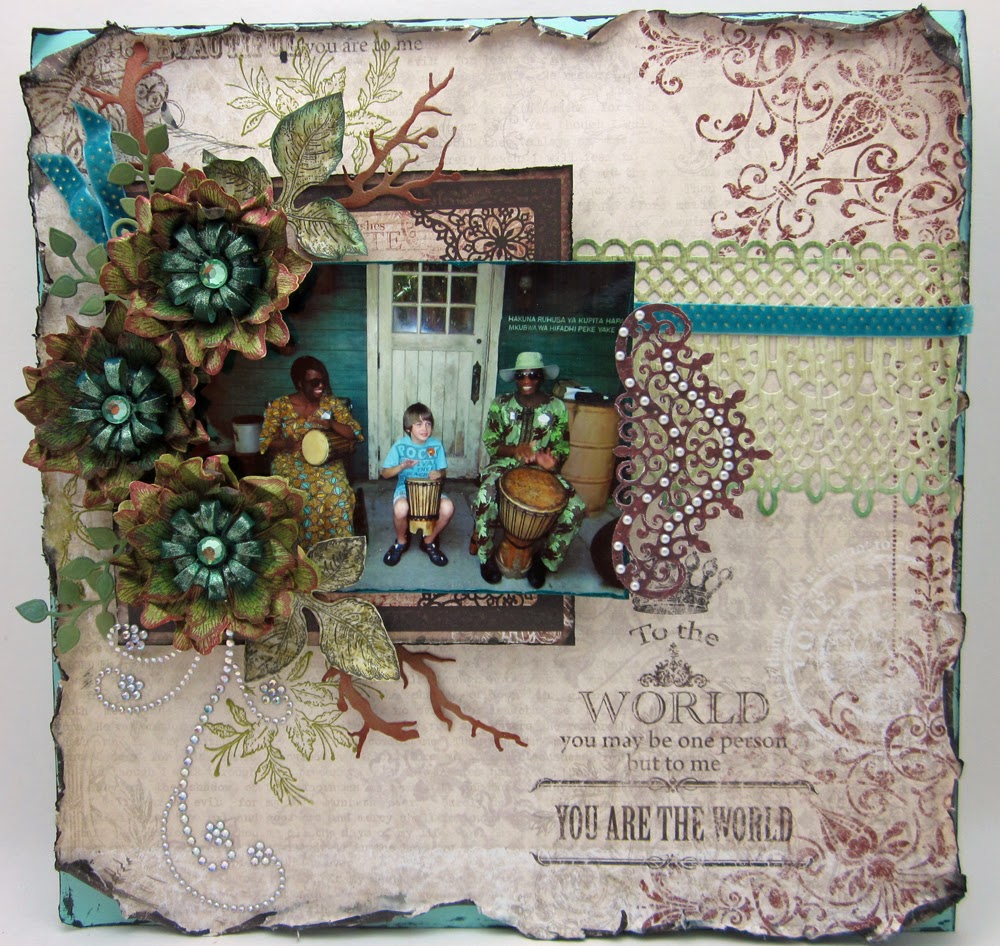
Welcome back, for another project created with Heartfelt Creations!  I've got another layout to share with you.  I love how you can really use any colors with the neutrals in the Antiquity paper collection - and they look great!

In a garden, these flowers would be considered hybrids - lol! I combined the Tattered Blossoms and the Sweet Juliet dies to create these blooms.

The Sweet Juliet centers were painted with 3D stamp paint, and the entire flower was misted with Art Anthology Pesto Colorations.
 

I embellished the ornate die cut with pearls.


Supplies:
HCDPI 237 Antiquity Paper Collection
HCDP1 230 Sunny Day Paper Collection 

HCD 740 Sweet Juliet Dies
HCD 722 Tattered Blossoms Die
HCD  736 Classic Leaf Die
HCD 737Ornate Gateway Die
HCD 713 Decorative Lace Border Die
HCPC 3564  Blessing to Me PreCut Set
HCPC 3545 Open Leaf PreCut Set
HCPC 3468 Tattered Blossoms PreCut Set
1259723 Art Institute Glue (Dries Clear)
Lime Green Metallic 3D Stamp Paint
Other:
Spellbinders Cherry Blossoms Die
WorldWin Cardstock Aqua Denim Colormates
Art Anthology: Pesto Colorations, Focus Colorations, Timeless Colorations, Tuxedo Velvet
Zva Creative Bling
May Arts Ribbon: 3/8" Velvet with gold dots  456-38-04
Clearsnap Ink: Burgandy, Blackbird, Artichoke
Xyron Foam Adhesives, Mega Runner

Paint the edges of the solid cardstock background with black dimensional paint and distress.  Spray some dark mist onto a mat, and run the edges of the main patterned paper through the liquid and distress the edges.  Stamp leaves under the area where the photo will be placed.  Cut a 6 x 6 mat from the patterned paper and apply to the layout using foam adhesives.  Cut the lace border and ink the edges.  Tuck under the photo mat and glue in place.  Add velvet ribbon over the die.  Cut the fancy flourish from the Ornate Gateway set, add pearls and glue to the photo edge.  Assemble three flower centers using the Sweet Juliet dies (one large and one small).  Paint them lightly with the stamp paint.  Stamp and cut 2 of the largest petals from the Tattered Blossoms and one of the next size down for each flower.  Spray with a light colored mist (very light coating), and shape with your fingers.  Assemble the flowers and mist with the Pesto spray.  Add bling to the centers.  Stamp and cut leaves to nestle into the flower cluster.  Add branches, ribbon and bling flourish to finish.

Monday, October 14, 2013

JustRite Friday Challenge - Easel Cards

 The current challenge for the JustRite Stampers is easel cards, and I wanted to see if I could come up with something a little different, so I made a card with a small box on the front of it, to hold a removable bookmark.

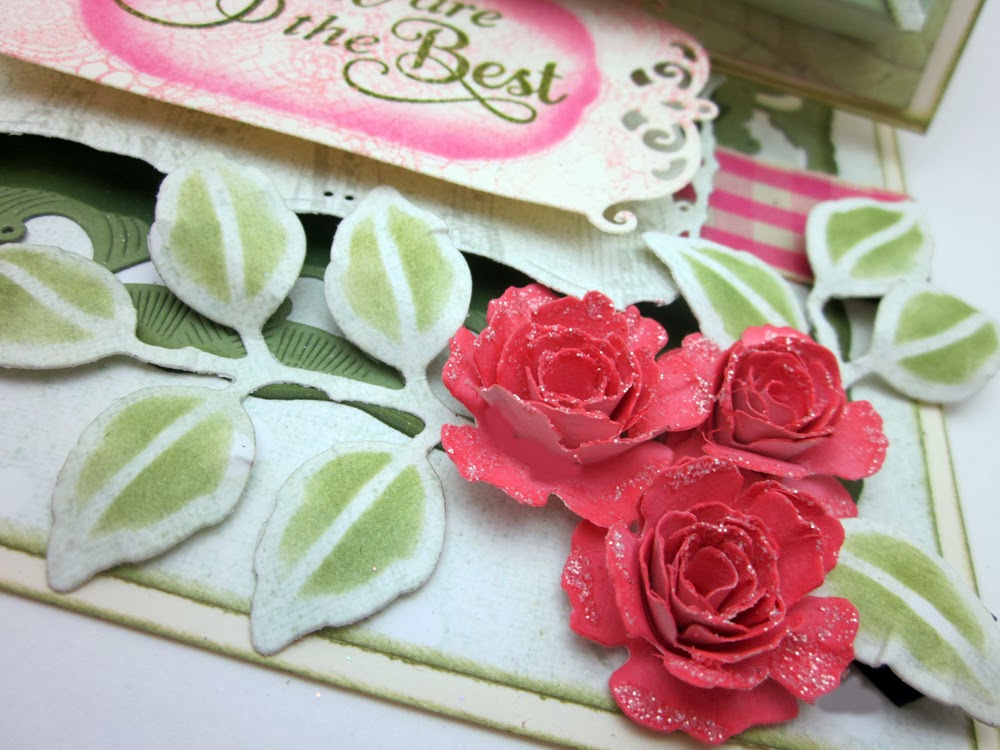
 I embossed the border from Lace Medallion Labels and cut it, and placed May Arts ribbon underneath it, and added a handmade flower using the Bitty Blossoms die set.

  I placed more flowers on the card base, along with some die cuts from Foliage.   The sentiment was stamped and layered on Nobel Rectangles and Exquisite Labels 11. 


I decorated the pocket/box with Botanical Swirls, and  embossed  a butterfly  from Grand Sentiments clear stamp set.

 Here's the bookmark - decorated with more Bitty Blooms, another butterfly and stamped with the frame and sentiment from Grand Sentiments.

Here's a front view of my card.  There are some great entries, so be sure to check them out!

Saturday, October 12, 2013

Boo To You - Art Anthology, Authentique and Basically Bare Week!

Christmas came early at my house this year, because I just got a big box of goodies from Art Anthology and couldn't wait to jump in and start playing.  This is my first official post as a new DT member, so I hope you will enjoy going on this artistic journey with me.  I was also "thrilled" to receive Authentique's  Thrilling Collection - it is adorable!

I have so many ideas, and this layout gave me the perfect start.  I was really jumping from one idea and product to another, but I'll walk you through what I did.

I adhered the black "Foundations" paper to a sheet of orange cardstock, and then distressed the two at the same time, so that bits of the orange would show through.  I then painted the edge with Kenyan Copper Sorbet. This looked so glossy and shimmery when it dried - perfect with the dark background.

I trimmed the "Moonlit" paper slightly, and spritzed Juicy Colorations onto my mat, and dredged the edges of my paper through the puddle.  Then I manipulated the damp edges to shape and curl them.

I painted  Tuxedo Velvet onto a Unity Stamp, and stamped it once onto scrap paper, and then used  2nd generation stamping onto my layout (so it was a bit more faint).  This gave me the perfect weathered look - with more paint collecting at the edges.

Stamp by Unity


Making my own flowers is probably my favorite technique , and I make them for almost every project.  I die cut layers of cream cardstock, and misted them with the  Honey Bee Colorations. Then I sprayed some of the  Juicy Colorations onto my mat, and dipped just the tip of each petal into it.  I let the flowers dry just a little, and then I began shaping them.  I let them dry completely before I glued them together.  The color was just a little to bright, so I grunged it up a bit with a light misting of Cinnamon Twist Colorations.

Die by Heartfelt Creations/Spellbinders, Cardstock by WorldWin Papers

My flower needed some leaves, so I grabbed some canvas fabric and painted it with a mix of 
June Bud Sorbet, with just a little Basil Velvet over the top.  


This gave me a nice smooth surface to stamp on and the paint also served as a sealer for the fabric, so it didn't fray when I cut it.

Heartfelt Creations Stamp

 I layered this chipboard fence over the cute little witch - and misted it with Plush Colorations and then painted a layer of Dazzle Sorbet over that - for a little glitz.

Chipboard by Twiddleybitz

I painted the Kenyan Copper around the edges of my photo .

And for the photo of my nephew in his Karate Kid costume - I added texture around  using dots of the Sunbeam Dimensional Crystal.


Under my photo and mat, I sprayed an acrylic mask with the Honey Bee Colorations, and then laid it on my paper. I also spritzed some May Arts Lace with the Guacamole Colorations, to help it fit in with my Halloween palette.

Bling by Zva Creative

And for the other side, I sprayed the Plush Colorations on a rubber background stamp, let the excess drip off just a bit, and stamped it.


Here's a final look at my layout - thanks for letting me share the fun with you today!


Challenges:
Twiddleybitz: Washi Tape
Cest Magnifique: October Sketch
________________________________________________________________


Check back with us every day this week for more inspirational projects! We have an Art Anthology Prize Pack to give away to one of our lucky commenters!  Make sure you also stop and visit our friends over at Basically Bare & Authentique for prizes and lots more wonderful inspiration coming your way!  And don’t forget to visit the Basically Bare & Authentique Facebook Pages and tell them Art Anthology sent you!
If you are on Pinterest, check out the special Pinterest board that we have created for this hop! Re-pin some of your favorite projects for an extra chance to win!
Last but not least, don’t forget to follow all 3 companies on Pinterest for more inspiration!

Thursday, October 10, 2013

Xyron and Doodlebug Blog Week

This week the Xyron Design Team has been having a great time hopping with the Doodlebug team.  Be sure to hop over to the Xyron blog, as well as the Doodlebug blog to see lots of amazing projects and maybe even a giveaway.

I worked with the Home for the Holidays collection - which is so bright and cheerful! But I think my favorite things in this collection are the Mini Bows. Don't you just love that big paper bow?  I inked the edges a little and assemble it with the Xyron 1/2" High Tack Tape.  I thought that  the sketch this week at Mojo Monday, would be the perfect layout to use with these papers and embellishments.


Supplies

Wednesday, October 9, 2013

Heartfelt Creations New Release - Sweet Juliet

We are pleased to introduce the Sweet Juliet Collection. This collection is inspired by the beauty of ancient rooms locked away and laden with antique treasures. These rooms are filled with yellow candlelight and dusty vases. Crinkly letters lay scattered around, turning crisp and fading more every day. A postcard lays covered in thick dust, forgotten in a dark corner. Wildflowers lay around, as crisp and crinkled as the beautiful wallpapers. Using these detailed floral and typographical stamps, complemented by black, gold and burgundy papers will enable you to create an outstanding classical creation.
Leave a comment on the Heartfelt Creations blog by October 15th and you will be eligible to win the entire collection valued at $150.


Heartfelt Creations Products:
HCPC 3566 Beautiful Juliet PreCut Set
HCPC 3563 Post Card PreCut Set
HCPC 3499 Delicate Asters and Butterflies PreCut Set
HCD 740  Sweet Juliet Die
HCD  739 Banner and Trees Die
Spellbinders Les Papillions  Die
HCDP1 237 Antiquity Paper Collection
3D Metallic Stamp Paint
Other:
WorldWin Cardstock
Watercolor Crayons
May Arts Ribbon
Want2Scrap Pearls
Embossing Powder
Clearsnap Ink
Xyron Mega Runner, Creatopia

Stamp the post card image on the patterned paper with watermark ink and heat emboss with embossing powder. Use watercolor crayons to add color to the floral image and blend with a water brush.  Distress the edges of the paper, creating a couple of torn flaps.  Adhere a piece of the lace tree die cut behind the opening. Stamp and cut the butterfly with the matching die - add color using the 3D stamp paint.  Stamp the sentiment with watermark ink and heat emboss.  Use a watermark pen to extend the lines of the stamp to fit the width of the card, and heat emboss.  Fussy cut and apply to card with foam adhesives.  Create a Sweet Juliet flower using 2 layers of the large die.  Assemble with a jeweled brad.  Glue a ribbon behind the flower and add to sentiment.

Wednesday, October 2, 2013

Warmest Wishes - Heartfelt Creations Layout


I've got a layout to share with you today that wraps up Heartfelt Creations' Season of Joy release.  I've had so much fun creating projects using this collection, but I have to say this one is my favorite! I added loads of details, which I will share with you today.

Also please remember:
 
It's that time of the year to vote for your favorite designers from Heartfelt Creations to see who will stay on the team!  I really hope that I have inspired you, and that you will take a minute to cast your votes.  Here are all of the details:

Vote for your favorite Designers: When we announce a new design team call that also means that we have a tough time deciding which of the current designers continue on the HC design team. We are giving you the opportunity to get involved and vote for 5 or more of your current favorite design team members. You can CLICK HERE and submit your vote. When you vote, you will also be entered into a drawing to be eligible to win a $50 HC Gift Certificate. You can only vote one time and you have to select 5 or more to be eligible to participate. Voting ends on October18th, 2013.

Also, HC always adds new designers to the mix - and my very talented sister, Lori Williams is in the running - so if you would vote for your favorite new designers as well (there are two separate polls and each one has a prize to be won!)

 Vote for your favorite Semifinalists: We would love to have you participate and vote your 5 favorite semi-finalists. Review each one of their blogs and then CLICK HERE to submit your vote. When you vote, you will also be entered into a drawing to be eligible to win a $50 HC Gift Certificate. You can only vote one time and you have to select 5 or more to be eligible to participate. Voting ends on October 18th, 2013

Chipboard circle, painted with 3D Metallic Stamp paint, then stamped with holly branches. Also check out the die-cut doily that was created using the Decorative corner dies.


Poinsettias were colored gold with mists and shaped while wet.


Pine cones add texture to the flower clusters. They were stamped, fussy cut and glittered.

The sentiment stamp serves as a title for the layout. 


Heartfelt Creations Products
Other:
Spellbinders Cherry Blossoms
May Arts Ribbon
Clearsnap Ink
Various Mists in yellow, gold
Xyron Mega Runner, Creatopia 
Chipboard

12 x 12 Layout:
Ink all of the edges of the patterned papers with brown ink, and distress the edges.  Layer the papers as shown, using foam adhesives. Cut a large open circle from chipboard.  Paint with 3D Stamp paint.  Ink the edges.  Stamp the Holly Swirls randomly on the circle. Layer the other panels as shown.  Cut the doily using the Decorative Blossom Corner die (after each cut, line up the edges, until you have made four cuts and have completed the doily). Place the photo over the doily. Tuck a small portion of the Banner and Trees die (the lace tree) under the left edge of the photo. Stamp the sentiment and cut using a circle die. Stamp and cut the flowers using the Christmas Poinsettia stamp and the Sun Kissed Fleur die.  Spritz with mists and shape while wet.  Assemble the flowers. Add a little glitter and a dew drop to the center of each. Stamp the pinecones and hand cut.  Trace the design using the metal tip on the dries clear adhesive and add ultrafine glitter.  Arrange the floral spray along the bottom of the chipboard circle.  Add branches from the Cherry Blossoms die set, and place the pinecones at each end.
 

Monday, September 30, 2013

Xyron and Core'Dinations Hop


I've got a fun project to share today as part of the Xyron and Core'dinations Blog Hop and hope that you will give it a try yourself.  Tussie Mussies are a Victorian inspired paper cone decoration. They are great for tucking in little treats or trinkets.

If you would like to try one for yourself, here are the simple steps:

1.  Cut paper 9 x 9". Make a small score mark or pinch in the bottom center, to help guide your rolling of the paper.

2.  Cut a contrasting 8 3/4" x 8 3/4" piece of paper (Black Magic Collection).  Dry emboss the corner to line the Tussie Mussie.  (I cut into the folding edge of my embossing folder slightly - 1.5",
 so that my design would line up in the corner like this)


3.  Sand the embossed area to reveal the colored core of the paper.  Trim the excess paper away (cut diagonally 2" below the embossed area).  Use the Xyron Mega Runner to add to the back "wall" of the pocket.

4.  For detailed die cuts, it is easier to run the paper through the Xyron Creative Station before making the cuts.  Cut a piece of paper close to the size of the die, run through the machine. Remove the top film, and proceed to die cut.  Remove the backing paper, and adhere to the front of the cone.

5.  Run the crocheted lace through the Xyron 1.5" Sticker Maker, and place around the opening of the cone.

6.  Add tissue paper filler inside the cone, and then decorate with flowers, diecuts, net, paper-mache mini pumpkin and any other goodies you would like to add. Also - tear strips of cardstock, and finger fold back and forth and add as a filler.


Xyron:
 Core'Dinations:
Other
Spellbinders: Foliage, Spellbinders Enchanted Labels 28
 Sizzix Embossing folder
Paper Mache Pumpkin
 Black Net
 Pink Paislee Flair
 Want2Scrap Pearls