Monday, November 25, 2013

Bleach Stamping


This weekend I tried a stamping technique that I haven't tried before - bleach stamping.  It sounded a little intimidating, but it was really easy - and the results are a fun surprise depending on the color of cardstock that you use.

I choose to use ColorMates Deep Creamy Cocoa - along with JustRite Stamp's Fancy Labels.  The results reminded me of gorgeous batik fabric.  If you would like to try this technique, just fold a paper towel several layers thick, place on a glass plate, and pour enough bleach on the towel to saturate it.  Then just use this as use would a stamp pad.  I did not have to leave the stamp on the paper extra time - the bleach effect was almost instantaneous.

 The sentiment was stamped from JustRite's  , and the edges were ink distressed in brown.  I also used a flourish from this stamp set at the top of the card.

The bottom half of the card was dry embossed and then inked to bring out the detail.  I die cut 2 of Spellbinder's Fantastic Flourish One (one in pink and one in green).  I cut the pink flowers off of the vine and glued them down on the green base.  I added pearls to the centers.  The large flower was made using Spellbinders Rose Creations, and water distressed to produce a more realistic look. Finally, the leaves were cut from Spellbinder's Foliage set, and the debossed areas were colored with a Copic marker.


Supplies
Tsukineko Ink
Viva Decor 3D Metallic Stamp Paint
Copic Markers
Sizzix Embossing Folder- Regal Flourishes
WorldWin Papers:

Saturday, November 23, 2013

Loved Canvas


 When I start creating a canvas, I generally have no idea what the finished piece will look like.  But it's a fun way to jump in and create with wild abandon and just have fun and end up with paint up to your elbows! This is a 6 x 6 canvas - so it is a great size for experimenting - not so big that it's intimidating.  After all, 6 x 6 is a card size, right?

I began by painting the canvas with gesso, and then layering torn strips of dictionary pages over the surface, leaving some areas bare. Then I started adding color with Art Anthology Colorations Sprays.  I used Studio Blue, Waimea Bay and Guacamole.  Next I used some of the Velvets Dimensional Paint, and apply the paint with my fingers around the edges of the torn pages.  I used Lagoon and Fiji, and while still wet, sprinkled the areas with embossing powder and heat set them.   For the blank areas, without dictionary print, I put a heavier layer of Viridian Sorbet Dimensional paint.

 
 After this was all dry, I used a stencil designed by Joann Sharpe for StencilGirl for my focal point.  I first laid the stencil down and painted on some Fiesta Velvet paint.  It was a very thin layer, but I let it dry completely, then I shifted the stencil slightly and used Viva Decor Modeling Cream and a palette knife to create a dimensional image.


 After that was completely dry, I rubbed Faber-Castell Gelatos around the edges and smeared them onto the canvas with my finger.  I also added some bright accents with Art Anthology Colorations in Glorious.


Finally, I added a little hand embroidery to the corner of my canvas.  I was pleased with the results - and was surprised to make a piece that was brighter and edgier than my typical style.  Are you planning a weekend of creating? Have fun!

Wednesday, November 20, 2013

The Ribbon Lady is Tying The Knot Blog Hop


It is really awesome to be a May Arts Ribbonsita not only because we get to play with the best ribbon in the world, but also we work with the most awesome Ribbon Lady, Bethney. So when she announced that she was engaged, her girls planned a blog hop to help celebrate!


 And in true May Arts Fashion, we have a huge giveaway from some awesome companies! To be eligible, just head  over to the May Arts facebook page and leave your best wishes and Congratulations to Bethney  on her recent engagement!


Bethney, I wish you many years of delirious love and abounding happiness!
 

And here is the rest of the hop...

Heartfelt Creations Inspiration


Heartfelt Creations Products and Products Carried by HC 

HCDPI 237 Antiquity Paper Collection
HCPD1 226 Delicate Asters Paper Collection
HCD 722 Tattered Blossoms Die
HCD 730 Decorative Butterfly Corner Die

HCPC 3468 Tattered Blossoms PreCut Set
HCPC 3471 Tattered Collage PreCut Set
Violet Metallic 3D Stamp Paint
Rose Metallic 3D Stamp Paint
Gold Metallic 3D Stamp Paint
Crystal Sparklets
1259723 Art Institute Glue (Dries Clear)
Other Products Used
May Arts Ribbon: GC07 3/8"Metallic Iridescent Wired Ribbon
Tsukineko Ink: Versamark, Memento Tuxedo Black
Copic Markers: V12, V17, YG95
Viva Decor Gold
Stampendous Embossing Powder - Midnight Black
WorldWin Papers Cardstock

Xyron Mega Runner, Teresa Collins Foam Adhesives

Journey Card:  Cut a  base for a 6" x 6" card from lavendar cardstock.  Cut the base patterned paper from the Antiquity paper collection and distress the edges.  Die cut a small Decorative Butterfly Corner and glue to the bottom right corner. Stamp the Tattered Collage image with watermark ink and heat emboss.  Tear around the stamped image, and then paint the edges with the Violet paint.  Rub Viva Decor gold over the words on the image.  Color the flowers and leaves with Copics.  Crumple the image and unfold and use Chocolate Distress ink to rub over the wrinkles.  Glue to the card base.  Stamp and cut the Tattered Blossoms and color with the 3D Metallic Stamp Paint.  Add Sparklets to the centers of the flowers.  Stamp the collage image again, and color just the flower buds with copics. Hand cut the images and apply to the card with foam adhesive.  Hand cut the Journey ticket from the Antiquity paper and finish with a bow.

Wednesday, November 13, 2013


Heartfelt Creations Products and Products Carried by HC 

HCDPI 237 Antiquity Paper Collection
HCPD 235 Burst of Splendor Paper Collection
HCD 740 Sweet Juliet Die

HCD 736 Classic Leaf Die
HCD 726 Delicate Asters Die

HCD 728 Timeless Amour Die
HCPC 3494 Delicate Asters PreCut Set
HCPC 3547 Bold Leaf PreCut Set

Spellbinders Radiant Rectangles
1259723 Art Institute Glue (Dries Clear)
Other Products Used
May Arts Ribbon:  DD17 5/8" Grosgrain Dots; SM17 String Burlap Ribbon
Tsukineko Ink: Versamagic Pixie Dust; Brilliance Crimson Copper; MementoLuxe Pistachio
WorldWin Papers Ivory Cardstock
Want2Scrap Pearls
Xyron Mega Runner, Teresa Collins Foam Adhesives

Memories Card:  Cut a  base for a 5" x 7" card from ivory cardstock.  Use the pink papers from the Burst of Splendor Colleciton for the bottom layer and distress the edges.  Cut the Radiant Rectangles using the Antiquity Paper Collection. Use the patterned rectangle from this collection for the next layer.  Center the heart from the Timeless Amour die set over the sentiment on the patterned paper and cut.  Use the dark burgundy paper on the opposite side to cut the lacey heart.  Stamp and cut the leaves, shape and adhere to card. Stamp and cut two sizes of the delicate asters, use Sweet Juliet to form the centers of the flowers.  Add pearls and ribbon to finish the card as shown.

Monday, November 11, 2013

White on White Card

I've got a WOW card to share with you today - which simply means a White on White card ( and that just happens to be the current challenge at the JustRite Friday Challenge) I think the trick to creating an all white card is to use lots of textures - so I pulled out all kinds of WorldWin Papers to give this card lots of visual interest.

I can never decide the best way to photograph these all white cards, so I've given you a couple of different shots.
 Let's talk about the layers.  The base is a 5 x 7 Colormates Smooth Cardstock in Heritage White.  The next layer is Pearlescent Paper in the Swirl pattern.  It was edged with a bead of Fairy Dust Glitter. The next layer was diecut from Petallics Cardstock in Beargrass using Spellbinder's Nobel Rectangle. The center rectangle  was cut using the same die, this time using the Kromekote papers, and embossed using the Spellbinder's M-Bossabilities folder - Butterfly Kisses.  I am completely in love with how spectacular the Kromekote paper embosses. The next layer was die cut using JustRite/Spellbinders Vintage Labels Six dies - using the Swirl Pearlescent paper again.  I added a little bit of the Fairy Dust Glitter to the stenciling areas of the die.  I used the same die set to cut the small oval using Translucent Vellum, that I heat embossed with white powder using JustRite's Fleuriste Newsprint Background Stamp.  The banner was cut from the Kromekote paper using Spellbinders Ribbon Banners.  The sentiment is from JustRite's Seeds of Summer Clear Stamp set.  It was stamped and heat embossed to seal the ink. The flowers were made using Translucent Vellum and cut with Spellbinders Rose Creations.  Of course, I added glitter to the petals.  The leaves were cut from Spellbinders Foliage using the Swirl paper. Whew! That is a lot of layering, but the results are worth it!


Thursday, November 7, 2013

Mixed Media Video Tutorial

Hi, it's Gini and I'm excited to be back with you today to share another video, showing you more great ways to use your Art Anthology products and Hampton Art Stamps.  We are going to create a background with stamped tissue paper and we will use the Velvets dimensional paint as a resist for the Colorations Sprays.


 Here's a close-up of the background that we will be creating.


So, if you would like to learn how easy it is to create this, then check out my video.


Thanks for stopping by!

Wednesday, November 6, 2013

Exciting News!


I am so excited to share that I was asked to join the Zva Creative Design Team! I am joining a fabulously talented group of designers and feel so honored to be a part!  Get ready for lots of bling and sparkle!  And be sure to mark your calendars for the first blog hop for the team on Monday, December 30th!

Zva Creative is proud to present its design team for the term of Nov 2013 – October 2014:
Windy Robinson – United States – DT Coordinator
Camila Borssoi – Brazil
Gini Williams Cagle- United States
Andrea Ewen – United States
Nicole Martel – United States
Carole Maurin – France
Tina McDonald - Canada
Jolanda Meurs – The Netherlands
Gine Silveira  - United States
Irene Tan – Malaysia
Yuliya Khudyakova – Russia
Anna Zaprzelska – Poland

Heartfelt Creations Inspiration


Heartfelt Creations Products and Products Carried by HC
HCDPI 237 Antiquity Paper Collection


HCD 736 Classic Leaf Die
HCD 734 Sun Kissed Fleur Die
HCD 728 Timeless Amour Die

HCPC 3545 Open Leaf PreCut Set
HCPC 3546 Classic Leaf PreCut Set
HCPC 3533 Sun Kissed Fleur PreCut Set 
HCPC 3554 Love At Christmas PreCut Set
Spellbinders A2 Bracket Borders One


1259723 Art Institute Glue (Dries Clear)

Other Products Used for projects other than Heartfelt Creations.
WorldWin Cardstock

May Arts Ribbon 1/2" Solid/Wrinkled Ribbon
Art Anthology Colorations Spray - Sangria
VersaMark Watermark Ink
Clearsnap Ink - Artichoke
Wow Embossing Powder - gold
Want2Scrap Pearl
Xyron Foam Adhesives, Mega Runner

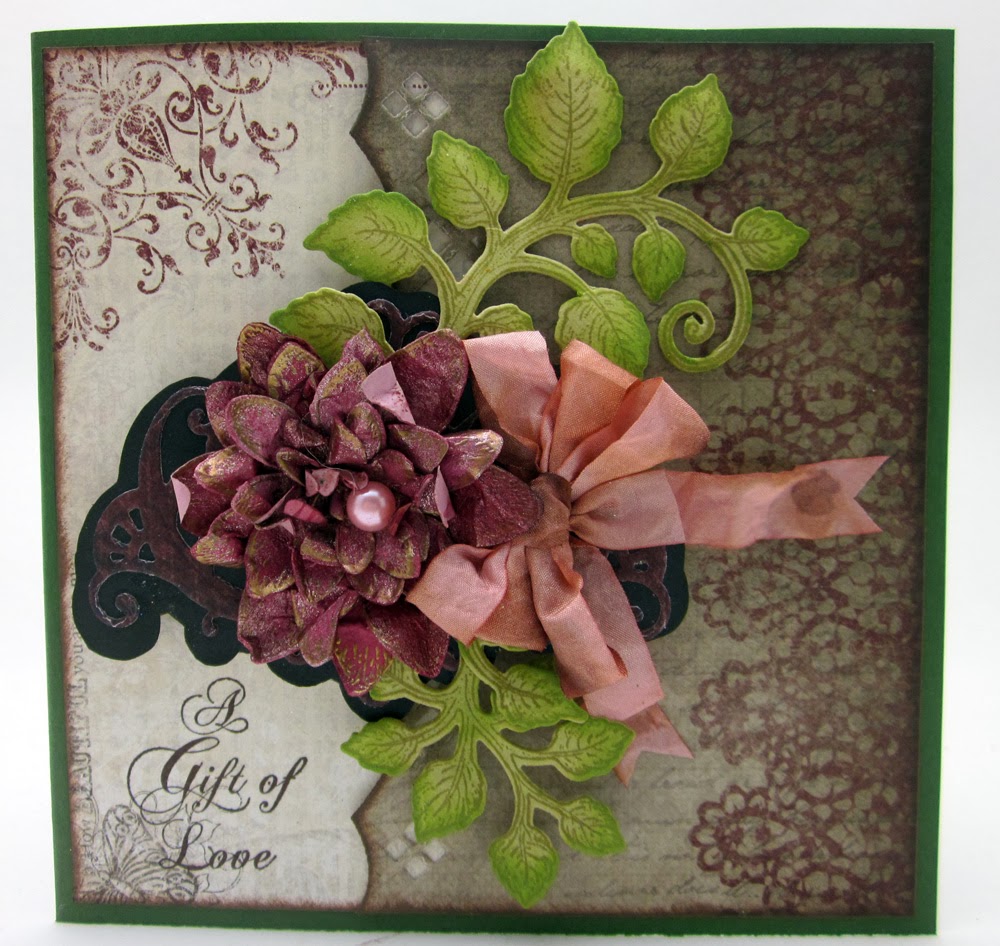
 The card size for this project is 6" x 6".  Die cut the left edge of the dark decorative paper using the Bracket Borders die.  Ink the edges and adhere over the light base patterned paper.  Stamp the sentiment in the lower left corner.  Die cut the Timeless Amour die using burgundy patterned paper.  Trace around the outside of the die with a pencil onto black patterned paper, and hand cut to form a shadow for the decorative die cut. Stamp and cut the leaves with the corresponding dies.  Stamp the Sun Kissed Fleur with watermark ink and heat emboss with gold powder.  Spritz with Colorations spray and shape and assemble.  Spray the ribbon and tie into a multi looped bow to finish the card.

Wednesday, October 30, 2013

Heartfelt Creations Inpsiration


I am so thrilled to share with you that I will be serving another term on the Heartfelt Creations Design Team!  A big thank you to everyone that took the time to vote for me - and also a huge thanks to Emma Lou and Linda for letting me be a part of this fantastic company!  I think this will be my fourth term - so needless to say, this is a company that I really love - both the products and the people.  So....onto the card for today!

Supplies:
HCDPI 237 Antiquity Paper Collection

HCD 740 Sweet Juliet Dies
HCD 736 Classic Leaf Die
Spellbinders Opulent Ovals
Open Leaf PreCut Set HCPC 3545
Juliet Spray PreCut Set HCPC 3567

1259723 Art Institute Glue (Dries Clear)

Other:
WorldWin Cardstock

May Arts Ribbon
VersaMark Watermark Ink
Clearsnap Ink - Artichoke
Wow Embossing Powder - gold
Xyron Foam Adhesives, Mega Runner

5 x 7 Congratulations Card
Cut the panel for the card from the Antiquity paper collection, ink the edges and adhere to the card base. Cut 2 sizes of Opulent ovals.  For the smaller, nested oval, stamp the image with watermark ink and emboss with gold.  Use watercolor pencils to fill in the image design.   Add the ovals to the base using foam adhesives. Die cut three of the larger Sweet Juliet dies - 2 in dark purple and one in light purple.  Fold the light purple flower as shown and use a brad to secure the petals together.  Cut the tips off of the dark purple flowers, shape and add as bottom layers to the folded flower. Stamp and cut the leaves with the corresponding die, and attach the flower and leaves to the card.  Finish with a bow.