It has been such a fun year, here at the Beary Scrap! We have really loved sharing our creations with you and seeing your cards and layouts as well! I think we have all "grown" in our styles, and that has been inspiring to see the evolution of artists.
We decided to share our favorite project of the year - and our favorites from the other team members (such hard choices!)
When I began this DT, I was really a die-hard card maker. In the past several months, I have been having so much fun with layouts (Maybe because it's just a bigger canvas to work on!) I was really having a hard time deciding between two layouts - this one, and the one that Susan chose as her favorite yesterday - So I thought I would share this one with you today!

Now, the really tough part - narrowing down just one project from my DT Sisters! They are all so talented - I should just link to their blogs and say I love it all!
For Jamie, I chose this layout that she did for a color challenge.

Jamie always brings a sense of whimsy to her creations - They are always fun. I love seeing the pictures of her beautiful family on her layouts - and don't you think that
Owen the Owl was just made for this paper? Jamie is so sweet and thoughtful and I have been so blessed to be on this team with her!
I was really torn on which project to pick for Patricia, but in the end I chose one of her Tear Bear Creations - because, let's just face it - she rocks those! Girl, some of your projects must take days and days to complete, but they are always well worth it - and I really enjoy seeing what you do with them!


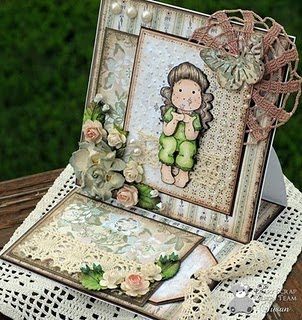
And now Susan - I don't think you have ever made a project that I have'nt loved. Your vintage style, your attention to detail - it always makes for such stunning cards. You do such amazing things with Magnolia's - so I knew I would pick one of those.

To me, this best represents your vintage style. Your layering is superb and your coloring just makes me say, ahhhhh! The hidden tag on this one was one of those little surprises that you through in to see if we are paying attention (and yes, we are!).
Elise is no longer on TBS DT, but we all still love her and are always inspired by her work. There is always such an attention to detail and little extra surprises along the way!


Kimm, thank you so much for giving me the opportunity to be a part of this wonderful, little family! You are always so sweet and generous with us - and I am really blessed.
We are looking forward to what 2011 holds in store for us and look forward to you being a part of it with us.


Clear Cardstock
Staz-on Ink (black)
Art Institute Glue - Dries Clear
Art Institute Metal glue tip
I stamped the cardinal border using Staz-on ink onto a piece of Clear Cardstock. Then, I chose my first color of glitter (red) and filled in the areas on my image that I wanted to be red. I sprinkled heavily with glitter and let dry (It took quite a while for this to dry completely - You can tell by looking under the clear cardstock, when the glue is completely clear). I continued this process until I had added each layer of glitter. I colored in details of the stamp using Smooch inks (the branch - Molasses, the beak -Carrot, filler on pine needles - Luscious Lime)
For my DP, I used all papers from My Mind's Eye, I Believe Collection. On the bottom layer, I inked the edges using Distress Ink in Fired Brick. My other mats were layers with red cardstock, stitched with gold thread and distressed. I attached the glittered image (glitter side down) to another layer of cardstock, using dimensional adhesives stuck on the cardinals (so it wouldn't show through to the front side).
">HCPC 3348 Cardinal Pine Cone Border
Clear Cardstock
Staz-on Ink (black)
Art Institute Glue - Dries Clear
Art Institute Metal glue tip
I stamped the cardinal border using Staz-on ink onto a piece of Clear Cardstock. Then, I chose my first color of glitter (red) and filled in the areas on my image that I wanted to be red. I sprinkled heavily with glitter and let dry (It took quite a while for this to dry completely - You can tell by looking under the clear cardstock, when the glue is completely clear). I continued this process until I had added each layer of glitter. I colored in details of the stamp using Smooch inks (the branch - Molasses, the beak -Carrot, filler on pine needles - Luscious Lime)
For my DP, I used all papers from My Mind's Eye, I Believe Collection. On the bottom layer, I inked the edges using Distress Ink in Fired Brick. My other mats were layers with red cardstock, stitched with gold thread and distressed. I attached the glittered image (glitter side down) to another layer of cardstock, using dimensional adhesives stuck on the cardinals (so it wouldn't show through to the front side).
Challenges:
Friday Sketchers: Sketch
Bunny Zoe: sparkle and shine
Oh Alice: Winter Wonderland
Stampin for the Weekend: Christmas