Friday, November 16, 2012

2nd Annual Handmade Holidays Blog Hop - Day 1

Welcome to the 2nd Annual Handmade Holidays Blog Hop!!!


Calling all crafters! We’ve gathered designers from some of our favorite manufacturers to show you ways to create something from the heart this holiday season. This 3 day Hop includes over 60 stops with inspiration brimming from every corner. Explore all of the thoughtful and frugal handmade gifts you could create for the holidays, all in one place, during our second annual Handmade Holidays Blog Hop!


To sweeten the Hop, we’re offering a gift for you! For every comment you leave on the blogs in the Hop, you’ll be entered to win a prize pack from one of the participating manufacturer sponsors! Use the Rafflecopter widget on the Clearsnap blog to gain extra entries each day: http://cleasnap.blogspot.com


Hampton Art is giving away 3 different prizes! Be sure to leave comments and "like" us on Facebook for your chance to win one of these fantastic prizes!

Prize 1
 
Prize 2
 
Prize 3


Now for my project! I found a yummy recipe for Cinnamon Almonds and thought it would be really fun to use the Hampton Art/Graphic 45 Nutcracker stamp to make a gift box.


I stamped my image and colored him with Copics and Smooch Ink (Gold) , and then fussy cut him.  I love this bubble frame from Globecraft Memories! and decided to use it for my box front.


 I covered the chipboard pieces of the frame set using Authentique's Festive Collection. The edges of all of the papers were inked with Clearsnap/ Donna Salazar Mix'd Media Inkz ( Mossy).

 
I added a decorative edge using the new Fiskars Interchangable Border Punches.  My almonds are in a clear celophane bag tied up with a pretty bow and baker's twine from the Twinery.  The tag was punched with the Fiskars Tag punch and decorated with the Fiskars Snowflake punch.
 
So here's the recipe for my project:
WorldWin Cardstock
May Arts Ribbon


And here's the recipe for the
 Crock Pot Cinnamon Almonds
 
1 1/2 C. Sugar
1 1/2 C. Brown Sugar
3 Tbsp. Cinnamon
1/8 tsp. Salt
1 Egg White
2 tsp. vanilla
3 Cups Almonds
1/4 C. Water

In a medium sized bowl, mix together sugars, cinnamon, and salt. Set aside. In another medium sized bowl, whisk the egg white and vanilla until it’s a little frothy. Add almonds. Make sure the almonds are thoroughly coated in the egg white mixture. Add cinnamon mixture to the almonds and toss until coated.
Thoroughly spray with Pam, or whatever, the stoneware of your large crock pot (mine is a 4 quart). Add the divine mixture of almonds and sugars to the crock pot and turn it to low.
Cook ( with the lid on) 3-4 hours stirring every 20 minutes (I only did 3 hours). In the last hour, add the 1/4 C. of water and stir well. This ensures a crunchy yummy coating. (*make sure after you’ve added the water that you continue to cook the nuts for another 45min to an hour.)
You have to stir really well, especially as it gets later in the cooking process.
Line a baking sheet with parchment and spread the almonds flat to cool (if you can wait that long!). The almonds will be sticky at this point, so make sure you separate them a little and have no large mounds.
 
Thanks for stopping by and enjoy the rest of the hop! Your next stop is Sabrina Alery from Clearsnap.


Visit the list of blogs below and leave a comment on each by Nov 27, 2011 at 11:59 PM PST. Each day we will be sharing a brand new list of blogs with brand new projects for you to explore, be inspired by, and create from!


Nov 16


Donna Salazar Designs – http://donnasalazar.typepad.com/


Eileen Hull for Sizzix http://eileenhull.blogspot.com/


Kristin Wilson – Graphic 45 - http://www.kristinwilsonhandmade.com/

Jennie Garcia - Tombow - earthyscrap.blogspot.com

Gini Williams Cagle - Hampton Art - http://ginicagle.blogspot.com/ YOU ARE HERE

Sabrina Alery – Clearsnap – http://Sabrinaalery.blogspot.com

DeeDee Catron - Globecraft Memories - http://umwowstudio.blogspot.com/

Michelle Grant – Donna Salazar Designs - http://michellejbg.blogspot.com

Emily Lanham – Authentique Paper -http://www.createserendipity.net

Emma Jeffery – Fiskateers - http://hellobeautifulblog.blogspot.com

Natalie Clause – The Twinery - http://www.southernbellescharm.com/

Alberto L Juarez – Graphic 45 http://vintageodyssey.blogspot.com/

Vivian Keh - Hampton Art - http://contadinak.wordpress.com

Jennifer Priest – Clearsnap – http://hydrangeahippo.blogspot.com

Heather Conklin – Authentique Paper - http://goldiecar.blogspot.com/


Cheers to creating gifts from the heart this holiday season!


Happy Hopping!

Wednesday, November 14, 2012

Hampton Art and Scor-Pal Week Part One!

This week Hampton Art and Scor-Pal have teamed up to inspire you!  I'm so blessed because I am on both of these teams, so I will have two projects to show you this week.  Today's post is what I created for my Hampton Art assignment.


Supplies:


WorldWin Papers Cardstock


Spellbinders :  Fleur De Lis Squares


Copic Markers

 Fiskars:  Fuse Die Cutting Machine


Designer Notes:

Cut the following pieces of paper to assemble card

Brown Cardstock: 9” x 9” – scored at 3”, 6”. Turn 90 degrees and score again at 3” and 6”

Blue cardstock:  7 1/8” x 7 1/8” – scored at 2, 5 1/8”. Turn 90 degrees and score at 2 and 5 1/8”

Blue cardstock: 5 1/8” x 5 1/8” – scored at 1” and 4 1/8”. Turn 90 degrees and repeat.

Cut from Patterned Paper:  (4) ¾” x 2 ¾”; (4) 1 ¾” x 2 ¾”; (1) 2 ¾” x 2 ¾”


Die cut:

(2) largest Fleur De Lis Squares from Brown Cardstock


1.       Score the cardstock as directed. Make an inner box using the brown cardstock.  Make the 2 sections of the outer box using the blue cardstock. Trim each of the scored sheets as shown to assemble the box.  Adhere the sides using Scor-tape.


1.       Ink the edges of the box as well as all patterned papers with Dark Cashmere ink.  Attach the patterned papers as shown.  Adhere the die cut squares to the bottom and top of the box.  Fold the edges down on the top of the box and glue in  place.

2.       Stamp the lady and color with Copic markers. Fussy Cut the image. Stamp the millinery stamp, ink with the Leather and Dark Cashmere inks, and add glitter around the edge.

3.       Bend the foot of the paper lady to a right angle and glue to the box top.  Decorate with vintage spool, buttons, ribbon and flowers.

4.       Bend the foot of the paper lady to a right angle and glue to the box top.  Decorate with vintage spool, buttons, ribbon and flowers.


You're So Special

I'm so excited to share my first official project for this term of the  Heartfelt Creations Design Team!  Not too long ago, HC introduced a new line of paper, and if you haven't used it yet, you are going to love it.  It's a very nice weight, and very smooth - just perfect for making flowers.
So let's get started!  This is a 6 x6 card.  Stamp the Delicate Asters and Butterflies stamp in embossing ink, emboss with gold powder. Cut the image using Long Classic Scalloped Rectangles. Die cut one large Labels 21 from the patterned paper, ink the edges.  Trace around the outside of this die onto reflective gold paper and hand trim. Cut two of the large semi-circles from the Layered Scalloped Posy die - glue beneath the curves of the Label 21.  Add pearls to the flower centers. Stamp 3 each of the two smallest flowers in the Delicate Asters set and cut with the coresponding die. Shape using the tool kit and assemble adding 3 layers of the flower centers in the middle.  Finish with a pearl. Stamp and cut two leaves from the same set.  Position the flower and leaves over the same image from the gold embossed layer. Stamp the sentiment and cut with Ribbon Banners. Shape the banner so that it curves up in the center - adhere with Zip Dry. Add ribbons and pearls to finish.
Spellbinders Labels Twenty-One
Spellbinders Ribbon Banners
Spellbinders Long Classic Scalloped Rectangles
WorldWin Metallic Cardstock
Helmar Zap Dots
Ranger Distress Ink - Seedless Preserves
Clearsnap ColorBox Pigment Ink - Pheasant Gold
Clearsnap Top Boss Embossing Ink
Wow Embossing Powder - Rich Pale Gold
Want2Scrap Pearls
Silk Ribbon

Monday, November 12, 2012

Cheery Lynn Designs Monday

Hope you had a good weekend! I've got two projects to share with you today -One for the CLD Inspiration Blog and one for the CLD Challenge Blog.

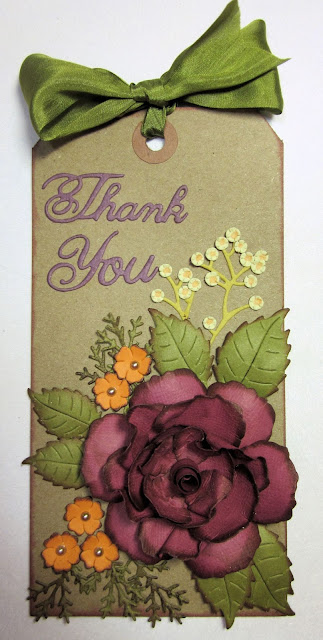
The challenge this week is fall colors (which is always my favorite palette!)  I decided to make a kraft based tag. I hope you will play along - remember, you could win a $20 gift certificate.


Cheery Lynn Designs Dies
 
On the Inspiration blog, I've got a wintery 12 x 12 layout to share with you. 
 
 
 Most of the cuts are pretty obvious, but I do have one neat new trick to share with you. My clustering includes lots of snowflakes, and I wanted to add some dimension, but foam adhesive was not an option, due to the very lacey, intricate cut. So, I cut 7 of the same snowflake, and glued each layer together. In essence, I made my own chipboard. I love how this turned out, so I will be using this technique again!
 
 
I can't tell you how often I am reaching for the Delicate Lace Script font. It is the perfect size to add titles/ journaling to my layouts.  My poinsettia was made with the Build a Flower One, and brushed with Stickles for a little glimmer. The center of the flower was created with Snowflake 5.


At first glance, you might think these smaller snowflakes are part of the patterned paper, but actually, they are cuts from the Snowflowers One. I used some of our larger snowflakes on this layout as well - so you can see this is a really great size to add to your collection.


Cheery Lynn Designs Dies
Pion Patterned Papers
WorldWin Papers Cardstock
 
Thanks for stopping by today!
 
 
Challenges:
Pion Designs: Sketch Challenge


Scor-Pal and Hampton Art Week!

I've been looking forward to this week for quite a while! Two of my favorite companies, Scor-pal and Hampton Art,  have teamed up for one great week!  I'll have two projects to share with you this week - but in the mean time, be sure to check on the companies' blogs so you don't miss a thing!