Thursday, May 29, 2014

Xyron and Quick Quotes Blog Hop Week


 This week, Xyron's DT is playing along with the team from Quick Quotes! How fun.  I decided to create a folding screen/ home decor piece.  I'm going to show you how to make this, using some heavy cardboard for the base.  The Baggage Claim collection was just perfect for this.  I may go back and add some travel photos later - but I think it would be cute to clip them on and change them out as desired.


 1.  Cut two pieces of chipboard 12" x 6.5".  Cut a piece of chipboard 4" x 6.5" to use as a template for scoring.  The chipboard is too thick to use a scoring board in the traditional manner, but I used the 4" wide template, and drew a pencil line every 4" on both pieces of board.  Then I was able to score these lines.


 2. Overlap the end panels of the cardboard strips, and adhere them together using the Xyron Mega Runner.  This will give you 5 panels (the center one will be double thickness).


3.  Fold the score lines back and forth, so that the screen will stay in position.


4.  Ink the edges of the screen with the QQ Powder Puff Ink (Blue Lagoon).

 5.  Cut the paper panels from the patterned paper and ink the edges. Run through the Xyron 5" Creative Station.  Adhere to the panels.

 6.  Make faux washi tape by cutting a border from the paper, and running it through the Xyron 1.5" Create-a-Sticker.  When you tear away the adhesive strip from the machine, it will create the perfect "tape tears" on the paper as well.


7.  Decorate each panel as desired - with the faux washi tape, stickers and stamped images.


Supplies
Zva Creative Gems: CRW-07CA-121; CRW-05CB-153
May Arts Ribbon: 408-05-10
WorldWin Papers: Heavyweight Chipboard

Wednesday, May 28, 2014

Heartfelt Creations Inspiration


Heartfelt Creations Products and Products Carried by HC 
HCDP1 243 Sweet Lullaby Paper Collection
HCD 746 Sweet Lullaby Die Set
HCD 744 Once Upon a Time Die Set 
HCD 701 Posy Patch Die Set


HCPC 3605 Sweet Lullaby Sentiments PreCut Set
HCPC 3604 Precious Lullaby PreCut Set
HCPC 3602 Sweet Little One PreCut Set
HCPC 3303 Posy Patch Flowers PreCut Set

1259723 Art Institute Glue (Dries Clear)
Paper Blossoms Molding Mat
Paper Blossoms Tool Kit 

Other Products Used 
Spellbinders A2 Filligree Delight die


May Arts Ribbon  -1/8"  SK27 Silk, EA17 Solid Wrinkled Ribbon
Zva Creative Pearls/Flourishes - CRW-07CA-157; PEW-03CB-148; PEW-03CB-110
CTMH Ink: Sky,Bubblegum
Versamark Watermark Ink
Embossing Powder - Blue
Copic Markers: YG03; G21; RV42; Y11; B02; B000; E01; E55
Xyron Mega Runner, Teresa Collins Foam Adhesives

WorldWin Cardstock

Begin with a 6 x 6 " card base.  Cut a panel of patterned paper at 5.75" x 5.75".  Ink the edges.  Die cut the Filligree Delight panel from patterned paper and adhere to the right side of the card.  Stamp the Precious Little One sentiment along a printed border, and fussy cut.  Adhere to the left side of the card.  Add ribbon between the space left.  Stamp the baby onto a panel with an oval.  Fussy cut the oval and color the image with Copic markers.  Mat with a slightly larger oval.  Add narrow silk ribbon for the bassinet. Stamp and cut the smallest Posy Patch flowers with the matching die. Add this to the card base.  Adhere to the flowers around the baby.  Cut the flowers from the Sweet Lullaby die set, shape and add to card.  Stamp and heat emboss the sentiments and cut with the Once Upon a Time Die - add the sentiment to the flower cluster.  Add a flower and bow to the ribbon on the left.  Finish with a pearl flourish.

Challenges:
Vintage Stamping Challenges - Ribbons and Bows

Monday, May 26, 2014


Zva Creative May Design Team Blog Hop!


Happy Monday to you! Zva Creative and our talented Design Team welcome you to our May blog hop!  We are very excited to kick off a new blog hop and to have you join us today. We hope you are inspired all of the beautiful work that we are about to share!
The hop begins at Zva Creative’s blog! Be sure head on over to check it out! You will also find a complete list of all the participating blogs there (in case there is a glitch along the way). 
As you know, Zva offers many beautiful color groupings for pearls, flowers and crystals.  If you like what you see along the hop you can find a list of stores and online retailers that sell Zva HERE.

Here in the United States, we are celebrating Memorial Day - a day to recognize and remember those that gave their lives to protect this country,  I thought it was only fitting to create a patriotic card for the day.


I used the CRW-06CA-151 for the center of my handmade flower - which made it coordinate beautifully with the flourishes CRW-07CA-148.

Supplies
Zva Creative:  CRW-06CA-151,
CRW-07CA-148
Graphic 45 - By the Sea Paper Collection
WorldWin Paper - Cardstock 
May Arts Ribbon- 404-15-34
McGill Paper Punch - Begonia 
If you would like to play along with our design team, just follow along the blog path.  I am linking to one of the Zva designers and that designer is linking to the next and so on. Be prepared to be inspired along the way!
The Blog Hop starts today, May 26th and runs through midnight US Eastern Standard Time on Tuesday, May 27th.
***Prizes***
Hidden on FIVE of the designer’s blogs is a Zva Creative prize package! Winners will be randomly chosen after the hop is over. All you need to do is leave a comment on this Blog Hop post... you do not need to leave a comment on each and every designer's blog post to qualify. However, the more times you comment along the blog hop path, the more chances you will have to win. 
The 5 winners will be announced on Wednesday, May 28th on Zva Creative’s Facebook page. We will do our best to notify each winner, but it's best if you can pop in to Zva’s page on Wednesday to see if you are a winner!
We also thought it would be more fun to add even more chances to win our blog hop prize!  To increase your chances of winning:
* Comment to let us know that you posted on your Facebook page about our hop (link to any of the blog hop posts)
* Comment to let us know that you "tweeted" about our hop (link to any of the blog hop posts)
* Comment to let us know that you asked your local store to carry Zva creative products.  If they already do, that's fantastic, maybe you can suggest other products that they don't carry.
*Hop over to Zva’s Facebook page and “like” our page or leave a comment there to tell us that you stopped by if you already like us there!
The blog hop begins here at Zva Creative’s blog. Your next stop is Gine Silveira's blog. Enjoy!
Thank you for joining us!
P.S. Mark your calendar to join us again on June 30th for our next Zva blog hop!
________________________________________

Sunday, May 25, 2014

Spring into a Mixed Media Layout

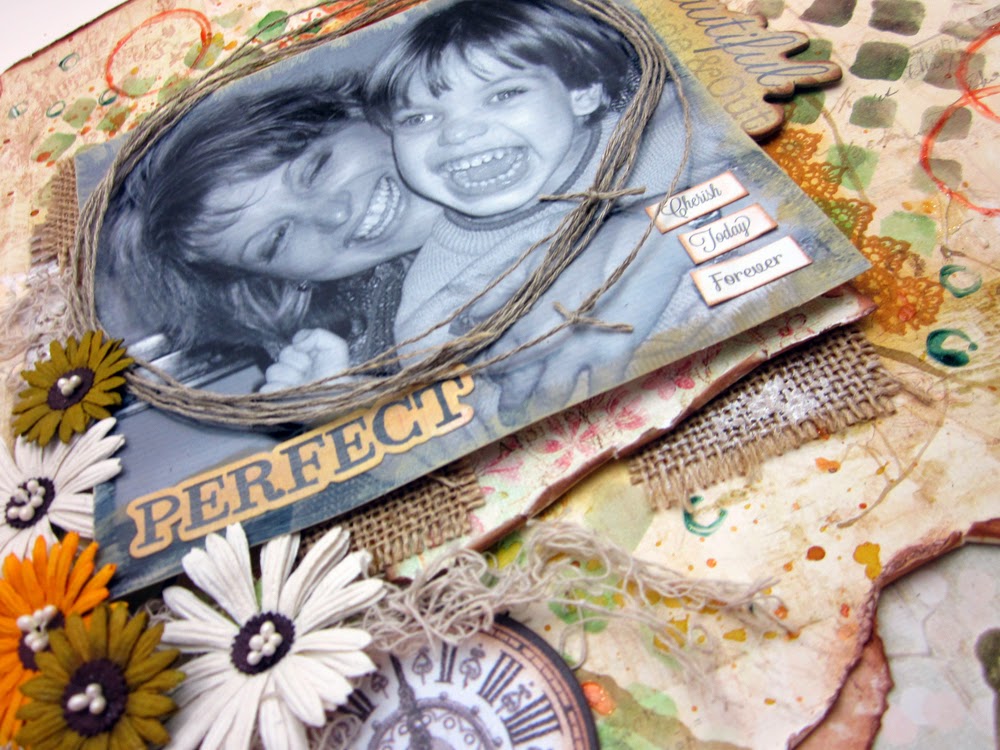
This is one of my favorite pictures of my nephew when he was young. Unfortunately, my sweet Will has a neurological disorder, and these days he is not usually able to smile and giggle like he did here - so it really makes me thankful to have these memories and to have captured them with photos.  So remember to take photos of your everyday lives and celebrate each and every little moment.

This layout was really fun to create and I used lots of different "tools" to add color and texture to the base page using the wonderful Art Anthology products.


The first thing to do when you are creating a mixed media style layout, is to determine the area where your photo will be and lightly draw a box around the area with a pencil. You don't want to have your very favorite designs covered over completely! So planning helps immensely.


Next, I will generally add some stenciling with the Art Anthology Colorations.  I want this first layer of design to be flat, so I can keep building it up.  I used the diamond stencil  with Grass and Plush.  Remember to let each step dry before moving on to the next.

I used a doily stencil, and the Coral Sorbet Dimensional paint for the next layer and positioned this behind the upper right corner of my photo. This paint is great for holding it's shape and it's kind of shimmery and semi-transparent - so it is great to reflect the light. I also added some stamped images around the edges of the photo.  And around the actual photograph, I dry brushed Art Anthology Gesso on, to help distress that as well.

It's pretty obvious how to make splatters with the Colorations - just unscrew the sprayer from the bottle and flick the tube towards the paper.  I used that technique, (with Salted Caramel) and in some places, I used a drinking straw and blew air on the wet ink to move it around.

I also wanted some larger open circles, so a added paint around the edge of my paint lid (using the Sorbet - Coral) and used this like a stamp.  Just make sure to wipe off the excess when you are finished so you don't have a hard time opening your paint.

I also dipped the drinking straw into paint and "stamped" with that ( Sorbet - Mint Julep).

I put a layer of stenciled molding paste over some of the designs - and after that was dry, I added more drips.


I also like adding hand stitching to my layouts.  I use a heavy twine, so I always pierce the holes first and then it's much easier to get clean results.


I used the same twine to create a "frame" around my photo.  Bits of burlap were stuck under the photo as a mat, and I rubbed a bit of gesso on those areas.


Mixed Media layouts aren't hard! They really are fun.  Don't be afraid to experiment with your paints and mediums and enjoy the journey!


Creative Embellishments - sketch, inspiration (flowers)
Prima Product Picks