Thursday, July 17, 2014

May Arts, Simple Stories and Xyron - Blog Hop Day Four

Welcome to fourth day of the May Arts Ribbon, Xyron and Simple Stories Blog Week. So far, the design teams from these three companies have had some incredible projects!  This is my second post of the hop for May Arts, but if you missed my Xyron post, you can see it here.. Be sure to check all of the blogs to see the daily line-ups and for more details on yummy prize packages.

I took an inexpensive craft frame and used the Story of Us paper line from Simple Stories to give it a makeover.  I ran the frame through my Xyron Creatopia, and covered it with the patterned paper.

The doily was printed on the paper, but I added the May Arts metallic trim and glued it down using the Xyron/Teresa Collins Clear Hold Adhesive.


Supplies
May Arts Ribbon
Xyron
Simple Stories

Wednesday, July 16, 2014

Heartfelt Creations Inspriration


Today is the second glimpse of the Cut, Create and Mat collection from Heartfelt Creations - and today, I'm sharing a card - that shows these versatile dies aren't just for scrapbooking!  They also create a lovely matted panel to use on cards or other small projects.

Heartfelt Creations Products and Products Carried by HC 
HCDP1 245 Cut Mat Create Paper Collection

HCD 749 Cut Mat Create Die 1A
HCD 750 Cut Mat Create Die 1B
HCD 748 Arianna Blooms Die
HCPC 3614 Summer Glory PreCut Set
HCPC 3619 Classic Rose PreCut Set
HCPC 3608 Arianna Blooms PreCut Set
HCPC 3611 Arianna Bird Haven PreCut Set
Paper Blossoms Tool Kit
Paper Blossoms Molding Mat
1259723 Art Institute Glue (Dries Clear)

Other Products Used 
May Arts Ribbon 1.5" Faux Linen Ribbon 368-15-17
Zva Creative Pearl Flourishes CRW-05CB-143


Creative Embellishments Chipboard
Tsukineko Ink: VersaMagic - Wheat, Pink Petunia, Aloe Vera, Sahara Sand. Versafine - Black
Golden Fluid Acrylics
Anna Griffin Embossing Folder

Xyron 9" Creative Station, Teresa Collins Foam Adhesives, Teresa Collins Adhesive Kit Box

WorldWin Papers -cardstock

Ink the edges of a 5 x 7 card base.  Emboss cream cardstock with a folder, and ink over the surface with Wheat ink. Distress the edges and glue to base. Die cut the rounded rectangle patterned paper and the coordinating mat from green cardstock. Machine stitch a border around the layers. Lay the chipboard circle down to get an idea of placement, then stamp the background stamp as shown.  Paint the chipboard with acrylic paints. Stamp and cut the flower using the coordinating die - shape with the paper blossoms tools. Cut greenery from the Cut Mat Create dies, Glue fibers/netting in the area where the flower will be placed. Stamp a flower border on the ribbon and tuck behind the flower. Stamp the sentiment and die cut. Place on the left side of the chipboard circle.  Finish with pearl flourishes and a few scattered sequins.

Monday, July 14, 2014

May Arts, Xyron and Simple Stories - Day One Blog Hop


Welcome to day one of the May Arts Ribbon, Xyron and Simple Stories Blog Week. The next few days promise to inspire you with fantastic ideas from all three design teams.  This is my first post of the hop for Xyron, but I will be back on Thursday with another project for May Arts. Be sure to check the blogs to see the daily line-ups and for more details on yummy prize packages.


Today's project is a faux canvas - and I'm going to show you how I created it.  I've found that sometimes if you add much media to a scrapbook layout, the page warps or curls - so this simple trick not only gives you more of a canvas look, it also solves this pesky problem.

1.  Begin with a textured cardstock (WorldWin ColorMates Textured Denim - Aqua Denim).  Use a household sponge to brush on a thin layer of gesso.


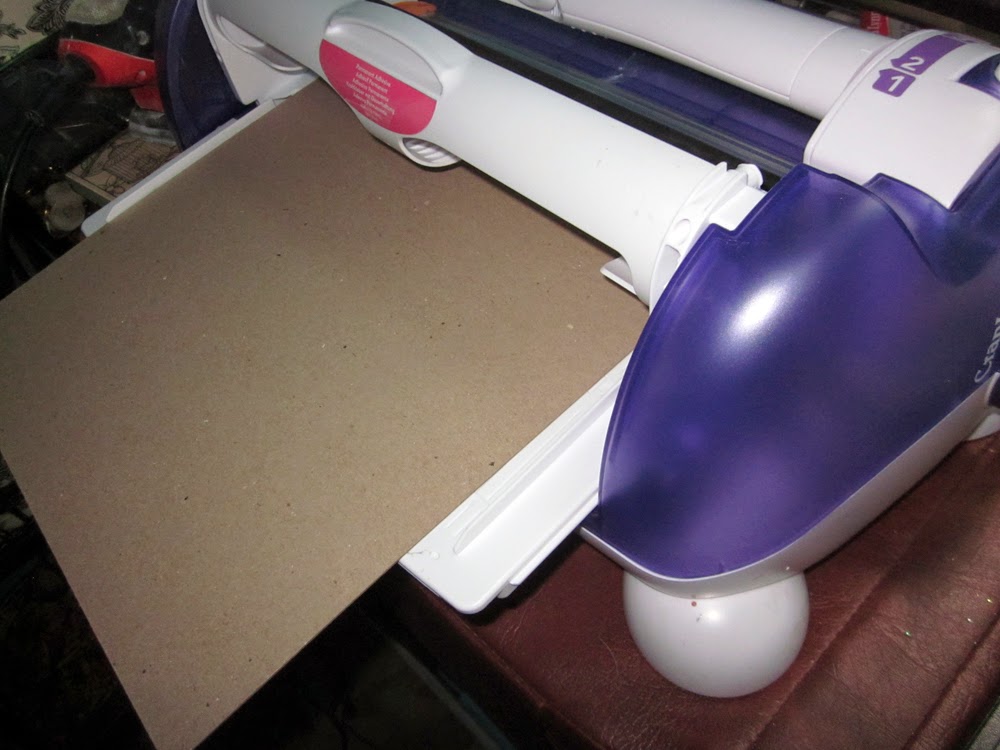
2.  Run a piece of 12 x 12 chipboard (WorldWin Heavy Chipboard) through the Xyron Creatopia to apply an edge to edge layer of adhesive.


3.  Carefully line up the edges, and  lay the cardstock  down on the chipboard.

4.  Stamp background images (Creative Embellishments) using watermark ink, and heat emboss with white powder.


5.  Arrange the elements of the layout as desired, using the Xyron/Teresa Collins foam adhesives when dimension is needed.

6. Use the Xyron Double Sided Tape to adhere the ribbon elements.

7.  Cut 3 chevrons from the printed paper ( Simple Stories - Hello Baby) Score the center of each.


8.  Use a scrap piece of plastic cross stitch canvas as a guide to pierce evenly spaced holes for stitching.
9.  Use twine to handstitch the chevrons.  Cut a plain cardstock chevron, and apply adhesive using the Xyron 5" Creative Station.  Place this on the backside of the chevrons, for a place for hidden journaling.
10.  Use double sided tape, down the spine of the chevrons to add to the layout.

11.  Fussy cut the title from the patterned paper, ink the edges and use foam adhesives to apply.

12.  Paint over the May Arts Sequin Heart with gesso to tone down the color and add to the center border.
I hope you have enjoyed my project - and remember to check out the rest of the inspiration this week!

Supplies:
Xyron:
May Arts Ribbon
Simple Stories
Zva Creative
CR-05CA-133
WorldWin Papers
Creative Embellishments


Challenges
Once Upon A Sketch - July- (Journaling theme - numbers - Mine is behind the chevrons)

Scrap Around the World - July Mood Board ( Colors, Pom-pom trim on the lampshade)
Mixed Media Monthly Challenge #2 - Around the House (sponge, plastic canvas)