Saturday, February 9, 2013

New Chipboard Release at Words or Whatever - Wow

Each month, Words or Whatever has a wonderful new product release.  This month, they are celebrating Back to School ( since it's an Australian company, their kiddos are heading off to school now).

So here are a couple of layouts that I created using a few of the new goodies.


I colored my chipboard with Clearsnap ink, and also added hightlights with Smooch.  My journaling was printed onto vellum and cut into strips and run through my Xyron 1.5" Sticker Maker - it works beautifully with the vellum, as it shows none of the adhesive through the paper.  I added a little text to the book in the lower right corner, by cutting apart Tim Holtz Tissue tape.


I found an image of an old school library card, and printed it out on cardstock and made a cute little library pocket for it.

The Little Kids border is not a new release, but it was perfect for this theme.

School Days:
AltaMATZ Chicken Wire Piece (Alta055) 
Graphic 45 Patterned Papers - An ABC Primer
WorldWin Papers Vellum
Xyron Mega Runner
Xyron 1.5" Sticker Maker 
Clearsnap Ink


I added some puff paint to my abacus beads to make them look rounded and then painted them with Smooch.


I cut apart one of the "2013" titles, and used it for my math equation, with the help of some simple embroidery.

"No Matter How You Count It"
Pink Paislee Patterned Paper - Old School
Epiphany Crafts Tools and Epoxies 

Be sure to check out the Words or Whatever Blog, for my inspiration from the rest of the team, and to see more of the new products!


Thursday, February 7, 2013

May Arts Ribbonista Valentine's Blog Hop Day 4


Welcome to the fourth day of the May Arts Ribbonista Valentine's Blog Hop!  We hope that you have loved what you've seen so far.  To sweeten the deal a little bit, the Ribbon Lady will be giving someone their choice of 4 spools of ribbon!  All you have to do is leave a comment on any of the participating blogs - the more comments you leave....the greater your chances of winning!


 I decided to make a Valentine magnet, so you can use it all year long to leave little love notes.

I started out my stamping/heat embossing my heart onto canvas cloth. I used Heartfelt Creations Passage to My Heart set.

I cut this out, leaving a little border around, so I could fray the edges.
Next, I misted it with various pink/red Tattered Angels  Mists.


While I still had extra mist on my work mat, I took one of the flowers from the
 Sheer/Frayed/Flowers/Wired 393-25-01, and trimmed away the outer petals, and just used the center, and ran it through the left over mists. 

I added a rhinestone brad to the center, and tucked a little piece of my favorite 5/8" Crochet Ribbon 361-58-26, behind it.

I die cut the bottom two layers using Heartfelt Creations/Spellbinders Timeless Amour from WorldWin Cardstock, and covered them with Sakura Crystal Lacquer, to make it more durable.  After that was completely dry, and attached the canvas piece to the front and the magnet to the back.

Be sure and check out the rest of the hop - we will have one more day tomorrow.  And leave comments for your chance to win!


Thursday

Wednesday, February 6, 2013

Tag - You're it with Heartfelt Creations

 I thought I would sit down and make a quick tag, and ended up working on this all morning! But it was fun, and that's what counts.  I wanted to make a tag that would be great for Valentine's Day without being too girly.  So, I went with deeper red and lots of distressing and was pleased with the results.  Hope you enjoy!

 Heartfelt Creations Products:
Antique Lantern PreCut Set HCPC 3512
 Delicate Twining Asters PreCut Set HCPC 3496
Delicate Asters PreCut Set HCPC 3494
Burlap Background PreCut Set HCPC 3315
Vintage Word Background PreCut Set HCPC 3320
Delicate Asters Die HCD 726
Decorative Metal Fixtures HCD 725
Decorative Lace Border Die HCD 713
Vintage Floret Paper Collection HCDP1 227
Classic Editions Paper Collection HCDP1 224


Other:
Inkssentials Kraft Tags #8
Want2Scrap Pearl Heart
Fiskars XXL tag punch
Wow Embossing Powders
Various Glimmer Mist in shades of red and pink
Clearsnap Ink
Xyron Mega Runner


Start with a Kraft tag. Randomly stamp the Delicate Twining Asters around the edges of the tag using embossing ink.  Dry emboss using a dark pink powder. Spritz the tag with various shades of red mists. Dry with heat gun. Use dark brown chalk ink to randomly stamp the Vintage Word background  randomly on the tag.  Use a dark purple to stamp the Burlap background in other areas of the tag. Add highlights of the ultrafine glitter to areas of the stamped Delicate Twining Asters.  Use patterned papers for all of your die cuts.  Cut the fancy heart shape from the Decorative Metal Fixtures set and glue to the right side of the tab.  Place the pearl heart on the tag, where the right side hangs of the edge, and trim away the excess. This will overlap the fancy die cut. Stamp and cut Delicate Asters with the matching stamps and dies. Create one flower and place in the center of the heart.  Add a decorative pearl to the center.   Spritz seam binding  with the same mists and tie a bow at the top of the tag.  Stamp the sentiment on a small punched tag, spritz and crinkle.  Add to the bow using linen string. Cut the Decorative Lace border die, ink the edges and slightly crumble to break the surface tension.  Use double sided tape to attach as a ruffle along the bottom edge.  Glue a piece of leftover ribbon to the backside to cover the seam and tidy things up.


Tuesday, February 5, 2013

Hampton Art CHA New Release Projects

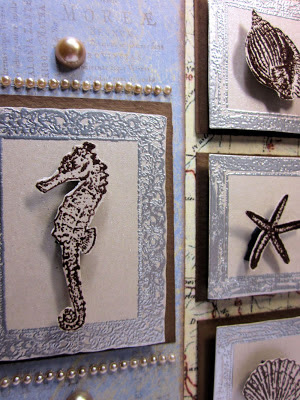
Hi, I"m back today to share with you a couple of the cards that I created for the new product release at CHA. The design team was assigned different stamps for the show, and we each were chomping at the bit to see what goodies would arrive in our mailbox. Well, you know I was thrilled to receive a big box of goodies from Hampton Art! We had a quick turnaround time, so papers, stamps and inks were flying around my studio. But there is something really cool about the rush of getting ready for the big show. I hope you enjoy!


Supplies:
Hampton Art Stamps: NEW Art Warehouse Dreams Grow (IC0237)
Clearsnap:
Archival Ink: Pumpkin Pie
Pigment Ink: Moss Green
ColorBox Chalk Ink : Dark Moss, Chestnut Roan
Mix’d Media Inkz Embossing Powder: Truffle
Top Boss Watermark Ink
WorldWin Papers Cardstock
My Mind’s Eye Patterned Paper: Stella Rose
Embossing Pen
Madeira Machine Embroidery Thread
 
Instructions:
1. Stamp three carrots by inking the top portion with the Moss Green and the lower portion with the Pumpkin Pie. Fussy cut, and ink the edges with the Chestnut Roan. Shape the leaves by wrapping them around a pen. To add the roots to the carrot, take a short piece of embroidery thread, and glue to the back, letting a tail hang down.
2. Glue the carrots to a piece of brown cardstock, so that it looks like the leaves are above the ground and the carrots are below.
3. Use an embossing pen to trace the word “Grow” from the stamp, stamp on the lower corner of the patterned paper and emboss with dark brown powder. Machine stitch around this layer. Ink the edges of the patterned papers using the Dark Moss.
4. Finish as shown. 


 Supplies:
Hampton Art licensed 7gypsies cling stamp set: Under the Sea (IC0222)
Clearsnap:
Donna Salazar: Leather Mix’d Media Ink
Colorbox Chalk Ink: Chestnut Roan
Topboss Embossing Ink
Brown and silver embossing powder
Farmhouse Paper Company patterned papers
Worldwin Cardstock
Want2Scrap Pearls
  
Instructions:
1. Stamp the frames using watermark ink and emboss in silver. Cut the frames out.
2. Stamp the sea creatures with the watermark ink and emboss with dark brown powder. Fussy Cut the images and mount on the frames using dimensional adhesive.
3. Add a mat of dark brown behind each of the frames.
4. Ink the edges of patterned papers with Chestnut Roan. Arrange as shown.
5. Add pearls to finish.

Monday, February 4, 2013

Valentine Shaped Card


WorldWin Cardstock
Xyron 1.5" Create a Sticker
Xyron Mega Runner