Friday, October 18, 2013

Xyron and Stencil Girl Week

  
Being on the design team for Xyron is not only great because I get to use such awesome adhesives, but also because we partner up with  fantastic companies, and I get the chance to get introduced to products I might not have tried.  This week we are playing with Stencil Girl products - and I've got to tell you, I love them!  The designs are not only fabulous, but the quality of the stencils is great too!

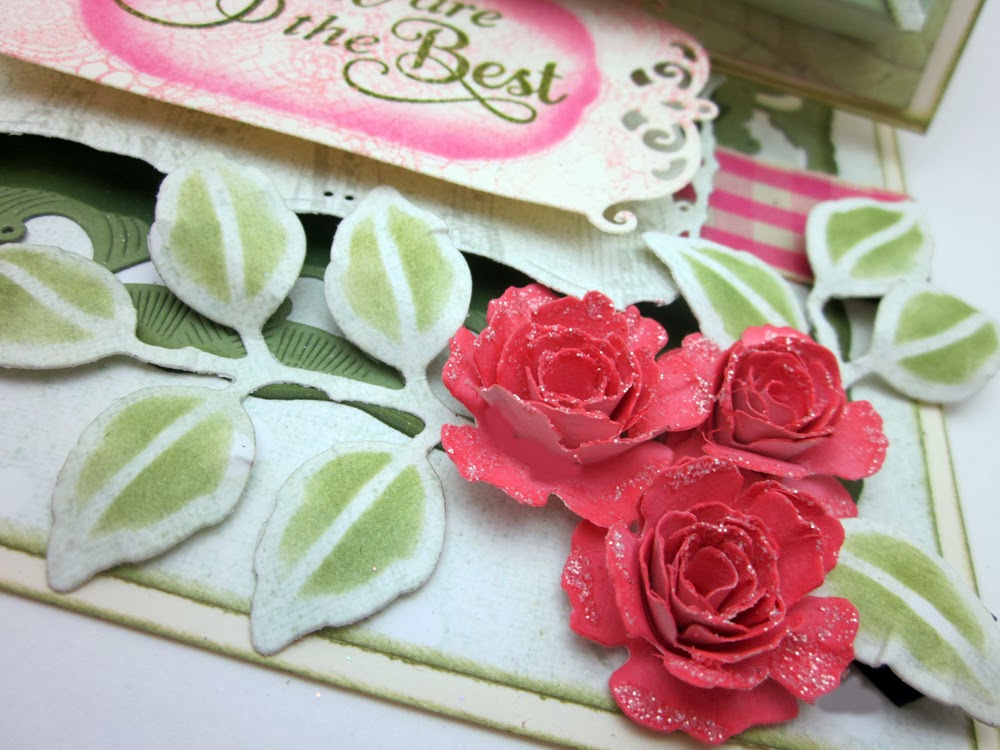
I made this very sparkly card - and I will share with you how I did it.

I started out with just white cardstock and spread a mix of Art Anthology Velvet Dimensional Paint in Aloha, Fiji and Tuxedo - using and old credit card to spread it out on the Fibonnaci 6" stencil.

While the paint was wet, I sprinkled some Wow Ultra High Embossing Powder in Metallic Silver over the design and heat set it .  Then I misted the white areas with Art Anthology's Studio Blue Colorations over the top.


I find that sometimes when I make a heavily embossed piece of paper, that it really tends to want to curl up - so I ran it through my 5" Creative Station - and of course, that held it perfectly in place on my card base.

I painted a Pink Paislee Artisan Element dimensional sticker with more of the Velvet paints, and ran it through my new Xyron 3" Sticker Maker (because the sticker had lost some of it's original stick).

I love all of the texture that  I got with this project - and hope that you might give it a try!


Be sure to stop by the Xyron Blog and the Stencil Girl blog.  There are some great giveaways and beautiful inspiration!


Inspired By Stamping and WorldWin Papers Blog Hop

Hi there crafty friends and thank you for joining us in this Holiday blog hop. Inspired By Stamping and WorldWin Papers has teamed up to offer you over 15 inspiring Christmas projects to jump start your holiday season. We hope that you’ll find just the right inspiration for your next Christmas themed project.
Christmas season is all about gift giving, and this hop is no exception. We have planned a very sweet giveaway for a lucky winner. To be eligible for the giveaway, please visit each blog in the list, grabbing the “letter” code as you go. Once you’ve landed on our last blog, which is the Inspired by Stamping blog, you will leave a comment with the secret phrase created by putting together all of those letters that you collected from each blog. Winners of the giveaway will be announced on October 23rd on both the WorldWin Papers and Inspired by Stamping blogs.
The designers have worked hard to produce all of these fantastic creations, and we would like to invite you to leave some comments on their individual blogs as well.
So what are you waiting for…let the hopping begin!

Welcome to my blog, I'm glad you stopped by today.  My letter for you to collect is "H". I've made two Christmas cards for you.....


WorldWin Papers - 
Inspired By Stamping Clear Stamps
May Arts Ribbon
Spellbinders
M-Bossabilities folder


WorldWin Papers:
Kromekote Dark Red
Inspired By Stamping Clear Stamps
Holiday Sentiments
Spellbinders Dies
May Arts Ribbon 
1.5" Crochet Ribbon
Want2Scrap Pearls
Xyron
Mega Runner, Creatopia

Now that you have collected your letter (and hopefully left a little love), hop on to Katrina Hunt's blog, and check out her adorable projects! 

Here is the whole hop, in case you jumped in somewhere in the middle!
Worldwin

Inspired by Stamping

Wednesday, October 16, 2013

May Arts Halloween Hop


Today is the third day in the May Arts Ribbonista Halloween Blog Hop! I'm sure you have been getting some great ideas to get you ready to spook!  Remember to leave comments on the posts - the more you leave the greater your chances for winning your choice of 3 spools of ribbon from our Halloween category!


It's fun to tuck little decorations in nooks and crannies around the house, and I thought this embellished bottle and pumpkin would be so cute nestled on a shelf.  I used Authentique's Thrilling paper collection, and adhered it to the bottle using the Xyron 5" Creative Station.  I added some of my favorite ribbons and that was it!  The paper mache pumpkin was colored with Art Anthology's Honey Bee Colorations, and then I just added a bow (she is too cute to spook!)

May Arts Ribbons

Partners in Crafts Supplies

Other
Paper Mache Pumpkin
Glass Bottle
Monday
Tuesday
Wednesday

Thursday

Friday

Heartfelt Creations Layout


Welcome back, for another project created with Heartfelt Creations!  I've got another layout to share with you.  I love how you can really use any colors with the neutrals in the Antiquity paper collection - and they look great!

In a garden, these flowers would be considered hybrids - lol! I combined the Tattered Blossoms and the Sweet Juliet dies to create these blooms.

The Sweet Juliet centers were painted with 3D stamp paint, and the entire flower was misted with Art Anthology Pesto Colorations.
 

I embellished the ornate die cut with pearls.


Supplies:
HCDPI 237 Antiquity Paper Collection
HCDP1 230 Sunny Day Paper Collection 

HCD 740 Sweet Juliet Dies
HCD 722 Tattered Blossoms Die
HCD  736 Classic Leaf Die
HCD 737Ornate Gateway Die
HCD 713 Decorative Lace Border Die
HCPC 3564  Blessing to Me PreCut Set
HCPC 3545 Open Leaf PreCut Set
HCPC 3468 Tattered Blossoms PreCut Set
1259723 Art Institute Glue (Dries Clear)
Lime Green Metallic 3D Stamp Paint
Other:
Spellbinders Cherry Blossoms Die
WorldWin Cardstock Aqua Denim Colormates
Art Anthology: Pesto Colorations, Focus Colorations, Timeless Colorations, Tuxedo Velvet
Zva Creative Bling
May Arts Ribbon: 3/8" Velvet with gold dots  456-38-04
Clearsnap Ink: Burgandy, Blackbird, Artichoke
Xyron Foam Adhesives, Mega Runner

Paint the edges of the solid cardstock background with black dimensional paint and distress.  Spray some dark mist onto a mat, and run the edges of the main patterned paper through the liquid and distress the edges.  Stamp leaves under the area where the photo will be placed.  Cut a 6 x 6 mat from the patterned paper and apply to the layout using foam adhesives.  Cut the lace border and ink the edges.  Tuck under the photo mat and glue in place.  Add velvet ribbon over the die.  Cut the fancy flourish from the Ornate Gateway set, add pearls and glue to the photo edge.  Assemble three flower centers using the Sweet Juliet dies (one large and one small).  Paint them lightly with the stamp paint.  Stamp and cut 2 of the largest petals from the Tattered Blossoms and one of the next size down for each flower.  Spray with a light colored mist (very light coating), and shape with your fingers.  Assemble the flowers and mist with the Pesto spray.  Add bling to the centers.  Stamp and cut leaves to nestle into the flower cluster.  Add branches, ribbon and bling flourish to finish.

Monday, October 14, 2013

JustRite Friday Challenge - Easel Cards

 The current challenge for the JustRite Stampers is easel cards, and I wanted to see if I could come up with something a little different, so I made a card with a small box on the front of it, to hold a removable bookmark.

 I embossed the border from Lace Medallion Labels and cut it, and placed May Arts ribbon underneath it, and added a handmade flower using the Bitty Blossoms die set.

  I placed more flowers on the card base, along with some die cuts from Foliage.   The sentiment was stamped and layered on Nobel Rectangles and Exquisite Labels 11. 


I decorated the pocket/box with Botanical Swirls, and  embossed  a butterfly  from Grand Sentiments clear stamp set.

 Here's the bookmark - decorated with more Bitty Blooms, another butterfly and stamped with the frame and sentiment from Grand Sentiments.

Here's a front view of my card.  There are some great entries, so be sure to check them out!