Friday, December 7, 2012

Christmas Decorating with May Arts Ribbons

Hi y'all! I wanted to offer a little bit of Southern hospitality and "invite" you in to see some of my Christmas decorations.  Some of the design team from May Arts Ribbon will be sharing their Christmas trees (or tree decorations) with you today.  So for a full list of those participating, stop by the May Arts Blog.

 
I'm really glad that we decided to do this blog post, because it gave me a deadline to get my tree up! and otherwise, I think all of my beautiful decorations would still be in boxes.  I tend to be an              over-the-top kind of a girl, and Christmas in no exception. My mammouth 10 foot tree is covered in all kinds of sparkly ornaments, and this year my tree got dressed a little bit more with the addition of May Arts Ribbons.
 
I have streamers of this Satin/Metallic Reversible ribbon, flowing from my tree top. It is so elegant and perfect for the season.  I can just imagine big bows on all of my presents, tied with this one.
 
 
I've had a cross tree-topper for years, because I think that's the best way to capture the true spirit of Christmas.  This year I added a large bow behind it, created with this Sheer/ Gold Swirls ribbon.


Here's a detail shot for you -


Thanks for stopping by my blog, and spending a little time.  I hope you are inspired by what you see and that you have a very blessed Christmas!


Thursday, December 6, 2012

Hampton Art And Cheery Lynn Blog Week

 
This week, the designers from Hampton Art and Cheery Lynn Designs have teamed up to share with you some great Christmas projects to help you get your jingle on! And I am blessed to serve on both of these teams - so this is my second post for the week. For more inspiration, please check out:
 
 
The blogs will be sharing new projects throughout the week - plus each company is giving away a fantastic prize to one lucky commenter.
 
Cheery Lynn Designs
$25 Gift Certificate
 
and
 
From Hampton Art
 
 
So make sure to visit the blogs every day and leave those comments for your chance to win!
 
 
Now, for the details of my card, here you go!


Supply List:

Hampton Art Stamps: 

Santa’s List ( PS0721); Believe In Christmas (SC0273)

Clearsnap:

Graphic 45 Decades Antiquing Dye Ink: Triumphant Red;

Color Box Fluid Chalk: Olive Pastel; Creamy Brown

Color Box Pigment Ink: Merlot

Cheery Lynn Designs Dies:


Patterned Papers: Riddersholm Design – The Day

WorldWin Papers Cardstock – ColorMates Maroon

May Arts Ribbon: Paper Cord ( 420-33); 5/8” Velvet

Adhesives: GlueArts Glue Glider Pro – Perma Tac; U Cut It Dimensional Adhesive

Other: Vintage button


Designer Notes:

1.      Stamp the “Night Before Christmas” words from the Believe in Christmas set, using the Creamy Brown ink onto a light patterned paper. Cut a circle from the paper.  Stamp the Santa image in the center of the circle using  the Merlot ink.  Ink the edges using the Triumphant Red.

2.      Die cut the Nautical Wheeler Doily using a light patterned paper. Ink the edges with the Triumphant Red.

3.      Die cut the medium sized Doily Stacker Circle using a dark red patterned paper.

4.      Die cut the Holly Flourish using a light patterned paper and color using the Olive Pastel ink.

5.      Ink the edges of all remaining panels for the card, using the Triumphant Red. Assemble as shown.

Wednesday, December 5, 2012

Heartfelt Creations Inspiration


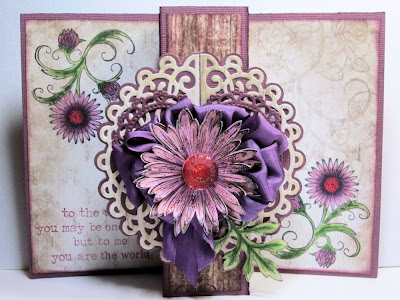
Today I have a Wing-fold card to share with you using some gorgeous Heartfelt Creations. I love making this fancy fold card, because it still tucks easily into an envelope, but when it's unfolded, it stands well by itself.
Cut the cardstock base 12" x 6".  Score at 3 3/8; 5 1/8', 6 7/8" and 8 5/8". For the decorative panels cut 2 for the outsides at 3 1/8" x 5 3/4". For the 3 inner panels, cut them 1 1/2" x 5 3/4".  Stamp the Twining Asters on the outer panels as shown and color with Copic Markers.  Add the sentiment to the left panel.  Ink the edges with Distress ink.  Glue all panels to the card base. Die cut two Layered Elegant Swirls and attach them up on the center panel.  Cut a decorative heart from the Timeless Amour die set, and glue that to the center using Dries Clear Adhesive.  Tie a multi-loop bow and glue to the center of the heart using Zip Dry Adhesive.  Stamp and cut with the coordinating die, 2 each of the two largest flowers from the Delicate Asteres stamp set.  Color with Copic markers and shape using the Flower Shaping Tools and mat. Paint a thin layer of Stickles over the flower.  Glue a Sparkler to the center of the flower. Adhere to the center of the bow.
Heartfelt Creations:
Other:
May Arts Silk Ribbon 1.25" SK47
Copic Markers: YG61,YG63, YG67, V12, V15, V17, RV14
Distress Ink: Seedless Preserves
ColorBox Pigment Ink - Eggplant
Glitz Stickles - Grape
Webster's Pages Sparklers
Bazzill cardstock


Tuesday, December 4, 2012

Cherry Blossoms


I tend to make a ton of square cards, because I really like the symetry - but sometimes, just trying a different sized card can get your creative juices flowing.  This card is 3 1/2" x 8" - and I love the long, skinny look.  I used papers from The FarmHouse Paper Company- Market Square Barbershop.   The borders surronding the text is from the Spellbinders' Resplendent Rectangles (I just cut one of the rectangles in half).  Finally, I used the new Spellbinder's Cherry Blossoms die set for the focal point. The edges of the flowers were inked with ColorBox pigment ink, and then each flower has a pearl from Want2Scrap to finish it off.  This was a quick card to put together, and would be easy to replicate if you needed multiples of a card.

Monday, December 3, 2012

Cheery Lynn Designs and Hampton Art


This week, the designers from Hampton Art and Cheery Lynn Designs have teamed up to share with you some great Christmas projects to help you get your jingle on!  I am blessed to serve on both of these teams - they are both such wonderful companies. For more inspiration, please check out:
 
 
The blogs will be sharing new projects throughout the week - plus each company is giving away a fantastic prize to one lucky commenter.
 
Cheery Lynn Designs
$25 Gift Certificate
and
From Hampton Art
So make sure to visit the blogs every day and leave those comments for your chance to win!
 
 
Now, onto my card!


The grandfather clock from the Nutcracker Sweet 3, was  my focal image for this 6 x 6 card.  After I stamped it and colored it with Copics, I fussy cut the image.  The Holly Lace Flourish was perfect to tuck behind the clock to tie in the stamped holly boughs. Fiona's Magic Mirror was the perfect sized frame to mount this image.  The "Magic of Christmas" was from the Nutcracker Sweet 1 set, and was stamped using the Warm Red ink, then fussy cut, and curled a little before adding it to the card.  All of the patterned papers were inked with the Burnt Copper ink.
 
We hope that you are inspired this week - and remember to leave those comments!  Also, we have a new challenge at the blog - Happy Holidays.  That should be an easy one. Just remember to use your Cheery Lynn dies for a chance to win a $20 gift certificate.
 
 
Cheery Lynn Designs Dies
Hampton Art Stamps

Sunday, December 2, 2012

Scor-Pal and Pink Paislee Week

It's always fun to try different fancy folds on cards and the trendy papers from Pink Paislee's Portfolio Collection seemed perfect for this angular folded card.


WorldWin Cardstock
Clearsnap Smooch Spritz
Clearsnap Color Box Wild Hare Pigment Ink
Spellbinders Labels Twenty-One


Cut card stock base 6" x 12". With the long side against the upper fence, score at 3", and 9". Turn a quarter turn and score at 2".  Cut as shown below.


Score from the upper inside corner, to the lower outside corner on both sides.


Fold in, towards the center.


Fold the lower edge, back up towards the folded edge, so they line up , and fold using your Scor-pal tool.
Your card frame is now ready to embellish.

Ink all edges using grey ink.  Cover all panels on the card base with coordinating patterned papers that are cut 1/4" smaller than the card base.  For the center section of the card, cut a 6" x 6" piece of cardstock.  Trace the shape of the Spellbinders label around the top, and handcut, just the top edge. Cut the patterned paper with the same die. and layer it onto the base. Layer other paperson the card as shown and decorate with the Pink Paislee embellishments.

When the card is folded and ready for the envelope, this is how it will look.


When the card is opened to display, the fancy folds will serve as a stand, to hold it up.