Saturday, July 30, 2011

Cameo Appearance


Don't you love all of the cameos that are popping up all over Scrappyland? They are so romantic and feminine. I was inspired by the Cameo and Oval Frame from CottageCutz to make this scalloped card. This is such a fun set to add some paper piecing. I cut two bows - one from patterned paper, and the other from cardstock to act as a shadow.


And what would a girly-girl card be without a handmade flower? I used the Pink Peony Flower
and inked it with Distress ink, and shaped it. I added Crystal Lacquer to the buds and the center to add another texture.


Thanks for stopping by! I hope you have a great weekend!

Challenges:
Simon Says: Shaped Card
Simon Says Stamp and Show: Anything goes
Alota: Circles

Best Creation DT!


I got some awesome news last night! I was asked to join the Best Creations Design Team - Woo Hoo! I fell in love with their beautiful sparkly papers about a year ago, when I found them at my LSS. I am really excited and honored to be working with some fabulously talented ladies on this team. You can check them out below.


Design Team:

Monthly Guest Designer:

Friday, July 29, 2011

Easter Layout


I have an Easter layout to share with you, that I recently made. This was supposed to be on HSN the last time Epiphany Crafts was on, but I don't think it made it on the air (maybe next time!)

The background paper was stamped with Perfect Pearls using bird cages from Birds at Home

Round Lace border was stamped by manipulating the straight lace stamp from Sew Special

The epoxy buttons were stamped with a flower from Fairyland, colored with Copics, and set in the Vintage Findings from Epiphany Crafts.

The sentiment is from Rose set – colored with Perfect Pearls

Bird and nest were stamped from Fairyland.

“April” poem, was printed from the free printables at Crafty Secrets blog.


To make the epoxies, I used Shape Studio Round 14 from Epiphany Crafts. These worked perfect with the typewriter letters from Echo Park.

I also made the large fabric flowers using some lovely left-over silk that was in my studio.

Thanks for dropping by!


Challenges:

Simon Says: Shaped card/project

Simon Says Stamp and Show: Anything Goes

Alota: Circles

Thursday, July 28, 2011

Beary Scrap Inspiration Challenge


Link
Well, you've had a week to discover that the Beary Scrap's Challenge is to be inspired by something in your closet. This week, I got my new Echo Park Country Drive collection, and I loved it so much, I knew I had to make it work for this week's challenge. As many of you know, my sweet sister Lori has moved right next door to me - and one of the perks that comes with that, is that we can now share what's in our closets! This is a picture of Lori and our Mom, taken a couple of years ago, at the Teacher's Luncheon, that Lori hosted. The theme was bees - and thus you can see the inspiration for today's project.

Don't you just love all of those bees?!!! I used a new stamp from Layers of Color Art stamps, and first colored it with Copics. I cut and colored and shaped a 2nd image of the bee and flowers, and highlighted them with Sakura Crystal 3-D Lacquer. I used a large Martha Stewart punch, and of course, had to add some Seam Binding ribbon.


Thanks for buzzing by today!

Challenges:
Simon Says Stamp and Show: Anything Goes

Chapel Road Stamps Inspiration

We are wrapping up Christmas in July at Chapel Road/Class Act Stamps - so I have one final Christmas project to share with you today. My shaped card is made using the Snowflake Plate. I made the patterned paper by randomly stamping and embossing the various snowflake stamps on black paper. The poem was stamped and die-cut, and snowflakes were stamped over the top in Versa-mark ink, to give a very subtle design.

Challenges:
Stampin' Sisters in Christ - Black and White
Creative Inspirations Paint - Christmas
Simon Says - Shaped Card
Simon Says Stamp and Show - Anything Goes
Pollycraft - Christmas in July
Designed to Delight - Christmas with no red or green
Totally Gorjuss - Diecuts

Sunday, July 24, 2011

Crafty Secrets Poppy Card

LinkI love poppies - they are one of my all time favorite flowers - and this Poppy Stamp from Crafty Secrets is one of my favorite stamps! Is stamped and colored the flowers twice - and fussy cut one of the layers. I added some Flower Soft for the centers. I made the bee charm using polymer clay , and stamped the wings from a Bug's Life on acrylic.

Friday, July 22, 2011

Chapel Road Challenge


For the entire month of July, the Chapel Road DT is showing off our Christmas stamps, and for Linkour challenge, we would love to see your Christmas creations. You don't have to use a Chapel Road/ Class Act stamp, but if you do, you will be entered twice for the prize (which happens to be the stamp of your choice).

My little plaque started out as some humble cardboard. I painted it with red acrylic paint and let it dry. Next, I stamped the Poinsettia Background with Versamark Ink and embossed with clear powder. Then I rubbed on a light coat of white paint, and quickly rubbed off most of it with a damp paper towel. I added some Frosted Stickles around the edge, and the background was finished.

The sentiment was stamped from the Holly Plate and cut out with a Spellbinders label die. White paint was added around the edge. The flower was handmade using the Dahlia punch from Punch Bunch.

You have two weeks to play along, so we hope to see your Christmas creations!

Thursday, July 21, 2011

Sparkly Poinsettia Card

I had these gorgeous glittery papers from the Robin's Nest, and thought that they would be perfect for a Christmas card. I die cut the Rebellious Red Glitter Cardstock. The main paper for my card is the Classic Glitter Swirl in the gold on black colorway. My stamp is from the Poinsettia Plate set from Chapel Road Stamps. I embossed the image with black embossing powder, and colored it with Copics. I added a little bit of Sunshine Yellow Flower Soft in the center of the flower.The yellow dew drops were the perfect accent to finish off this project. This was a very elegant card, that came together pretty quickly.

Tuesday, July 19, 2011

Inspiration from the closet


We've started a new challenge at the Beary Scrap, and I have to admit, this one was my idea. Look in your closet and find some inspiration for your project, from one of your favorite things to wear. This can be clothes, jewelry, accessories - you name it! If you can wear it, let it be your inspiration.

I love embellished jeans, so I added a ribbon of old denim, with a strip of paper, and Dew Drops over it. I adhered the denim with Scor-tape which held it perfectly. The papers are from Prima's Sweet Fairy line, (including the cute tickets that I cut from one of the pages.) The stamps/dies are from Prickley Pear.

Challenges:
Prickley Pear: sketch
Simon Says: Anything Goes
Creative Inspirations: Dies

Monday, July 18, 2011

Crafty Secrets Design Team Challenge - NEW Product Show Offs!

If you are ready for a ton of inspiring ideas and fun new techniques to try, then you are going to want to check out all of the projects from the talented Crafty Secrets DT! We are introducing 15 new sets for CHA - and they are all must haves! If you would like to find out how I made this card, please see my tutorial below.


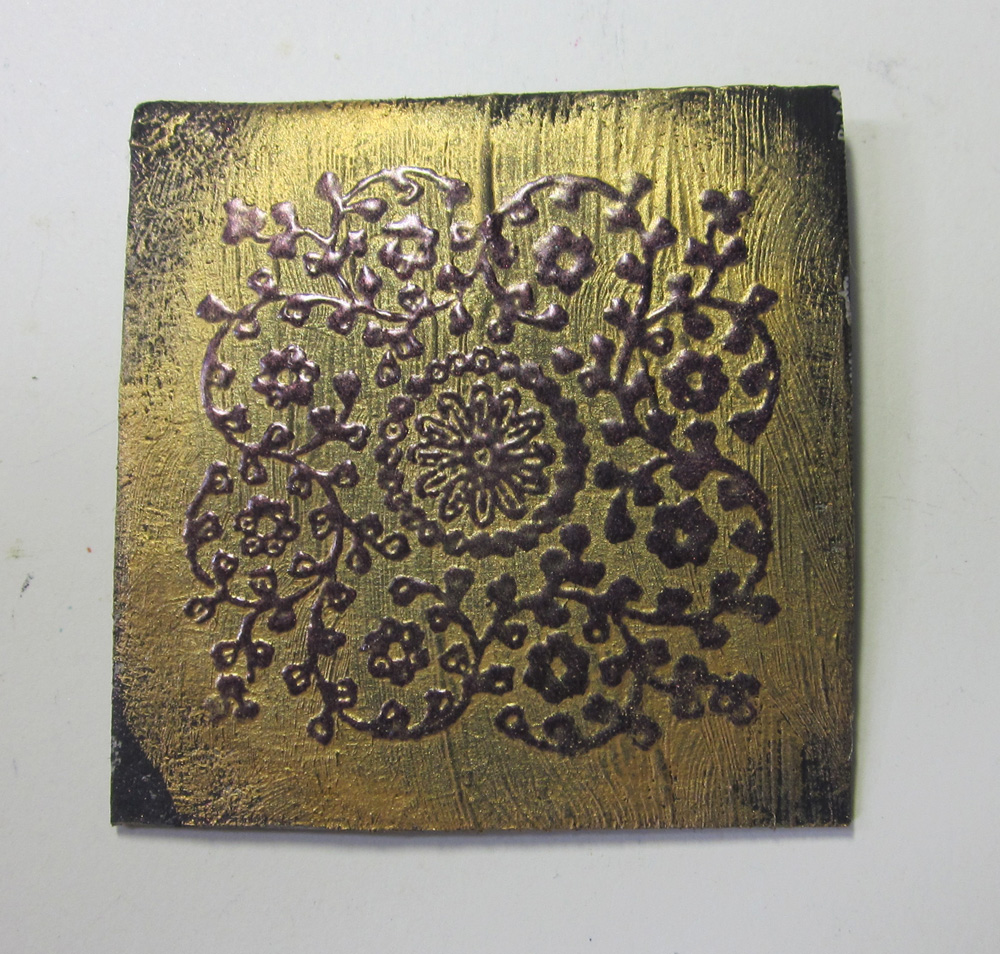
Step 1: Cut four squares of cardboard 2.25 x 2.25


Step 2: Paint the board with black paint. Try to leave texture in the paint.


Step 3: Stamp each block with a different image from SM42 Lacey Patterns using Versamark ink. It's really easy to line the stamps up in the center of the square since the stamps are clear.


Step 4: Emboss with amethyst embossing powder and heat set.


Step 5: Rub over the image using Viva Decor Inka Gold. Take a damp paper towel and rub off the gold from the embossed area.


Step 6: Add some thick tacky glue to your non-stick mat and water it down.

Step 7: Add a little around the edge of each tile, and sprinkle with glitter.


Step 8: For my patterned paper, I print one of the PNG files from our new CD, Creating with Vintage Patterns, at 5.75 x 5.75 inches onto Bazzill cardstock.

For the rest of the card, I colored and cut out the fairy from SL41 Born To Fly . I used Viva Decor Inka Gold to color the Embossed Frame. The small epoxy squares were made using the Mini Vintage Creative Scraps. Those scraps are so pretty, I had to force myself to cut into them! I also trimmed out the edges of the card using the Metallic Peel Off Stickers Gold Scallop and Dot Mini Trim. A few pearls, some seam binding and a vintage button, and this card was completed.


I know you are going to want to see what the rest of the design team came up with, so here's a list of everyone, so you can check it out! Keep your notepad handy, cause I'm sure you are going to want to start your shopping list! So when you finish, you can head to the Crafty Secrets website and get some Crafty Secrets goodies delivered to you! And to make sure you don't miss anything, why not subscribe to the Heartwarming Vintage Blog? There's always lots of inspiration, announcements and giveaways.


Challenges:
Simon Says: Anything Goes
Creatalicious: 1920's
Simon Says Stamp and Show: embossing
Simply Scrapping Crafts: Embossing