Monday, November 12, 2012

Cheery Lynn Designs Monday

Hope you had a good weekend! I've got two projects to share with you today -One for the CLD Inspiration Blog and one for the CLD Challenge Blog.

The challenge this week is fall colors (which is always my favorite palette!)  I decided to make a kraft based tag. I hope you will play along - remember, you could win a $20 gift certificate.


Cheery Lynn Designs Dies
 
On the Inspiration blog, I've got a wintery 12 x 12 layout to share with you. 
 
 
 Most of the cuts are pretty obvious, but I do have one neat new trick to share with you. My clustering includes lots of snowflakes, and I wanted to add some dimension, but foam adhesive was not an option, due to the very lacey, intricate cut. So, I cut 7 of the same snowflake, and glued each layer together. In essence, I made my own chipboard. I love how this turned out, so I will be using this technique again!
 
 
I can't tell you how often I am reaching for the Delicate Lace Script font. It is the perfect size to add titles/ journaling to my layouts.  My poinsettia was made with the Build a Flower One, and brushed with Stickles for a little glimmer. The center of the flower was created with Snowflake 5.


At first glance, you might think these smaller snowflakes are part of the patterned paper, but actually, they are cuts from the Snowflowers One. I used some of our larger snowflakes on this layout as well - so you can see this is a really great size to add to your collection.


Cheery Lynn Designs Dies
Pion Patterned Papers
WorldWin Papers Cardstock
 
Thanks for stopping by today!
 
 
Challenges:
Pion Designs: Sketch Challenge


Scor-Pal and Hampton Art Week!

I've been looking forward to this week for quite a while! Two of my favorite companies, Scor-pal and Hampton Art,  have teamed up for one great week!  I'll have two projects to share with you this week - but in the mean time, be sure to check on the companies' blogs so you don't miss a thing!


Saturday, November 10, 2012

O Christmas Tree

This time of year, I usually start getting ready to decorate for Christmas, and I have to say...I've really not even thought about it yet! But I do have a Christmas Tree card to share with you today.  Maybe this will help get me geared up to go!


Wow Embossing Powder: Cable Car Red, Earthtone Olive
Challenges:


Friday, November 9, 2012

Hampton Art Stamps Holiday Gifts Blog Hop

Welcome to the Hampton Art Stamps Holiday Gifts Blog Hop! The Design Team will be sharing hand-made holiday gifts with you during the hop. It is not too early to start making your holiday cards, gifts, gift warp, and treats! Join us for some holiday-inspired fun and creativity!
The hop will be open for the entire weekend, giving you time to visit all of the blogs. On Monday, November 12th, we will be drawing for fantastic prizes!


In order to be entered to winone of the two  prizes, simply leave a comment on each of the blogs listed blow, including the Hampton Art Stamps Blog! We will choose two blogs at random, and one comment from each blog to win the prize.


Hampton Art is so generous with their design team - and they sent us a ton of Christmas stamps! So, I had to try to figure out a way to use several of them on this project. I've made an ombre word-art decoration that would be perfect on a mantel or table.


 I started off with a wooden "Peace" plaque from Kaisercraft.  I'm sure local craft stores would have various wooden words that you could substitute.  I painted the entire thing with several coats of gesso and let it dry completely.  Now the fun part!  I stamped various holiday words as well as snowflakes and musical notes all over my base, using Top Boss Embossing Ink and  embossing it with clear powder.  I just worked one small section at a time, until the whole word was covered. Next I added Scarlet pigment ink to the top quarter of my project, then quickly wiped over the inked area with a paper towel to remove the ink from the embossed area. The next quarter was inked with Cranberry pigment ink, and the process was repeated.  The final two layers were with Moss Green pigment ink and finally Olive Pastel Chalk ink.  I lightly coated the whole piece with a spray of Vanilla Shimmer Smooch Spritz, and rubbed my paper towel from the top to bottom, in a swiping motion.  This helped to blend my colors more, and to soften them a bit as well.


Hampton Art Stamps
Santa Stops Here SC0272
Just Add Snow SC0271
Holiday Dreams and Wishes SC0274
Merry Christmas PS0179
Kelly's Snowflake Border PS0495A
Elegant Merry Christmas PS0176
Clearsnap Inks
Color Box Scarlet Pigment Ink
Color Box Cranberry Pigment Ink
Color Box Moss Green Pigment Ink
Color Box Olive Pastel Chalk Ink
Smooch Vanilla Shimmer Spritz
Top Boss Embossing Ink

Here is the list of Design Team Blogs:


1. Hampton Art Stamps Blog http://blog.hamptonart.com/
2. Gloria Stengel http://gloriascraps.blogspot.com/
3. Britt Bass http://pinkpapercrowns.blogspot.com/
4.Adora http://adoraconcepcion.blogspot.com/
5. Dana http://kraftpaperstamps.blogspot.com
6. Vivian http://contadinak.wordpress.com/
7. Gini http://ginicagle.blogspot.com/

Thursday, November 8, 2012

Scor-Pal Decorative Box With Drawers Tutorial

I've got a tutorial to share with you that I wrote for the Scor-Pal blog.  If you like trying different types of projects, be sure and check out all of the great how-to's found there.

It's so fun to find inspiration on Pinterest, and today's box was inspired by a box found on the site from Marianne.  This one is a three drawer version and would be perfect for special trinkets.


Farmhouse Paper Company:  Market Square - Barbershop
WorldWin Papers card stock
Cherry Lynn Designs Mini Pearl French Flair Reflections Doily
Spellbinders Rose Creations
Tim Holtz/ Advantus Screw Fastners
May Arts Ribbon
Ranger Distress Ink: Vintage Photo
Box base: 12 x 10 ½” card stock – With the 12” side along the top fence, score at 4”, 8”. Turn once clockwise and score at 3 ½”, 6 ¾”. Cut as shown.

Drawer Dividers: (2) 6”x 10 ¼” card stock – Score each long side at 1” and 5”, turn with the long side along the top fence and score at 1 ½”, 5 ½”, 9 ½”.  Cut as shown to form tabs and then fold  valley, mountain, valley, as shown .


 Secure the two center sections together to form a shelf.
 Join the two shelf sections together.

Add Scor-tape to both sides and the rear of the shelving unit. Attach the back to the center square first, and then the sides.

Adhere the rest of the flaps on the box base around the shelving unit to complete.


Drawers: (3) 8” x8” card stock – Score each at 1”,2”6”, 7” – turn a quarter turn and repeat.  Cut tabs as shown.

  Add Scor-tape to each tab, and attach the sides.
 Fold over the top edge, with Scor-tape to reinforce the sides.

Your basic drawer box is now put together and ready to decorate.


Designer Papers:
Drawer Fronts: (3) 7/8” x 3 ¾”
Box Top 3 ¾” x 3 ¾”

Box Wrap Décor: Cut 2 strips of card stock 4” x 12”.  Use a decorative die to shape the top peak on each piece of paper. With the die cut edge in the upper left corner, the long side lined up with the top fence, score at 2”, 4 ½”, 8”.  Repeat for second paper strip.
Add decorative papers to these panels, and attach to the bottom and sides of the box.  Score-tape the upper flaps together or use a ribbon to hold the sides together.


Monday, November 5, 2012

Thank You Card

 
I love the Graphic 45 Tropical Travelogue line and wanted to see if I could create a Hibiscus to match the papers.  It actually turned out to be a really easy flower to create, using the Build a Flower Two.
I cut 5 petals from a peach cardstock, and inked the edges darker.  I added color to the centers using  India Ink markers. With  a flower shaping tool, I ruffled the edges of the petals and glued each one to a small circle of paper. I rolled a little strip of paper for the stamens and glued it to the center.  The Tropical Leaves were the perfect way to finish it off.

 
I added the Princess Garden Window behind the French Flair Doily Stacker, and used just the corner portions of the Hawaiian Luau Doily Frame as added embellishment.

 
The plain cream French Doily Stacker on the inside of the card provides space to write your note.


The theme this week at Cheery Lynn Designs Challenge Blog is Give Thanks.  Be sure to play along for your chance to win a $20 gift certificate.
 
 
Cheery Lynn Designs Dies
Graphic 45 Tropical Travelogue Paper
WorldWin Papers Cardstock
Faber-Castell Big Brush Pens
Want2Scrap Pearls


Friday, November 2, 2012

Cream Layout

 
I've got a layout to share with you today that I challenged myself to go monochromatic.  I really had fun with thisusing texture to add interest. Scrap-Mart carries so many great lines, it's really easy to put together mixed media type projects.  Did you know that Scrap-Mart offers a 40% off coupon every month, that you can use on one item (off the MSRP).  The code for November is "STUFFING".  So, I'm sure if you head over to the store, you will see all kinds of wonderful goodies that you might want to use the discount on or maybe get an early start to your Christmas shopping!


Supplies

Heartfelt Creations Classic Editions Collection Paper Pad


Wow Embossing Powder Ultra High Clear; Pepper


Dusty Attic Chipboard

Vintage lace, embroidered organza


Mix’d Media Inkz – Leather

Versamark Ink

WorldWin Papers Cardstock

Ranger Melting Pot

Heat Gun


1.        Roughen the edges of the base page using a distressing tool, then ink the edges with brown ink.  Cut an 11” square sheet of patterned paper, attach to the base and paint with gesso.   Allow to dry.

2.       Randomly stamp the Vintage Word Background using water mark ink, and emboss using Pepper colored powder. Glue a piece of lace down the left side of the page.  Dry emboss a panel of white cardstock and add over the lace. Add another light coat of gesso over this, and rub the gesso away from the embossed areas of text.  Stamp a few flower swirls from the Tattered Blossom Swirls. Layer a piece of embroidered organza or other sheer fabric, under the area where the photograph will go (extending beyond the space for the photo).

3.       Randomly spritz the entire page with the Iridescent Gold Glimmer Mist.  Paint the chipboard pieces with Gesso, allow to dry, and ink the edges using the brown ink.  Apply to the page.

4.       Using the cream and black patterned paper from the paper pad, stamp and cut multiple flowers in all sizes from the Tattered Blossoms.  Shape the flowers, arrange them in stacks, but don’t glue them together yet.

5.       Heat Clear Ultra High embossing powder in a Melting Pot.  Using tweezers, dip each of the flowers into the molten powder – starting with the bottom flower of the stack.  Remove a flower, set it on a heat resistant pad, and do the same thing with the next flower in the group.  Take the second flower and place in the center of the first.  The embossing powder will “glue” the flowers together.  Continue doing this for each layer of the flower. Make 3 large flowers in the manner.  Use single layers of smaller flowers for fillers.

6.       Take the completed flower and slightly heat with a heat gun, and while it is hot, mist it with Tattered Angels Chalk mist.  Attach the flowers to the layout.  Add a pearl to the flower center.

Wednesday, October 31, 2012

Fantastic News!


Woo hoo! I am so excited!  I made the Heartfelt Creations Design Team! I absolutely adore their line of stamps,dies and paper and can't  wait to share with you my creations.  I've been on their team for one term before, and now I am blessed to be back.  Congratulations to all of the other new and returning designers.  Huge thank-you's to all of my friends that took the time to vote for me!  You can check out the rest of the team here.


Monday, October 29, 2012

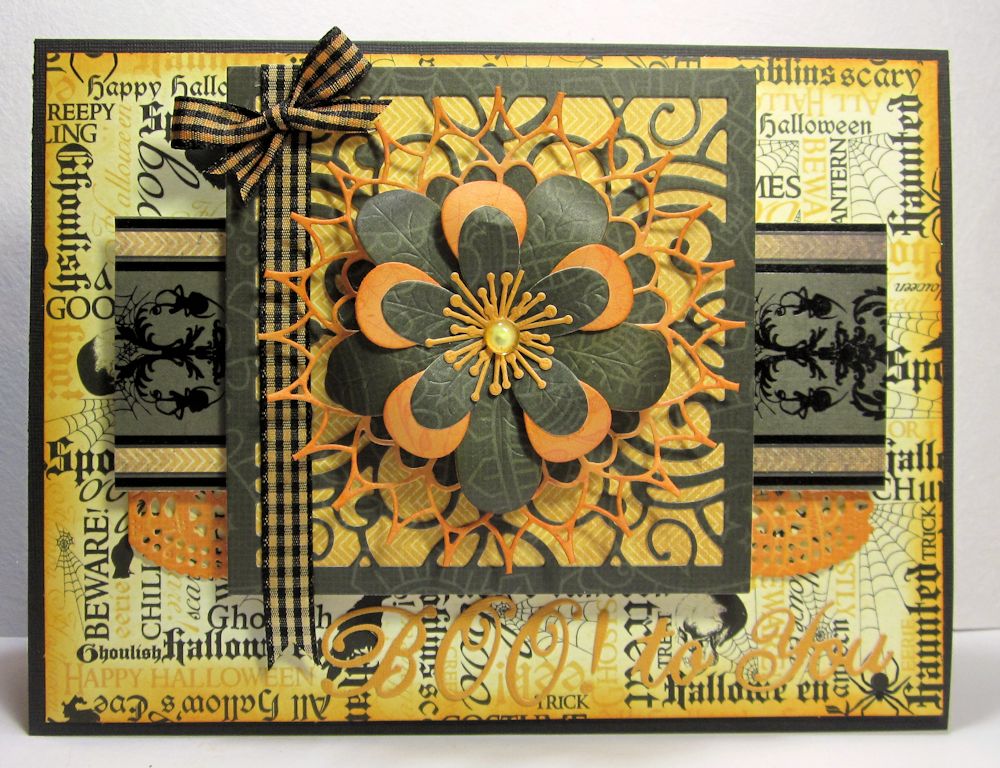
Boo To You!


I realized I really haven't made too many Halloween projects this year, so I thought I better sneak one in while I still can.  My flower was created using the leaves and petals from the Franipani set, built on a calyx from the Embellishment 2 set.  My sentiment was created using a mix of fonts and words (you).  The new Delicate Lace Script is my favorite font set ever! Such a perfect size.
 
The new challenge is up at the Cheery Lynn Designs Challenge blog, and it's one of my favorites! Vintage!  So be sure to play along for your chance to win a $20 gift certificate.
 
 
Patterned Paper - DCWV: Witches Brew
May Arts Ribbon
Robin's Nest Dew Drops


Sunday, October 28, 2012

Scor-Pal and DCWV Week

The design team from Scor-pal has been having a great time playing with the Autumn Melody stacks from DCWV this week. If you haven't seen all of the fabulous projects, be sure to go back to the  Scor-Pal blog and check them out so you don't miss a thing. The papers from DCWV's Autumn Melody stacks are wonderful to create any type of fall project and when paired with the  Scor-Pal, the ideas are endless.  This book card opens to reveal a shadow box feature as well as a handy pocket.


To get started, cut the following from a very heavy paper:
(2)  8" x 4.5"
(2)  8" x 6"

For each panel of paper, align  the long side against the top fence of the Scor-Pal.  Score at every inch.  Do this for all 4 panels of paper and accordian pleat them.


Ink the edges of all the folds.Interlock the folds, with the two longer panels running vertically and the shorter panels horizontally.  Glue each section together, in the corner intersections,  to form a rectangle.


Cut a sheet of brown cardstock from the Autumn Melody Cardstock pad - 6 3/4" x 10 3/4 ".  With the long side along the top of the Scor-Pal, score at 5" and 5 3/4".  Add patterned paper to the back of the frame using Scor-tape.
 
 
Cut 4 strips of paper from the wood grained patterned paper -
(2) 4 1/2 x 1 1/4
(2)  6 x 1 1/4

Arrange these panels on top of the accordian book frame, to form a frame with mitered corners. (See how to use your Scor-pal to easily align this in the photo below.)


Decorate the inside and outside panels as you desire.


Supply List
American Crafts Button
Helmar Zapdots