Showing posts with label Wow Embossing Powders. Show all posts
Wednesday, June 26, 2013
Heartfelt Creations and Scor-Pal
I've got a special treat for you today. Scor-pal and Heartfelt Creations have teamed up to bring you a wonderful week of projects. Be sure to check out the Scor-Pal Blog every day , and the Heartfelt Creations blog today, for all of the gorgeous creations. Sometimes a simple structure is best, if you want to add lots of beautiful embellishments. That's why I decided to make a very simple basket, to really show off the gorgeous Heartfelt Creations products.
Take a 12 x 12 piece of cardstock, and score at 4" and 8". Turn the paper to the right and score again at 4" and 8". Cut the corner blocks away, leaving a cross shape. (Leave a 1/2" tab on both sides of the upper and lower center squares to adhere the sides of the basket together.)
Apply Scor-tape to the tabs and assemble the basket.
Cut a strip of paper for the handle, and decorate with Parisian Accents border die cuts. Also add ribbon to the middle of the handle. Attach handle to the inside of the basket with the tape. That's it for the basic structure. Easy-peasy.
Next add decorative paper panels to the inside and outside of the basket. Die cut 4 sets of the Ornate Gateway dies, and adhere to each of the front panels. Stamp, cut and shape the Striped Sun Kissed Flowers. Add to the top of the handle. Add pearls to the center of the flowers and along the border of the handle. Take a bought oval tag, stamp the sentiment and heat emboss with powder. Stamp the birdhouse over the sentiment. Ink the edges, and glue a small flower to the lower corner. Cut two of the Ornate gateway toppers, and add to the sides of the tag. Finish with ribbon and twine to attach the tag to the basket.
Scor-Pal Products:
Scor-Pal
Scor-Tape
Heartfelt Creations:
Daphne Paper Collection HCDP1 234
Ornate Gateway Die HCD 737
Sunkissed Fleur Die HCD 734
Spring Season PreCut Set HCPC 3540
Heartfelt Expressions PreCut Set HCPC 3474
Striped Sun Kissed Fleur PreCut Set HCPC 3534
Other:
WorldWin Cardstock: Light Pretty Pink ColorMates
May Arts Ribbon: String/Burlap SM-17; Faux Canvas/Lightweight 444-58-20
Want2Scrap Pearls
Wow Embossing Powder - Bark
Wednesday, June 5, 2013
Heartfelt Creations Inspiration
It's Wednesday - so another day of inspiration with Heartfelt Creations! I stamped my flowers today using Ultra High Embossing Powders, which really gave them some great dimension.
Cheery Lynn Designs Products
Sun Kissed Paper Collection HCDP1 233
Striped Sun Kissed Fleur PreCut Set HCPC 3534
Sun Kissed Tags and Basket PreCut Set HCPC 3535
Classic Message PreCut Set HCPC 3354
Sunkissed Fleur Die HCD 734
Layered Scalloped Posy Die HCD 717
Other:
WorldWin Papers Cardstock, Vellum
May Arts Ribbon
Want2Scrap Pearls
Wow Embossing Powder Ultra High Gold
Clearsnap Ink
Xyron Mega Runner, Xyron Creatopia
You're the Best 6 x8" Card
Distress the edges of the patterned papers for your card layers, and then ink them with dark brown ink. Make two cuts with the dies from the Layered Scalloped Posy - lining them up next to each other to cut a circle and mounting circle. Stamp the flowers onto vellum using a watermark ink and heat emboss with ultra high powder. Cut with the matching die and assemble with pearls in the center. Swipe some rust colored ink over the edges of the flowers, and wipe away excess with a paper towel. Stamp the tag and fussy cut. Stamp a sentiment and mount a portion of the stamp on the card as shown. Finish assembling the card as shown.
Wednesday, May 1, 2013
Heartfelt Creations Inspiration
I was so thrilled when I saw the Balmy Breeze collection from Heartfelt Creations, because I completely adore anything to do with the beach. From the imagery in this set, to the sun-faded colors of the papers - I was completely in love! I used one of my favorite pictures of my nephew at the beach, for this layout.
Heartfelt Creations Products:
Balmy Breeze Paper Collection HCDP1 232
Seascape PreCut Set HCPC 3531
High Seas PreCut Set HCPC 3527
Sand and Sea PreCut Set HCPC 3528
Surfs Up PreCut Set HCPC 3529
Antique Lantern PreCut Set HCPC 3512
Tattered Blossoms PreCut Set HCPC 3468
Tattered Blossoms Die HCD 722
Gala Glitz- Blue
Dries Clear Adhesive
Other:
Clearsnap Ink: ColorBox - Harbor Pigment Ink, Blackbird Chalk Ink; Chox - Sparrow
May Arts 5/8" Eyelet Ribbon
Words or Whatever chipboard
Wow Embossing Powder - gold
Faber Castell Gelatos
Xyron Mega Runner, Creatopia
Directions: Distress the edges of the base paper. Stamp the birds in the upper right corner using a white pigment ink. Cut the patterned papers to form the basic sketch shown. Ink edges of papers and layer with foam adhesives. Stamp and fussy cut images from the Balmy Breeze sets ( anchor, palm tree, lighthouse, compass). Layer these around the photos. Stamp the sentiment from the Antique Lantern set in the center of the printed label. Fussy cut and adhere to the lower right corner of the photo. Stamp and cut with the corresponding die Tattered Blossoms flower. Layer the flowers and add Gala Glitz to the centers. Nestle around the layered elements to finish the layout.
Wednesday, April 24, 2013
Heartfelt Inspirations
It's Wednesday - so it's time to share another Heartfelt Creations project using the Balmy Breeze collection.
Heartfelt Creations Supplies
Balmy Breeze Paper Collection HCDP1- 232
Decorative Lattice Swirl Die HCD 733
Decorative Flower Pot Die HCD 732
Tattered Blossoms Die HCD 722
Beautiful You PreCut Set HCPC3532
Waters Edge PreCut Set HCPC3530
Timeless Lace PreCut Set HCPC 3508
Tattered Blossoms PreCut Set HCPC3468
Other:
Words or Whatever Chipboard banner
WorldWin Papers - cardstock
Want2Scrap Pearls
May Arts 3/8" Ribbon - GC-8-16
Stickles
Clearsnap Chox Ink -
Wow Gold Embossing Powder
Xyron Mega Runner
Directions- Make a 6 x6 easel card. Ink and distress the base layers (5 3/4" x 5 3/4") Stamp greenery on the upper base page, using the Waters Edge stamp. Cut the flower pot from patterned papers using the HC die. Ink the edges. Use foam adhesive to attach to the card. Stamp and cut with the corresponding die the Tattered Blossoms. Shape the flowers and attach to the flower pot.Use pearls for the flower centers. Add a decorative lattice swirl behind the flowers. Stamp and cut the leaves. Nestle ribbon bows into the floral arrangement. Use a chipboard banner to decorate the bottom layer of the card. Color with ink, let dry and stamp the Timeless Lace stamp with Versamark ink onto the chipboard. Heat emboss with gold powder. Add pearls and ribbons to finish decorating.
Heartfelt Creations Supplies
Balmy Breeze Paper Collection HCDP1- 232
Decorative Lattice Swirl Die HCD 733
Decorative Flower Pot Die HCD 732
Tattered Blossoms Die HCD 722
Beautiful You PreCut Set HCPC3532
Waters Edge PreCut Set HCPC3530
Timeless Lace PreCut Set HCPC 3508
Tattered Blossoms PreCut Set HCPC3468
Other:
Words or Whatever Chipboard banner
WorldWin Papers - cardstock
Want2Scrap Pearls
May Arts 3/8" Ribbon - GC-8-16
Stickles
Clearsnap Chox Ink -
Wow Gold Embossing Powder
Xyron Mega Runner
Directions- Make a 6 x6 easel card. Ink and distress the base layers (5 3/4" x 5 3/4") Stamp greenery on the upper base page, using the Waters Edge stamp. Cut the flower pot from patterned papers using the HC die. Ink the edges. Use foam adhesive to attach to the card. Stamp and cut with the corresponding die the Tattered Blossoms. Shape the flowers and attach to the flower pot.Use pearls for the flower centers. Add a decorative lattice swirl behind the flowers. Stamp and cut the leaves. Nestle ribbon bows into the floral arrangement. Use a chipboard banner to decorate the bottom layer of the card. Color with ink, let dry and stamp the Timeless Lace stamp with Versamark ink onto the chipboard. Heat emboss with gold powder. Add pearls and ribbons to finish decorating.
Thursday, April 4, 2013
Today's Beautiful Moments
Do you ever see a piece of paper, and just want to keep holding it, because it is so beautiful? That's how I feel about the WorldWin Petallics. They are the most elegant papers ever! The beautiful colors are so shimmery due to the mica-infused coating. I wanted to create a card that really played up these characteristics, so I thought dry embossing would do the trick.
On this side view, you can see the shimmer a little better. And look how gorgeous this paper accepts stamping and heat embossing. This is a 5x 7" card - and the really great thing, is that WorldWin has matching envelopes in 5 different sizes in the Autumn Hay ( and 12 other Petallic colors).
WorldWin Papers
Metallic Foil Gold
Hampton Art Stamps
Words or Whatever Chipboard
May Arts Ribbon
Wow Embossing Powder
Anna Griffin Embossing Folder
Poppy
Xyron
Friday, March 8, 2013
Words or Whatever - WOW March Release!
Today marks the new release at Words or Whatever - WOW Chipboard. I have a layout to share with you that uses some of my favorite chippies - but I have to admit - these aren't from the new release. My package with the new goodies will arrive later, but I didn't want to miss out on the fun, so I just created a layout with some of the pieces already in my stash.
Doesn't this Bamboo Tree look amazing with the Graphic 45 Bird Song Paper? It was like they were made for each other! I colored the tree with Smooch Inks - such an easy way to add color and sparkle.
The title, Sisters & Friends, was colored in the same way.
This photo just shows a little of the depth on this layout. I've been making my own foam adhesives using craft foam, and running it through my Xyron Creatopia with permanent adhesive. It is such an easy and inexpensive way to build up those layers.
Please do have a look at the Words or Whatever - Wow blog, so you can actually see the new release! There are so many fun designs this time and the rest of the design team has done a marvelous job! While you are there check out the past design team inspiration. Every week, one of the designers floods the blog with amazing projects, fantastic tutorials and so much chippie goodness, you really don't want to miss it. And remember, we also have a monthly challenge. This time, it's super-duper easy - Just make a layout and use a little Wow on it. You have until March 15th to link up. We hope you will play along with us.
Supplies
Graphic 45 Bird Song Patterned Papers
Graphic 45 Staples: Metal Butterfly; Metal Buttons
Words or Whatever -WOW chipboard: Bamboo Tree; Sisters & Friends
Spellbinders dies: Labels 28; Enchanted Labels 28
May Arts Ribbon: Paper Cord 420-10
Wow Embossing Powder: Cotton Candy, Angel Wings
Wednesday, January 30, 2013
Family Another Word for Love
Since it's Wednesday, that means I get to share another Heartfelt Creations Project with you! Today I've got a layout that I made using a picture of my sister and sweet little nephew. We took this at the local pumpkin patch this fall.
I love the detail that the matching stamps and dies give to these flowers.
The chipboard title (from Words or Whatever -Wow) was embossed using several colors of powder.
Heartfelt Creations Supplies
Other Supplies:
Spellbinders Foliage Two
Words or Whatever - Wow Chipboard (Family Another Word for Love)
May Arts Ribbon - 1.5" Crochet NP 10
Wow Embossing Powder - Ultra High Gold, Earthtone Pepper, Cable Car Red
WorldWin Papers Cardstock
Clearsnap Ink - Color Box Chalk - Dark Peony, Chestnut Roan
Top Boss Embossing Ink
Xyron Mega Runner
Xyron Mega Runner
Glimmer Mist - Rum Punch
Copics: R39, YG95, YG97, E74, E77
Directions for 12 x 12 layout:
Stamp the Burlap background directly onto your background page using embossing ink - and emboss with gold. This will be the mat for your photo. Line the Decorative Blossoms Corner die up, to cut two adjoining corners, that will make a lacey semi-circle, using a light colored patterned paper. Glue this so that it slightly overlaps the bottom right corner of the embossed burlap. Add your photo over the burlap. Stamp and fussy cut the Weathered Fence and color with copics. Layer this to the left of your picture. Stamp the Vintage Floret flowers using the Dark Peony ink and cut with the coresponding die. Mist with Glimmer Mist, shape and assemble. Add foliage around the flowers and add to your layout. Heat emboss the chipboard title and and to the layout to finish.
Sunday, November 18, 2012
Scor-Pal and Hampton Art Wrap-Up
This time of the year, people are always on the look out for cute projects that are easily and inexpensively made, to had out as those last minute gifts. This treat holder really fits the bill. It was designed to hold Ghiradelli Chocolate Squares, but you could tweak the measurements to hold any treat that you would like to use. It's so quick to put this together using the Scor-Pal! And since we are talking chocolate here - the sentiment stamp from Hampton Art was perfect!
Echo Park Patterned Paper - Very Merry Christmas
Best Creation Glitter Paper
WorldWin Cardstock
Hambly Screen Prints Transparency
Cheery Lynn Designs Holly Leaves B183
Spellbinders Labels Nineteen
May Arts 377-38-14 Metallic Velvet
Wow Embossing Powder
Robin's Nest Dew Drops
Cut (2) red card stock pieces 7" x 6"for the top and bottom of the box. With the 6" side along the top fence, score at 2" and 4". Turn a quarter turn, and score at 2" and 5". Score the top and bottom corner pieces to add a 1/2" tab. e.g. For the upper left corner, score at 1 1/2", only down to the 2" mark. Do this for all four corners and trim away the rest of the corner paper.
Cut decorative paper to cover the box top and bottom:
(5) 1 3/4" x 2 3/4"
(4) 1 3/4" x 1 3/4"
Ink the edges of the patterned papers using the Dark Moss ink. Attach these papers to the box form before you assemble it - that way you can easily punch two holes into the top, to tie your ribbon through. After the holes are punched, assemble the box top and bottom using Scor-tape.
Cut the transparency 9" x 10 1/4". Score at 1 7/8"; 4 3/4"; 6 5/8"; and 9 1/2". Attach the tab using Scor-tape, and slide the sleeve into the box bottom. Add your treats, and top with the lid.
To decorate the box, stamp and emboss the Hampton Art sentiment, using gold embossing powder. Cut using a die cut, and frame the cut with a nesting cut from red glitter paper. Add die cut holly leaves, and red Dew Drops for the holly berries.
Keep a few of these ready throughout the holidays!
Friday, November 2, 2012
Cream Layout
Supplies
Heartfelt Creations Classic Editions Collection Paper Pad
Wow Embossing Powder Ultra High Clear; Pepper
Dusty Attic Chipboard
Vintage lace, embroidered organza
Mix’d Media Inkz – Leather
Versamark Ink
WorldWin Papers Cardstock
Ranger Melting Pot
Heat Gun
1.
Roughen
the edges of the base page using a distressing tool, then ink the edges with
brown ink. Cut an 11” square sheet of
patterned paper, attach to the base and paint with gesso. Allow to dry.
2.
Randomly stamp the Vintage Word Background using
water mark ink, and emboss using Pepper colored powder. Glue a piece of lace
down the left side of the page. Dry
emboss a panel of white cardstock and add over the lace. Add another light coat
of gesso over this, and rub the gesso away from the embossed areas of
text. Stamp a few flower swirls from the
Tattered Blossom Swirls. Layer a piece of embroidered organza or other sheer
fabric, under the area where the photograph will go (extending beyond the space
for the photo).
3.
Randomly spritz the entire page with the
Iridescent Gold Glimmer Mist. Paint the
chipboard pieces with Gesso, allow to dry, and ink the edges using the brown
ink. Apply to the page.
4.
Using the cream and black patterned paper from
the paper pad, stamp and cut multiple flowers in all sizes from the Tattered
Blossoms. Shape the flowers, arrange
them in stacks, but don’t glue them together yet.
5.
Heat Clear Ultra High embossing powder in a
Melting Pot. Using tweezers, dip each of
the flowers into the molten powder – starting with the bottom flower of the
stack. Remove a flower, set it on a heat
resistant pad, and do the same thing with the next flower in the group. Take the second flower and place in the
center of the first. The embossing
powder will “glue” the flowers together.
Continue doing this for each layer of the flower. Make 3 large flowers
in the manner. Use single layers of
smaller flowers for fillers.
6.
Take the completed flower and slightly heat with
a heat gun, and while it is hot, mist it with Tattered Angels Chalk mist. Attach the flowers to the layout. Add a pearl to the flower center.
Thursday, October 25, 2012
Heartfelt Prayers
I really love the homespun feel of these papers from Farmhouse Paper company! I created the flowers using Spellbinders Rose Creations and Glimmer Mist. The sentiment and the flourish at the bottom are from the JustRite Vintage Filagree Fancies (designed by Becca Feeken). I also used the rose stamp from that set to make a watermarked image underneath the embossed sentiment. It doesn't jump out at you, but adds another layer of interest.
May Arts Ribbon
Wow Embossing Powder
Xyron Mega Runner
Challenges:
JustRite: Flower Power
Wednesday, October 17, 2012
Autumn Breeze
Well, today is the final day to vote for your favorite semi-finalists at the Heartfelt Creations blog - so if you haven't done so, could you take a moment and check it out? Just by voting you will be entered to win a $50 gift certificate (and you would be helping this girl out!)
I've got the details on how I created this layout, and all of my supplies listed below. Thanks for stopping by!
1.
Take base
page ( Corner blackberry) and water distress the edges. After the page is completely dry, randomly
swipe the edges using watermark ink, and sprinkle with ultra high gold
embossing powder and heat set. Tuck gold crocheted lace behind any tears along the edge. Glue this entire sheet to a plain piece of
cardstock.
2.
Cut patterned papers for each of the panels as
shown. Ink the edges using Leather ink,
and then use a distress tool along the edges. Tuck a piece of crocheted lace
under the long panel on the left side before gluing to the base. Use dimensional foam to attach the other
panels.
3.
Stamp the flower trio from the Tattered Blossoms
Swirl set onto white cardstock, and fussy cut the image. Color using Copic markers.
4.
Stamp 5 of the smallest Tattered Floral flowers,
and 2 of the second smallest – using brown archival ink. Heatset the ink. Using the matching die set, cut the flowers.
Paint using Creative Inspirations Paint and allow to dry. Shape the flowers
using the McGill tools and mat. Layer the flowers on the stamped base and add
pearls to the centers. Tuck chipboard
swirls behind the flower cluster. Attach
above the photograph.
5.
Die cut words from the Spellbinders Girly Grunge
Labels and attach directly to the photograph.
6.
Stamp, cut and color multiples of all 5 sizes of
the Tattered Blossoms as above. Shape
and layer the petals as shown to create varying blossoms.
7.
Build the flower cluster on the page, starting
with a die cut flourish from the Decorative Dutch Iris set. Center your largest flowers in the center of
the cluster, adjacent to the photograph.
Make sure some of the cluster touches the photo to help maintain a nice
balance. Build the cluster up by adding the smaller flowers to the outer
edges. Add glass glitter to some of the flower centers, pearls to others.
8.
Stamp the Maple leaf from the Open Falling
Leaves set using watermark ink. Heat emboss using the Ultra High Gold embossing
powder and cut using the matching die.
Shape the leaves and nestle the around the flowers. Add a small bow made with the gold crocheted
ribbon amongst the flower cluster.
9.
Color
the chipboard letters using embossing powders and add to the upper right corner
of the layout.
Supplies
Dusty Attic Chipboard
WorldWin Papers Cardstock
Wow Embossing Powder – Ultra High Gold; Presidio Purple
Creative Inspirations Paint
May Arts Ribbons: 5/8” Crochet (361-58-10); Burlap Cord (SP25) ; Gold Crochet( HP30)
Stampendous Glass Glitter
Versamark Ink
Tuesday, October 16, 2012
Art Washes Away - Wall Art
I've got a project to share with you today that I used tons of my new Hampton Art/ 7 Gypsies stamps on. This was one of those projects that I just kept layering stamps and mists and paints to come up with a really cool surface.
Hampton Art
Stamps: 7 Gypsies Distressed
Words PS0680, Best of Times IC0150; Art
Soul DF2193
Clearsnap:
Donna Salazar Mixd Media Inkz: Patina, Pewter, Leather
Archival Dye: Mudslide
Top Boss Watermark Ink
Smooch Spritz: River Mossy, Log Cabin
Smooch Ink: Ocean Soul
WorldWin Papers Cardstock
Cheery Lynn Designs Dies: Miniature Rose; Flourish Leaf Strip
Wow Embossing Powder: Metaline Green; Ultra High Copper; Tea
Garden Green; Black Glint; Metallic Platinum Sparkle; Clear
Tools: Fiskars Fuse Die Cutting Machine
Adhesives: GlueArts Glue Glider Pro – Perma Tac; U Cut It Dimensional
Adhesive
Designer Notes:
1. Ink and stamp all pieces of the Shadow Box
Frame prior to assembling.
2. On the main
piece of the frame, stamp the Distressed Words using the Mudslide Archival
ink. Heat set.
3. Using an
open flourish stamp from Best of Times, stamp over the top of the words with
the watermark ink. Heat set.
4. Ink over
the entire surface with Pewter ink.
Randomly apply Patina, and apply Leather around the edges. Take a paper towel and rub to remove excess
ink from the embossed areas.
5. Fill in
areas of the flourish stamp with Smooch ink.
Blot immediately with a paper towel to soften.
6. Randomly
stamp a few areas with the Distressed Words and the Mudslide ink.
7. For the
inside of the shadow box, mist with Smooch spritz. Allow to dry, and stamp the sentiment with
watermark ink, and sprinkle with black embossing powder. Heat set.
8. Ink the
fence with the same Mixd Media Inkz as above, adding more of the brown. Randomly sprinkle with the Copper and Green
embossing powders and heat set.
9. Emboss the
lamppost with the Platinum powder and heat set.
Add handmade flowers and die cut leaves to embellish.
10. Ink all
remaining pieces of the frame (fronts and backs) with the Patina ink. Assemble as shown.
Thanks for stopping by!
Challenges:
Simon Says - Dies/Punches
Stamp and Show - Favorites (Using Mists to build layers)
Challenges:
Simon Says - Dies/Punches
Stamp and Show - Favorites (Using Mists to build layers)
Tuesday, October 9, 2012
Heartfelt Creations - I Believe In You
I have had so much fun playing with Heartfelt Creations stamps, dies and papers and am excited to share a card with you today! In case you don't know, I was named a semi-finalist for their Design Team - and now it's up to you to vote for your favorite semi-finalists (and returning team members), to see who will be on the team. If you haven't voted, I would be honored and thrilled, if you could take a moment and vote for me. Just for voting, you have a chance to win a $50 gift certificate! There is one poll for the semi-finalists and one for returning members (and each poll offers a prize).
So now, onto the details of this card. My papers are all from Heartfelt's new paper line - Classic Editions Collection and features the Tattered Blossoms collection of stamps and dies.
Supplies:
Heartfelt Creations Tattered Blossom Swirls Pre-Cut Set HCPC 3469
Heartfelt Creations Tattered Blossoms Pre-Cut Set HCPC3468
Heartfelt Creations Tattered Blossoms Die HCD722
Heartfelt Creations Posy Patch Swirls Pre-Cut Set HCPC 3304
Heartfelt Creations Western Broncos Die HCD 720
Heartfelt Creations Decorative Butterfly - Border Die HCD 702
Heartfelt Creations Classic Editions Collection Papers
Spellbinders Romantic Rectangles
Spellbinders Fancy Tags Three
Kaisercraft Sparklets
May Arts 1.5" Satin Pleats Ribbon - 379-15-47
McGill Paper Blossoms Paper Tool Kit and Mat
Gathered Twings Distress Ink, Seedless Preserves Distress Ink
Tattered Angels Glimmer Mist - Creme de Rouge
Wow Embossing Powder - Sierra Sunrise
Clearsnap Fairy Dust Glitter - Pralines and Cream
Helmar Spray Adhesive
Dries Clear Adhesive
Bazill Cardstock
1. Randomly stamp the large swirl flower from the Tattered Blossom Swirls pre-cut set using Versamark Ink. Heat emboss with glitter embossing powder. Ink the edges of the panel with Gathered Twigs Distress ink.
2. Cut two nesting frames from the Spellbinder's Romantic Rectangles set, in coordinating papers. Keeping the papers in the dies, ink the edges as a stencil. Cut a journaling square from the patterned paper and layer on the smallest Romantic Rectangle. Attach to the card base using dimensional foam.
3. Adhere May Arts Pleated Satin Ribbon (with adhesvie only down the center portion of the ribbon). Die cut two borders from the Decorative Butterfly - Border set. Ink the edges and tuck under each side of the ribbon.
4. Die cut the tag from Spellbinder's Fancy Tags Three, ink the stencil and stamp the sentiment from
Posy Patch Swirls set.
5. Stamp the three flower cluster form Tattered Blossom Swirls onto white cardstock and fussy cut the image. Color the image using Copic markers.
6. Stamp 3 coordinating flowers for each of the three -flower cluster using the Tattered Blossoms Pre-cut set (for a total of 9 flowers. Die -cut these using the matching Tattered Blossoms die. Spray the flowers with Tattered Angels Glimmer Mist and allow to dry.
7. Shape each of the flowers using the McGill Paper Blossoms Paper Tool Kit and Mat. Glue the flowers onto the base flower, aranging the petals, so there are no gaps. Lightly mist with Helmar Spray Adhesive, and then sprinkle with Clearsnap Fairy Dust Glitter (Pralines and Cream). Add a Kaisercraft Sparklet to the center of each flower.
8. Attach the flower cluster to the card, to the left side of the sentiment tag. Cut foliage from the Western Broncos die, ink the stencil, and tuck behind the flower cluster.
Thanks for looking and remember to go vote!
So now, onto the details of this card. My papers are all from Heartfelt's new paper line - Classic Editions Collection and features the Tattered Blossoms collection of stamps and dies.
Supplies:
Heartfelt Creations Tattered Blossom Swirls Pre-Cut Set HCPC 3469
Heartfelt Creations Tattered Blossoms Pre-Cut Set HCPC3468
Heartfelt Creations Tattered Blossoms Die HCD722
Heartfelt Creations Posy Patch Swirls Pre-Cut Set HCPC 3304
Heartfelt Creations Western Broncos Die HCD 720
Heartfelt Creations Decorative Butterfly - Border Die HCD 702
Heartfelt Creations Classic Editions Collection Papers
Spellbinders Romantic Rectangles
Spellbinders Fancy Tags Three
Kaisercraft Sparklets
May Arts 1.5" Satin Pleats Ribbon - 379-15-47
McGill Paper Blossoms Paper Tool Kit and Mat
Gathered Twings Distress Ink, Seedless Preserves Distress Ink
Tattered Angels Glimmer Mist - Creme de Rouge
Wow Embossing Powder - Sierra Sunrise
Clearsnap Fairy Dust Glitter - Pralines and Cream
Helmar Spray Adhesive
Dries Clear Adhesive
Bazill Cardstock
1. Randomly stamp the large swirl flower from the Tattered Blossom Swirls pre-cut set using Versamark Ink. Heat emboss with glitter embossing powder. Ink the edges of the panel with Gathered Twigs Distress ink.
2. Cut two nesting frames from the Spellbinder's Romantic Rectangles set, in coordinating papers. Keeping the papers in the dies, ink the edges as a stencil. Cut a journaling square from the patterned paper and layer on the smallest Romantic Rectangle. Attach to the card base using dimensional foam.
3. Adhere May Arts Pleated Satin Ribbon (with adhesvie only down the center portion of the ribbon). Die cut two borders from the Decorative Butterfly - Border set. Ink the edges and tuck under each side of the ribbon.
4. Die cut the tag from Spellbinder's Fancy Tags Three, ink the stencil and stamp the sentiment from
Posy Patch Swirls set.
5. Stamp the three flower cluster form Tattered Blossom Swirls onto white cardstock and fussy cut the image. Color the image using Copic markers.
6. Stamp 3 coordinating flowers for each of the three -flower cluster using the Tattered Blossoms Pre-cut set (for a total of 9 flowers. Die -cut these using the matching Tattered Blossoms die. Spray the flowers with Tattered Angels Glimmer Mist and allow to dry.
7. Shape each of the flowers using the McGill Paper Blossoms Paper Tool Kit and Mat. Glue the flowers onto the base flower, aranging the petals, so there are no gaps. Lightly mist with Helmar Spray Adhesive, and then sprinkle with Clearsnap Fairy Dust Glitter (Pralines and Cream). Add a Kaisercraft Sparklet to the center of each flower.
8. Attach the flower cluster to the card, to the left side of the sentiment tag. Cut foliage from the Western Broncos die, ink the stencil, and tuck behind the flower cluster.
Thanks for looking and remember to go vote!
Saturday, September 8, 2012
Wow Embossing Powder - Hummingbird Card
Today is the Powder Puff Girls Team Blog post over at the Wow Embossing Powder Blog.
Be sure to stop over to see all of the amazing projects created by my team
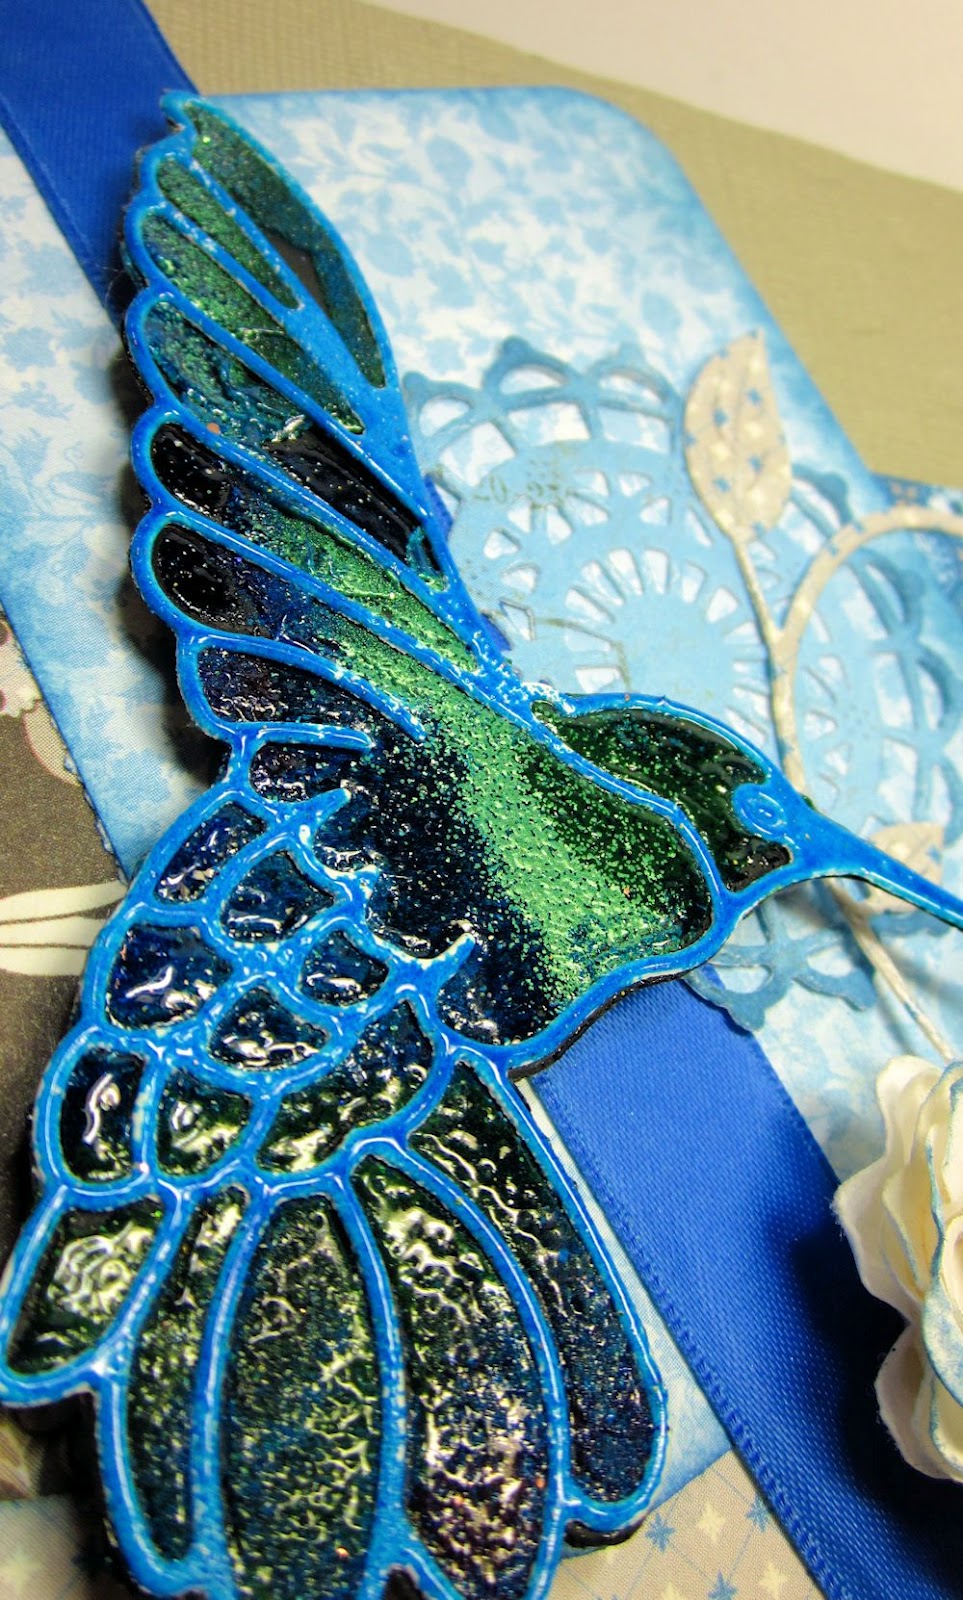
members! For my project, I made a card using the Cheery Lynn Lace Humingbird die backed with Scor-tape sheets. The embossing powders were used to color in the sections of the bird to create a stained glass effect.
Challenges:
Mojo Monday - sketch
Supplies:
May Arts Ribbon - SATIN/REVERSIBLE RP44
Authentique Patterned Paper - Journey
Core'Dinations Cardstock
Clearsnap Ink
Challenges:
Mojo Monday - sketch
Subscribe to:
Posts (Atom)


