Showing posts with label Creative Inspirations Paint. Show all posts

Tuesday, January 22, 2013

JustRite Stampers Thank You Card


JustRite Stampers has been on a break from their challenges - so this is the first one of the new year. So, you know I had to play along!  This was a sketch week, which is always fun.

I stamped and embossed my background using Elegant Fronds. I then cut it using Spellbinders Resplendent Rectangles.  The Thank You is from Grand Sentiments (although it is supposed to be all on one line - I cut the words apart so I could center them in a circle.)  I added the Fancy Round Frame from Wow - Words or Whatever Chipboard - Isn't it gorgeous?!! It was bare chipboard, and I painted it with sparkly paint from Creative Inspirations.  The ribbon embellishment was made using May Arts Silk Ribbon and my favorite - Paper Cord.


Thanks for stopping by! I hope your week is great.

Wednesday, January 2, 2013

Heartfelt Creations Inspiration


Love Is Enduring
6 x 6 card
Heartfelt Creations Products
HCPC 3508 Timeless Lace PreCut Set
HCPC 3499 Delicate Asters and Butterflies PreCut Set
HCD 728 Timeless Amour Die
HCDP1 228 Timeless Amour Paper Collection
Zip Dry Glue
Other:
Want2Scrap Pearls
Bazzill Cardstock
Creative Inspirations Paint: Tutu Pink; Emerald; Green Olive; Carmel
May Arts Ribbon: GC-8-35
ColorBox Ink

Directions:
Cut a 5.75" square of the dark patterned paper from the paper collection. Stamp the Timeless Lace along the right side of the pape, using a cream colored ink. Ink the edges of the paper with Merlot ink. Mount to the 6 x 6 cardbase. Cut a decorative piece of paper 4 x 5.75". Mount to the left of the base. Die cut the fancy heart and glue to the center of the card. Cut the sentiment from the paper collection and use foam adhesives to mount on a slightly larger rectangle cut from cream patterned paper. Glue to the center of the die cut. Add preals between the two patterned papers. Stamp and cut the butterfly and paint using transparent glimmer paints. Add a fancy bow and use foam adhesives to add the butterfly to the bottom right corner.

Wednesday, October 17, 2012

Autumn Breeze


Well, today is the final day to vote for your favorite semi-finalists at the Heartfelt Creations blog - so if you haven't done so, could you take a moment and check it out?  Just by voting you will be entered to win a $50 gift certificate (and you would be helping this girl out!)


I've got the details on how I created this layout, and all of my supplies listed below.  Thanks for stopping by!


1.        Take base page ( Corner blackberry) and water distress the edges.  After the page is completely dry, randomly swipe the edges using watermark ink, and sprinkle with ultra high gold embossing powder and heat set. Tuck gold crocheted lace  behind any tears along the edge.  Glue this entire sheet to a plain piece of cardstock.

2.       Cut patterned papers for each of the panels as shown.  Ink the edges using Leather ink, and then use a distress tool along the edges. Tuck a piece of crocheted lace under the long panel on the left side before gluing to the base.  Use dimensional foam to attach the other panels.

3.       Stamp the flower trio from the Tattered Blossoms Swirl set onto white cardstock, and fussy cut the image.  Color using Copic markers.

4.       Stamp 5 of the smallest Tattered Floral flowers, and 2 of the second smallest – using brown archival ink. Heatset the ink.  Using the matching die set, cut the flowers. Paint using Creative Inspirations Paint and allow to dry. Shape the flowers using the McGill tools and mat. Layer the flowers on the stamped base and add pearls to the centers.  Tuck chipboard swirls behind the flower cluster.  Attach above the photograph.

5.       Die cut words from the Spellbinders Girly Grunge Labels and attach directly to the photograph.

6.       Stamp, cut and color multiples of all 5 sizes of the Tattered Blossoms as above.  Shape and layer the petals as shown to create varying blossoms.

7.       Build the flower cluster on the page, starting with a die cut flourish from the Decorative Dutch Iris set.  Center your largest flowers in the center of the cluster, adjacent to the photograph.  Make sure some of the cluster touches the photo to help maintain a nice balance.  Build the cluster up by  adding the smaller flowers to the outer edges. Add glass glitter to some of the flower centers, pearls to others.

8.       Stamp the Maple leaf from the Open Falling Leaves set using watermark ink. Heat emboss using the Ultra High Gold embossing powder and cut using the matching die.  Shape the leaves and nestle the around the flowers.  Add a small bow made with the gold crocheted ribbon amongst the flower cluster.

9.         Color the chipboard letters using embossing powders and add to the upper right corner of the layout.
Supplies


Dusty Attic Chipboard

WorldWin Papers Cardstock

Wow Embossing Powder – Ultra High Gold; Presidio Purple

Creative Inspirations Paint


Stampendous Glass Glitter


Versamark Ink


Sunday, August 12, 2012

Mojo Monday on Sunday


I always love the sketches at Mojo Monday, but usually forget to play along. Well, tonight, I remembered to get this card finished and posted before the time runs out!


Papers:  SEI
Stamps: Verve
May Arts Ribbon
Cheery Lynn Designs Dies
Spellbinders Dies
Kaisercraft Pearls
Creative Inspirations Paint

Challenges:
Mojo Monday: Sketch
Simon Says: Tic Tac Toe
Stamp and Show: Paint it Up

Tuesday, July 10, 2012

May Arts Ribbon - DT Round Two


I can't even begin to tell you how excited I was when I saw that I had made it to the finalist round for the May Arts Ribbon Design Team.  So next came the fun part - designing my project for the final round - which is what I am sharing with you today.


You know I love making my own flowers - and making my own flowers with yummy May Arts Ribbons?!!  Ah, it just doesn't get any better.  I wanted a way to showcase a wide variety of flowers, and teach you how to make them all.  My project is a mini album, which includes tags with the Reader's Digest version of the tutorials.  (Don't worry, the full tutorials, with lots of pictures are all in this post).

But for now, I'll show you the book pages, with their how-to tags.


Are you ready to explore a little further? Then come on, and visit my Ribbon Garden!


Front Cover


 Flowers
 Velvet Cockscomb Flower
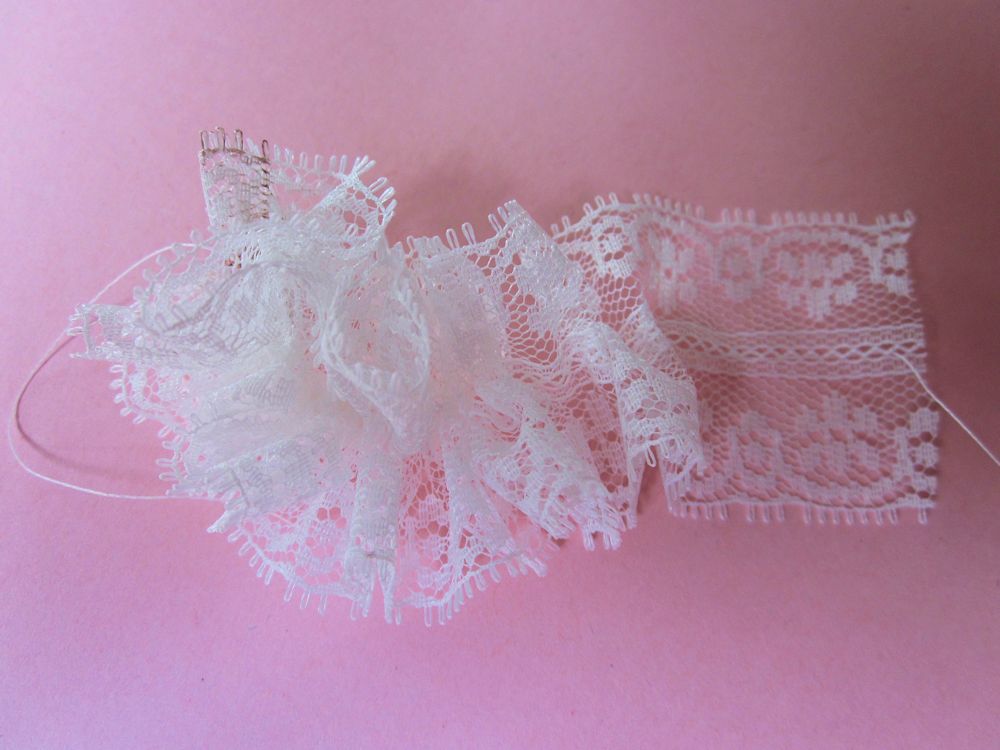
 Gathered Lace Flower
 Tea-dyed Sheer Frayed Flowers
Ribbon Embellished Die-cut Leaves

Ribbons

Gathered Lace Flower

Cut a length of lace about 18" long.  Thread a needle and tie off around the center end of the lace.


Make running stitches down the center of the lace.


Gather tightly and tie the two ends together to form your rosette.


Add buttons or paper flowers for the center. 

**The flowers on the front cover just seemed too white, so I soaked them in a strong bath of tea for a minute or so....

I also used the Sheer Frayed Flowers on the cover, and gave them the same tea treatment.  Various ribbons will respond to the tea or any other dye differently.


Ribbon Embellished Die-Cut Leaves

I used this technique throughout the book, with various ribbons.  Here I am showing you the burlap, but the 2.5" net did a fantastic job of adding texture to more intricate dies. 

Glue your ribbon onto cardstock and let dry completely.  Run through your die-cut machine as normal.


Velvet Cockscomb Flower


Take an 18" piece of 3/4" wide velvet ribbon.
Fold the ribbon in half, length-wise.  Sew a running stitch along the raw edges, forming a tube.  Gather the ribbon, and tie-off.  Form a small circle, for the center of the flower, at one end of the gathered ribbon, and stitch into place.  Reverse the direction of the ribbon, and wind around the center, and stitch into place. Continue wrapping the ribbon in a serpentine fashion, and stitching in a pleasing formation. 


Page One


Flowers
Tattered Twill Flower

Ribbons


Tattered Twill Flower


Cut a 24" piece of 1 1/2"Twill Ribbon, and cut tabs along one edge.  Cut tabs on the opposite edge, but make sure they are off-set from the first side.


Fold the ribbon, a little less than half, so that the edges are off-set.  Sew a running stitch along the folded bottom.

Gather the ribbon, coil the ribbon into a flower and stitch into place.


Page Two


Flowers
Spider Web Rose
Rolled Rosette Flower

Ribbons


Rolled Rosette Flower


Cut a 1 1/2" circle from a sheet of Scor-Tape.  Remove one side of the backing.


Starting in the center, roll the ribbon in a rosette pattern, until all of the tape is covered.
Remove the other side of the backing and attach to your project.


Spider Web Rose


Cut a 2" circle from cardboard, and find the center, and poke a hole.  Take a length of twine, knot one end, and thread a needle on the other.  Come up from the back of the circle, and go around the edge and back up through the hole - forming a spoke. Form a total of 9 spokes (or any odd number).  Tie the twine off in the back. 
Tie a knot in the end of your ribbon, thread the other end through a large needle, and bring the ribbon up through the center hole.

Start weaving the ribbon over and under the spokes. (I find this much easier to do if the ribbon is threaded through a needle). Continue until the entire circle is covered, and glue the end of your ribbon to the underside of the circle.


Page Three

Flowers
Lollipop Flowers

Ribbons


Lollipop Flowers

For each flower, cut 5 concentric circles - freehand, from wide satin ribbon.

Hold each circle carefully, beside a candle flame.  This will melt and seal the satin ribbon, as well as cause the circle to cup.

Stack the circles and glue them together.  Add a decorative button to the center to finish the flower.

Page Four


Flowers
Rolled Rosette Flower (also on p.2)
Gathered Lace Flower (also on cover)

Ribbons

Page Five

Flowers
Five Petal Posy

Ribbons

Each flower will require 5 small, 5 medium and 5 large circles, cut from a wide satin ribbon.


Melt the edges of each of the circles, as you did for the Lollipop flowers above.
Take one of each sized circles, for each petal, and line them up with bottoms even.  Pinch the grouping together and stitch to hold.  When all five petals are completed, sew them together to form your flower.  Add a knot of Net for the center of the flower.
Page Six


Flowers
Bias Cut Satin Carnations

Ribbons

Bias Cut Satin Carnations

Take 24" of bias cut satin ribbon, and cut fringe along the edge.  Vary the width and the depth of each cut.  Put a small section of the ribbon between your thumb and foreginger, and gently "pluck"  to remove some of the fibers.

Do this for the entire length of ribbon.  Start winding the ribbon into a rosette, and stitch into place.


I hope you have enjoyed visiting my Ribbon Garden, and hope that you will be "planting" your own ribbon flowers on many projects. And thanks for sticking with me on the longest blog post I've ever written!  If you are inspired to make any ribbon flowers, I would love to see them!


May Art Ribbons
Cheery Lynn Designs Dies
Oval Doily Stacker One
Fanciful Flourish
Judy's Blooms
Ribbon Eyelet Border
Mega Fanciful Flourish
Fiona's Magic Mirror
Dutch Scallop Square
French Lattice Large
Anastasia Border
Pair of Ferns
English Tea Party
Build a Flower One

Carta Bella
Beautiful Moments Patterned Paper

Worldwin Papers
Cardstock - ColorMates

Jolee's
French General tags, buttons

Epiphany Crafts
Epoxies - Bubble Caps Round 14

Want2Scrap
Paradise Chipboard Album

Creative Inspirations Paint

Ranger
Distress Ink, Distress Paint

Glue Arts
 GlueGlider Pro

Friday, March 9, 2012

Creative Inspirations Paint and Great Impressions Stamps Blog Hop


Hi! And welcome to the Creative Inspirations Paint/Great Impressions Stamps Blog Hop! The designers at CI teamed up with Great Impressions stamps to help them celebrate the grand opening of their new and awesome online store and to let you see how fantastic Creative Inspirations Paints look with these stamps. You should have arrived from Deloris's blog. My stop is halfway through the hop, so if you just stumbled here, you will want to go back to the beginning, at the Creative Inspirations Paint blog so you don't miss out on some fabulous candy and plenty of inspiration! You will have until March 11th at 8:00 pm EST to complete the hop - so that gives you the whole weekend.
That's right, I mentioned candy - and it is very sweet! The winner will get to choose 5 colors of paint from Creative Inspirations and will also get a $25 gift certificate to Great Impressions! To be eligible to win, you will need to leave comments on each of the blogs and collect letters as you go to find the mystery words, and leave a comment at the end, spelling out the answer. Pretty easy, huh?


So here is my card that I am sharing today. The main image is Lady in Love (G189). I colored in some of the details with Copics, but then painted over the shadows with Creative Inspirations Paint using Sea Foam for the dress, Autumn Wheat for the background and Amethyst and Royal Purple for the frame. I also added a layer of CI's gold glitter around the border of the frame.

My background paper matched the aqua color of my lady's dress very nicely, but there was no purple to tie it together. So, the Distressed Background stamp (K94) was the perfect solution. I inked it up and was able to add the purple that I needed. This is a stamp I will be using over and over again.

To add to the vintage look of the card, I stamped the Lace Frame (H212) and embossed in white. The embossing made it seem more like a layer, rather than just background.
I absolutely adore the look of gorgeous die-cuts that have been painted in sparkly goodness!

My letter is P. Don't forget to write it down, and collect one from each blog to form the secret answer. It's time to hop on to Shanna's blog. Have fun and thanks for stopping by!

Creative Inspirations Paint

Tuesday, February 28, 2012

God is Our Refuge

My favorite way to use Creative Paperclay® modeling material is with a mold - and my favorite things to mold come from my jewelry chest. I have a beautiful, antique carved Victorian cross and thought it would make a fantastic centerpiece for a card. I made the mold using Amazing Mold Putty and used the Delight™ air dry modeling compound to cast it. After it was dry, I painted the cross with Creative Inspirations Paint in Sea Foam, which really went great with my papers. I think this card is one of those that would be lovely framed.


Patterned Papers: Bo Bunny
Cardstock: Worldwin Papers

Creative Inspirations Paint: Sea Foam
Stamps: Verve
Delight™ Air Drying Modeling Compound
Amazing Mold Putty