Showing posts with label Carta Bella. Show all posts

Tuesday, February 9, 2016

What Does the Fox Say?


Is this little fox not the cutest thing? Of course I would want to be friends with him! He was colored with the Spectrum Noir Sparkle pens.  He is just my favorite!

Supplies:
Carta Bella Patterned Papers

Wednesday, October 21, 2015

Hello Autumn with Joy Clair Stamps

 I'm really excited about the new stamp company, Joy Clair - and even more thrilled that I am part of their first design team! I will be sharing their lovely designs with you every week.  These are the best quality clear stamps I've ever used - they stamp like a dream. These stamps are perfectly clear, have no odor, have sharp and deep etch depth, adhere well to acrylic blocks, have excellent ink transfer and are resistant to yellowing. You've got to try them!

http://www.joyclair.com/ 
For my card today, I used the Hello Autumn Stamp set. This set is loaded with wonderful fall sentiments and lovely leaves and acorns - just what you need for your autumn projects. 

Be sure to check out the other stamps in the Joy Clair Store.
You can follow us on our blog, Facebook, Pinterest, Twitter, Instagram, and YouTube (in other words, we want to make it easy for us to inspire you!) And please tell them that I sent you!

Wednesday, August 19, 2015

Blessed

I've been working on getting my studio cleaned out and cleaned up, and found this picture of me with my youngest nephew.  I love the fall colors and knew it would be perfect with the Carta Bella Fall Blessings Line. I had a simple frame that I covered in paper, and added stamped/die cut shapes.  I think this is one I will leave out year round...not just for fall.


Tuesday, August 18, 2015

Crafter's Companion Birthday Week Blog Hop

Welcome to the Crafter's Companion USA Birthday Blog Hop! We have so much fun planned for you this week including inspiration, prizes and discounts at the store.  We’re celebrating the 8th birthday of our US company! We’ve put together some fantastic money-saving offers, plus a FREE gift with every order* over $35, as well as FREE shipping* & double Loyalty Points on all orders too! PLUS every retail order placed with us during Birthday Week will receive a mystery coupon in their package, worth between 20% and 50% off your first order with us in September to spend on Holiday crafting goodies! Read more: http://eepurl.com/bwhiH5.

For more info on the prizes go here.

I made a fun birthday card using some of my favorite Crafter's Companion products. 
Supplies
Carta Bella Paper
May Arts Ribbon - 444-5820 

 Blog Hop Order


Monday, August 17, 2015

Just Buzzing By

I have a thing for bees, so when I saw this Botanical Bee stamp from Technique Junkies, I had to have it.  To complete the scene, I added a honeycomb die cut background.

Sunday, August 16, 2015

Circus Time Popcorn Cart.

 I decided to remake one of my all-time favorite projects...my popcorn cart.  When I saw this Circus Party collection, by Carta Bella. I knew that I had to make a circus themed one. I used the Carta Bella Silhouette file for the big top and decorated it with die cuts.


 So, I think it's time for a party, don't you?

Saturday, August 15, 2015

I Love You


I thought this card would be lovely to share with you tonight.  The colors remind me of late summer - early fall. I stamped the Berrie Panel stamp twice, and fussy cut the images to frame my sentiment, from the Grateful Flourish Sentiments set.
 

Supplies
Technique Junkies Stamps: Berries Panel, Grateful Flourish Sentiments

Challenges
 

Thursday, July 23, 2015

Ribbon Scraps Blog Hop with May Arts


Are you a hoarder of ribbon? Even the tiny scraps? Then today's blog hop is for you! The May Arts Ribbonistas are showing you ways to make those little bits and pieces still pack a punch. Be sure to check out all of the inspiration, and leave comments....The Ribbon Lady will be giving away three grab bags of new release ribbons!

For my card, I used a couple of easy tips to stretch those ribbons.  First, the  AKB14 checkered "bow" isn't really a bow at all.  I wrapped the ribbon to the back of the card paned and attached it only on the backside (leaving the length on the front loose).  Then I had a very small piece of the ribbon that I just tied once around the ribbon, and it gives the appearance of a bow, with much less ribbon required.  The other trick that I used was with the 426-58-46 Grosgrain Stitch Print Scalloped Edge Ribbon  (It's peaking out from behind the red panel) - was to cut the ribbon in half, and use part of it along the top of the panel and one along the bottom of the panel). To wrap everything up, I added small bows using the burlap string SM28.


Tuesday, September 25, 2012

Keep Dreaming


  I have a sweet card to share with you today, that's a really simple fold, but it looks great.  You just start out with a hexagon shaped card base, make a couple of scores with your Scor-pal and you are in business!


Designer Notes:

  1.  Cut a Hexagon from cardstock with all sides 3.5” long.  Place the hexagon on the Scor-pal with the points faced right and left.  Score from top left corner to the bottom left corner, and from the top right corner to the  bottom right corner, to form a rectangle in the center of your cardstock. Fold the triangular sides in towards the center. Ink all edges.


  1. Cut another hexagon from patterned paper, with sides each 3” long. Cut two triangles from this by cutting off the two pointed sides, ink the edges and adhere to the outside of the cardbase.
  2. Cut from a coordinating paper, a panel measuring 3 ¼” x 5 ¾”.  Ink the edges and glue to the center of the cardstock.
  3. Cut a tag, 3” x 5”. Decorate the tag with a printed panel from the paper collection, matching stickers, paper flowers, die cut leaves and lace. Position the tag inside the card, and use a Crop-a-Dile to punch a hole through the tag and card.  Secure the layers together with ribbon.
  4. Punch a small hole on the point of each triangle, and use Baker’s Twine to secure the card closed. 
 
 
Scor-pal Scoring Board and Scor-Tape

Patterned Papers, Stickers: Carta Bella – Beautiful Moments

Cardstock: WorldWin Papers ColorMates – Mustard

Cheery Lynn Designs Dies: Flourish Leaf Strip (B178)

Kaisercraft Mini Paper Blooms – Honey (F645)

May Arts Ribbon – 7/8” Solid/Ivory Check (AKB10); 5/8” Crochet (361-58-10); Baker’s Twine (412-10)

Clearsnap Mix’d Media Inkz – Leather

Crop-A-Dile

Fiskars Fuse Die Cutting Machine


Saturday, July 21, 2012

Love You Always with Wow Embossing Powders


Today is the Powder Puff Girls Team Blog post over at the Wow Embossing Powder Blog.  Be sure to stop over to see all of the amazing projects created by my team members!

I've got a layout to share with you today of my beautiful sister and nephew. I am so blessed to have them in my life!  The unusual combination of Suzy West Wow colors creates an eclectic, layered layout. The corrugated cardboard shimmers with Angel Wings. The Dusty Attic chipboard was dry embossed with a Spellbinder's folder, and heat embossed with a mixture of Cable Car Red and Skyline Grey Puff. The fern fronds were misted with Tattered Angels Glimmer Mist (Apple) and then embossed with Earthtone Olive.
Carta Bella - Beautiful Moments Patterned Paper
May Arts Ribbon
Dusty Attic Chipboard
Want2Scrap Pearls
Tattered Angels Glimmer Mist (Apple, Suede)
Clearsnap Ink
GlueArts Adhesives

Tuesday, July 10, 2012

May Arts Ribbon - DT Round Two


I can't even begin to tell you how excited I was when I saw that I had made it to the finalist round for the May Arts Ribbon Design Team.  So next came the fun part - designing my project for the final round - which is what I am sharing with you today.


You know I love making my own flowers - and making my own flowers with yummy May Arts Ribbons?!!  Ah, it just doesn't get any better.  I wanted a way to showcase a wide variety of flowers, and teach you how to make them all.  My project is a mini album, which includes tags with the Reader's Digest version of the tutorials.  (Don't worry, the full tutorials, with lots of pictures are all in this post).

But for now, I'll show you the book pages, with their how-to tags.


Are you ready to explore a little further? Then come on, and visit my Ribbon Garden!


Front Cover


 Flowers
 Velvet Cockscomb Flower
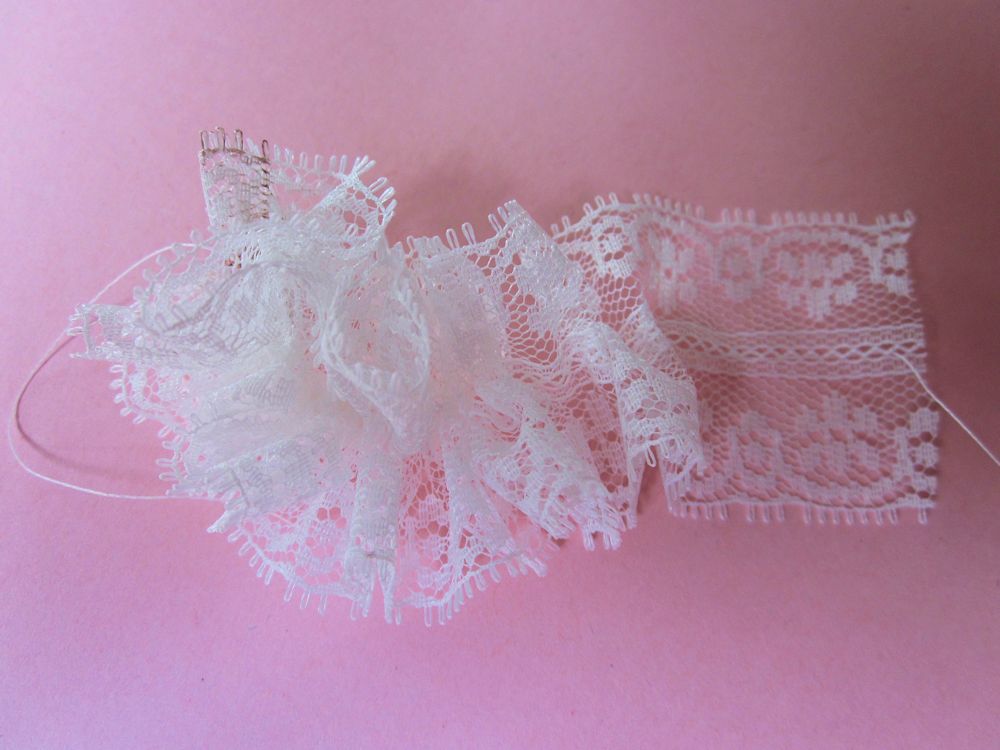
 Gathered Lace Flower
 Tea-dyed Sheer Frayed Flowers
Ribbon Embellished Die-cut Leaves

Ribbons

Gathered Lace Flower

Cut a length of lace about 18" long.  Thread a needle and tie off around the center end of the lace.


Make running stitches down the center of the lace.


Gather tightly and tie the two ends together to form your rosette.


Add buttons or paper flowers for the center. 

**The flowers on the front cover just seemed too white, so I soaked them in a strong bath of tea for a minute or so....

I also used the Sheer Frayed Flowers on the cover, and gave them the same tea treatment.  Various ribbons will respond to the tea or any other dye differently.


Ribbon Embellished Die-Cut Leaves

I used this technique throughout the book, with various ribbons.  Here I am showing you the burlap, but the 2.5" net did a fantastic job of adding texture to more intricate dies. 

Glue your ribbon onto cardstock and let dry completely.  Run through your die-cut machine as normal.


Velvet Cockscomb Flower


Take an 18" piece of 3/4" wide velvet ribbon.
Fold the ribbon in half, length-wise.  Sew a running stitch along the raw edges, forming a tube.  Gather the ribbon, and tie-off.  Form a small circle, for the center of the flower, at one end of the gathered ribbon, and stitch into place.  Reverse the direction of the ribbon, and wind around the center, and stitch into place. Continue wrapping the ribbon in a serpentine fashion, and stitching in a pleasing formation. 


Page One


Flowers
Tattered Twill Flower

Ribbons


Tattered Twill Flower


Cut a 24" piece of 1 1/2"Twill Ribbon, and cut tabs along one edge.  Cut tabs on the opposite edge, but make sure they are off-set from the first side.


Fold the ribbon, a little less than half, so that the edges are off-set.  Sew a running stitch along the folded bottom.

Gather the ribbon, coil the ribbon into a flower and stitch into place.


Page Two


Flowers
Spider Web Rose
Rolled Rosette Flower

Ribbons


Rolled Rosette Flower


Cut a 1 1/2" circle from a sheet of Scor-Tape.  Remove one side of the backing.


Starting in the center, roll the ribbon in a rosette pattern, until all of the tape is covered.
Remove the other side of the backing and attach to your project.


Spider Web Rose


Cut a 2" circle from cardboard, and find the center, and poke a hole.  Take a length of twine, knot one end, and thread a needle on the other.  Come up from the back of the circle, and go around the edge and back up through the hole - forming a spoke. Form a total of 9 spokes (or any odd number).  Tie the twine off in the back. 
Tie a knot in the end of your ribbon, thread the other end through a large needle, and bring the ribbon up through the center hole.

Start weaving the ribbon over and under the spokes. (I find this much easier to do if the ribbon is threaded through a needle). Continue until the entire circle is covered, and glue the end of your ribbon to the underside of the circle.


Page Three

Flowers
Lollipop Flowers

Ribbons


Lollipop Flowers

For each flower, cut 5 concentric circles - freehand, from wide satin ribbon.

Hold each circle carefully, beside a candle flame.  This will melt and seal the satin ribbon, as well as cause the circle to cup.

Stack the circles and glue them together.  Add a decorative button to the center to finish the flower.

Page Four


Flowers
Rolled Rosette Flower (also on p.2)
Gathered Lace Flower (also on cover)

Ribbons

Page Five

Flowers
Five Petal Posy

Ribbons

Each flower will require 5 small, 5 medium and 5 large circles, cut from a wide satin ribbon.


Melt the edges of each of the circles, as you did for the Lollipop flowers above.
Take one of each sized circles, for each petal, and line them up with bottoms even.  Pinch the grouping together and stitch to hold.  When all five petals are completed, sew them together to form your flower.  Add a knot of Net for the center of the flower.
Page Six


Flowers
Bias Cut Satin Carnations

Ribbons

Bias Cut Satin Carnations

Take 24" of bias cut satin ribbon, and cut fringe along the edge.  Vary the width and the depth of each cut.  Put a small section of the ribbon between your thumb and foreginger, and gently "pluck"  to remove some of the fibers.

Do this for the entire length of ribbon.  Start winding the ribbon into a rosette, and stitch into place.


I hope you have enjoyed visiting my Ribbon Garden, and hope that you will be "planting" your own ribbon flowers on many projects. And thanks for sticking with me on the longest blog post I've ever written!  If you are inspired to make any ribbon flowers, I would love to see them!


May Art Ribbons
Cheery Lynn Designs Dies
Oval Doily Stacker One
Fanciful Flourish
Judy's Blooms
Ribbon Eyelet Border
Mega Fanciful Flourish
Fiona's Magic Mirror
Dutch Scallop Square
French Lattice Large
Anastasia Border
Pair of Ferns
English Tea Party
Build a Flower One

Carta Bella
Beautiful Moments Patterned Paper

Worldwin Papers
Cardstock - ColorMates

Jolee's
French General tags, buttons

Epiphany Crafts
Epoxies - Bubble Caps Round 14

Want2Scrap
Paradise Chipboard Album

Creative Inspirations Paint

Ranger
Distress Ink, Distress Paint

Glue Arts
 GlueGlider Pro