Showing posts with label Verve. Show all posts

Friday, April 24, 2015

Oh So Shabby Mother's Day Card

Are you intimidated by Shabby Chic styles? No need to fear, they are really pretty easy and very fun. I'm going to show you in a few steps how to add some easy techniques to achieve this trendy look. a
 So Shabby Mother's Day Card Supplies:
010
 Step 1. Begin with a 4 x 6" card base.
 Step 2. Cut a slightly smaller panel and emboss. Sand the raised design. b  
Step 3. Cut remaining mats as shown for card. Use a distressing tool to roughen the edges. c  
Step 4. Have you ever wished that you could match embellishments to a patterned paper, and you just didn't have the right colors? It is so easy to create your own designer papers using Core'dinations and a simple background stamping. That way, you can create whatever you imagine. Randomly stamp a small image using an opaque ink. d  
Step 5. Machine stitch the stamped panel and the backing panel together.  
Step 6. Add flower clusters, cheesecloth and sentiment as shown. e
See, it's really easy to put together your own shabby chic card. Here are the key ideas to incorporate to get this look -
  • Soft, muted colors
  • Distressed edges
  • Stitching
  • Sanded embossed designs - especially florals
  • Lots of layers with textures

Saturday, December 27, 2014

Thank You

I am so thankful for the wonderful Christmas I had - and hope that you were blessed as well!  So after so much receiving, it's only appropriate to share a thank you card with you.

I fell in love with these stamps from Crafter's Companion (Frou Frou Line - Love Letters). I just crazy about their vintage charm.  I stenciled the art nouveau design (from Dreamweavers) onto the green cardstock using Imagine Crafts Electric Purple Neon Ink - don't let the "neon" scare you - this ink is fantastic for remaining bright and true on dark cardstocks.   I embossed the gold foil paper with Crafter's Companion folder, and distressed it a bit with Staz On ink in Ganache.   I framed the image with a chipboard wreath from Creative Embellishments.


 I colored the stamped image with a mix of Spectrum Noir Alcohol Ink Markers and their new  Blendable Pencils.  This was my first attempt with the pencils, so I have a bit of practicing to do... but they are really fun to play with!

Supplies
Crafters Companion Stamps: Love Letters, Frou Frou Collection
Crafters Companion Embossing Folder: Decadent Rose
Verve: Sentiment Stamp
Stencil: Dreamweavers
Chipboard: Creative Embellishments
Ribbon: May Arts
Spectrum Noir Markers: IB1, FS1, FS4, CG2, EB7
Spectrum Noir Blendable Color Pencils: 117,119,120, 063,064, 079, 081,106, 100,101.102, 043,044,045
Inks, Embossing Powder: Imagine Crafts/Tsukineko

Challenges:
Crafters Companion: December Challenge - Thank You
Spectrum Noir: December Challenge - CAS (at least my version)
Creative Embellishments: December Inspiration Challenge +Stencilling - inspired by the wreath, and jewel tone colors
Dreamweaver's Stencils - Cute and/or Quick
Simon Says Wednesday Challenge Blog - Anything Goes

Monday, July 22, 2013

Good Things Are Going To Happen

  I've got a shaped card to share with you today.


 WorldWin Papers: ColorMates, DoubleMates
Lindy's Stamp Gang: A Bit of Bubbly Starburst Spray, Geranium Coral Blush Embossing Powder
Verve Stamps: Brighter Days
Want2Scrap: Pearls


Monday, July 8, 2013

May Sunshine and Laughter Brighten Your Days

This week the DT's from Scor-Pal and Clearsnap have joined forces to bring you some amazing projects.  Be sure to check the Scor-Pal Blog and the Clearsnap Blog everyday for inspiration, and maybe a prize or two!

 It seems like the rain is never going to stop here, so I loved the sentiment that I used for this Upright Z-fold card.  This project uses a couple of different techniques, so I'm going to break them down for you, so you can make your own.

For the background paper, I took a patterned paper, and ran it through my machine with an embossing plate.

I used a brayer to apply Top Boss watermark ink over the top , and sprinkled it with Clear Embossing Powder and heat set the powder. 

I repeated the brayering and embossing two more times to build up a thick layer of embossing powder.


I inked over the surface with the Mix'd Media Inx in Truffle, and then used a paper towel to remove the ink off of the embossed areas. 

I set this to the side, and started the card base by cutting a strip of cardstock 4 1/4" x 11.  I placed the paper with the long side along the top fence of my Scor-Pal, and scored at 5 1/2" and then flipped the paper, and scored at 2 3/4".  Fold the base so that you have a small "tent" to the front of the card.

I adhered the embossed paper to the back panel of the card with Scor-tape.   I took a strip of gold paper 4 1/4" x 2 3/4" and used the City Girl Edger to cut decorative borders on each side.  A added a scrap of the embossed paper to the center of this panel and adhered to the bottom of the card. 

For my image panel, I cut brown cardstock 3 1/4" x 4 1/4" and covered it with the French Lattice Small.  I used the Coved Rectangle and Coved Rectangle Stitching Tool for my sentiment.  The stitching tool allows me to make perfect stitches around my border. I adhered the bottom of this whole panel to the base of the card.


The original directions for making this type of card relied on a tab on the back panel to tuck the front panel behind, to make it stand up, but I created a different method.  I glued a lace Corner to the back of my brown panel, and sat my card on the table, and used a Crop-a-dile to punch holes to line up with the opening in my fancy corner die.  I then ran ribbon through the holes in the card and laced it through the die cut and tied my bow.  This keeps the card standing upright, and can be untied to flatten the card for mailing. 

For the flowers, I used the Shasta Daisy Strip.  I inked the edges with Mix'd Media Chox in Butternut.  
  Then, I cut a small circle into a scrap of paper to make a template, and placed it over each flower, lining up with the center.

I spritzed into the opening with the Stephanie Barnard Tangerine Spray.  This kept the splatters just to the center of my flower.


I assembled the flowers and added some greenery to finish the card.


Clearsnap:
Verve Stamp Set - Brighter Days


Monday, May 20, 2013

Where Flowers Bloom so Does Hope

I love spring, when all of the flowers are blooming everywhere you look!  So even if your aren't much of a gardener, you can still enjoy the season with your own handmade flowers.


 Supplies:
Basic Grey Patterned Paper - Mint Julep
WorldWin Cardstock - Kraft
Want2Scrap Pearls 
Clearsnap Ink

Friday, August 24, 2012

Warmest Thanks


Last card for today! All this week, I've been enjoying reading about  the Card Design Handbook at Moxie Fab World. And of course, there are challenges going on there to test just how well you paid attention to the rules of design.  For this card, I wanted to try out the principles of the Focal Point and  wanted to focus on the vellum rose that I made using the new Cheery Lynn Designs Build a Flower 2.  I colored the plain vellum using Faber Castell Pitt Big Brush Artist pens and Art Grip Aquarelle pencils.  This let me create a very realistic striated rose petal.


The background was stamped using Verve's Artful Elegance stamp set (as well as the sentiment). The tag was cut using Verve's Tiny Sweet Scallop Die Set.  The white satin pleated ribbon is from May Arts as well as the very cool paper cord.
 
Challenges:
Moxie Fab World - Focal Point

Happily Ever After

 
Here's another card for today - an anniversary card using the Fairy Tales Stamps from Verve.
The papers are from DCWV, and the wooden accents are from Kaisercraft.
 
Challenges:
DCWV: August Card Stack-a-Holic Challenge

Fabulous- Just the Way You Are

 
Today, I have just been playing in the studio, just for fun.  I've been making challenge projects - and wanted to see how many I could get done -lol!

This card uses the oh so pretty Love's Flower stamp set from Verve.  They are having a new release party tonight over at Splitcoast Stampers. So, if you don't have plans tonight, you might want to stop by.


Challenges:
Touch Twin: Good Eats with Shadowing (My DP has apples)

Friday, August 17, 2012

More from Cheery Lynn Designs New Release


I have a second project to share with you from the new die release at Cheery Lynn Designs.  This one uses  New dies used: B207 Cross Set, B189 Sentiment Frame 1,
B190 Sentiment Frame 2, B187 Build a Flower #2;
B188 Embellishment 2, B200 Celtic Band

If you haven't gone over to the Cheery Lynn Designs Storefront - you really need to go see all of the new release! There are so many incredible dies!

Sunday, August 12, 2012

Mojo Monday on Sunday


I always love the sketches at Mojo Monday, but usually forget to play along. Well, tonight, I remembered to get this card finished and posted before the time runs out!


Papers:  SEI
Stamps: Verve
May Arts Ribbon
Cheery Lynn Designs Dies
Spellbinders Dies
Kaisercraft Pearls
Creative Inspirations Paint

Challenges:
Mojo Monday: Sketch
Simon Says: Tic Tac Toe
Stamp and Show: Paint it Up

Sunday, June 3, 2012

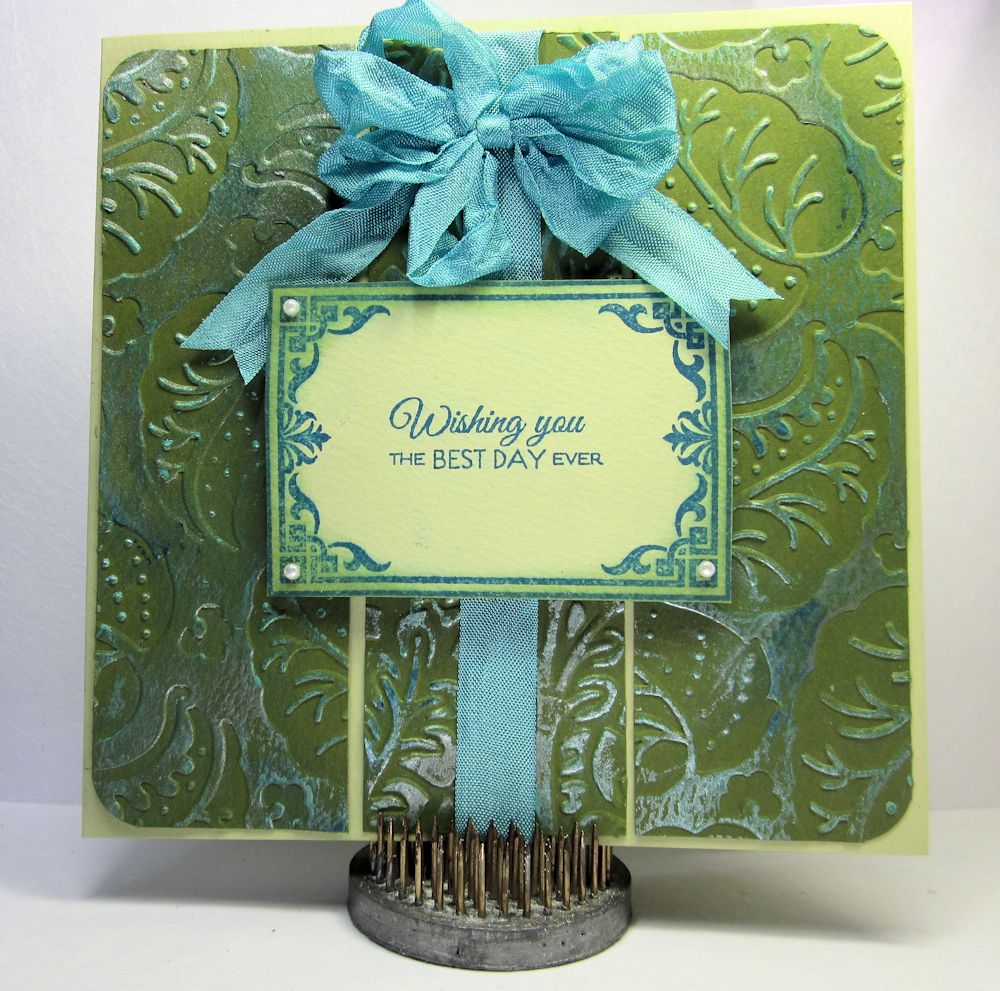
Wishing You the Best Day Ever


I love embossing! and I have a really easy card to share with you today...but it just goes to show how some beautifully detailed embossing, really dresses a project up.  I started with CutMates Cardstock from Worldwin Papers, and embossed it with the Flora M-Bossabilities folder from Spellbinders.  I then took several shades of Faber-Castell's Gelatos, and rubbed over the raised areas.  This added some subtle shading and interest. The Stamp is from Verve, and I added Distress ink around the edges to finish it off.  As my card says, I wish you the best day ever!

Challenges:
Creative Inspirations Paint: CAS
Simon Says: Anything Goes

Monday, May 28, 2012

Felt Flowers Tutorial with Cheery Lynn Designs Dies


You know making flowers is one of my favorite techniques - but they don't always have to be made from paper.  Today I have a tutorial to share with you to use your Cheery Lynn Designs Dies and felt to create gorgeous blooms.  And, these flowers don't have to stay just on your paper projects.  Imagine these on your favorite sweater, a cute summer straw hat or purse.  The ideas are endless!

So, let's get started!

Grab some felt (I used  wool felt, but feel free to use the acrylic felt found at any craft store). In order to get a nice clean cut, place a piece of cardstock, then your fabric, then your die.  Having the paper under the felt gives the die a little more "tooth" to cut.  I used the Large, Medium and Miniature Rose dies for my flower.  I also placed my die to the far left of my cutting plates, because I've found on my machine, this is the area with the most pressure.


Cut 2 Large, 2 Medium, and 1 Miniature Rose for each flower.


Instead of stitching through the whole flower stack at a time, add one layer at a time, and stitch with a cross stitch, to secure the petals adjacent to each other.


Continue adding layers, one at a time, until the stack is complete.  I sewed seed beads, one at a time for my center, but you could also add French knots, or other decorative embroidery stitches. 


For the bud, I just took one of the large roses, and stitched the petals together, and then added a green felt calyx around the petals.

I'd love to see your projects that you create using these techniques!  The new challenge is also up - For the Grad - so get those projects in for your chance to win a $20 gift certificate!

Cheery Lynn Designs Dies
Patterned Paper, Crate
Cardstock, Worldwin Papers
Ink, Ranger - Distress

Challenges:
Catered Crop: Felt

Monday, May 21, 2012

Love is the Flower


Have you ordered your new Cheery Lynn Designs dies yet? It was such a great release, I've added more to my wishlist too! The Build - a -Flower I is a must have for anyone who likes making their own flowers.  I used it to create the Clematis for this card.  I used the Princess Tree for my buds.  Something else that you might not recognize is the Wedding Vows die ~ I made two cuts with it, and just used the background portion of it for my rectangular frame.  So don't think that it is limited to wedding only projects. It's such a beautiful die, you will want to use it any time you can!


There is also a new challenge this week - Add a door or window.  This will be the perfect time to try out the new gorgeous window dies!

Cheery Lynn Designs Dies
Webster's Pages Patterned Paper
Verve Stamps

Tuesday, February 28, 2012

God is Our Refuge

My favorite way to use Creative Paperclay® modeling material is with a mold - and my favorite things to mold come from my jewelry chest. I have a beautiful, antique carved Victorian cross and thought it would make a fantastic centerpiece for a card. I made the mold using Amazing Mold Putty and used the Delight™ air dry modeling compound to cast it. After it was dry, I painted the cross with Creative Inspirations Paint in Sea Foam, which really went great with my papers. I think this card is one of those that would be lovely framed.


Patterned Papers: Bo Bunny
Cardstock: Worldwin Papers

Creative Inspirations Paint: Sea Foam
Stamps: Verve
Delight™ Air Drying Modeling Compound
Amazing Mold Putty


Monday, February 27, 2012

Kind of CAS


This week, the Verve challenge was a Clean and Simple sketch. I have to say, I am CAS challenged! As much as I try, my cards always end up a little too embellished to count as CAS! But, that's ok, I'm glad they turn out looking like me.

Spellbinders Damask Accents
Spellbinders Damask Motifs
Distress Stain - Worn Lipstick
Viva Decor Pearl Pen Cream
Verve Stamp - Fairy Tales
GCD Patterned Papers
Worldwin Papers Cardstock

Friday, January 13, 2012

Card Storage Tutorial with Epiphany Crafts

I make lots of cards, but have found that keeping them organized by occasion can be difficult. I'm going to show you how to take a simple box from your pantry and recycle it into the perfect storage solution. This is also a lovely way to present someone a set of cards as a gift.


Save a suitable box from your pantry. This one was 6.25 inches wide, so it was the perfect size to hold 6 x 6 cards.

Measure up 6.75 inches from the bottom, draw a line at that measurement around the box, and cut the top away.

On the right side, make a mark 2.5" from the bottom. Draw a diagonal line from the upper left corner to the mark on the lower right side. Repeat for the other side and cut along the lines.


You now have the basic shape for your holder. Prime the box with Gesso to help cover over the print.

Now the fun begins - Cut patterned papers to cover the box. I stamped/embossed my papers before I attached them. Use Crafty Power Tape to adhere the papers.

Add a tag to label what type of cards are in each box - this one was for Thank-you cards. After the box was complete, I realized the buttons and bows would have been more functional on the back spine, so you could stack several of these side-by-side.


Supplies
Epiphany Crafts Button Studio Accessories Buttons Round 20
Epiphany Crafts Button Studio Tool Round 20
Scrapbook Adhesives Crafty Power Tape
Patterned Papers Riddersholm Design
Stamps Unity
Wow! Embossing Powder Copper Regular
Metallic thread DMC
Memory Box Charlotte Border Die
Verve Tiny Sweet Scallop Die
Fiskars Scallop Punch
May Arts Ribbon
Ranger Distress Ink

Challenges:
Unity: Gift Wrapping Challenge
Friends With Flair: Friday Hop
Berry71Bleu Challenge: Shabby