Wednesday, September 10, 2014
Heartfelt Creations New Release - Classic Sunflower Collection
Heartfelt Creations Products and Products Carried by HC
HCDP1 247 Classic Sunflower Paper Collection
HCPC 3630 Summer's Day PreCut Set
HCPC 3627 Sunflower Stem PreCut Set
HCPC 3626 Classic Sunflower PreCut Set
HCD Classic Sunflower Die
Spellbinders Classic Oval Large
Spellbinders Floral Ovals
Other Products Used
FlowerSoft Ultrafine Black
Fun Stampers Journey - Licorice Ink
May Arts Ribbon - 1.5" Faux Burlap; Paper Cord Ribbon
Art Anthology Colorations - Warm
Copic Markers
WorldWin Cardstock
Cut a 6 x 6" patterned paper piece from the Classic Sunflower collection. Ink the edges and distress. Die cut an oval window on the left side. Stamp the Sunflower Stem on the polka dot paper. Color the image, ink the edges and glue behind the window. Add ribbon. Die cut the Floral Oval and glue around the stamped image. Stamp, cut, color and shape the Classic Sunflowers twice and use the largest flower. Add Flower Soft to the center. Apply over the stamped image using foam adhesives. Stamp the butterfly, cut, and color. Glue just the butterfly body to the card. Mount on a cardbase.
Monday, September 8, 2014
Guest Designer for Craft Hoarders Anonymous
Hi! My friend Gloria Stengel asked me a few months back to be a guest designer for her Craft Hoarder's challenge - and I couldn't have been chosen for a more fitting challenge - Challenge #15 All the Pretty Flowers. This challenge is for all of you flower hoarders! Maybe you
hoard pre-made flowers. Maybe you hoard flower punches or dies. Maybe you hoard
flower stamps. "Dig" out those flowers and use them on your project! There are some great prizes, so be sure to head over and get your entry in!
Supplies
Heartfelt Creations Delicate Asters Die Set HCD 726
Heartfelt Creations Cut Mat Create 1A Die HCD 749
Heartfelt Creations Delicate Asters PreCut Stamp Set HCPC 3494
Heartfelt Creations Delicate Asters Collection Patterned Paper HCDP1 226
Spellbinders Exquisite Labels Eleven Die
May Arts Ribbon GC07
Grand Caliber Machine
Core'Dinations Cardstock
Xyron Adhesive
Close To My Heart Ink
Wednesday, September 3, 2014
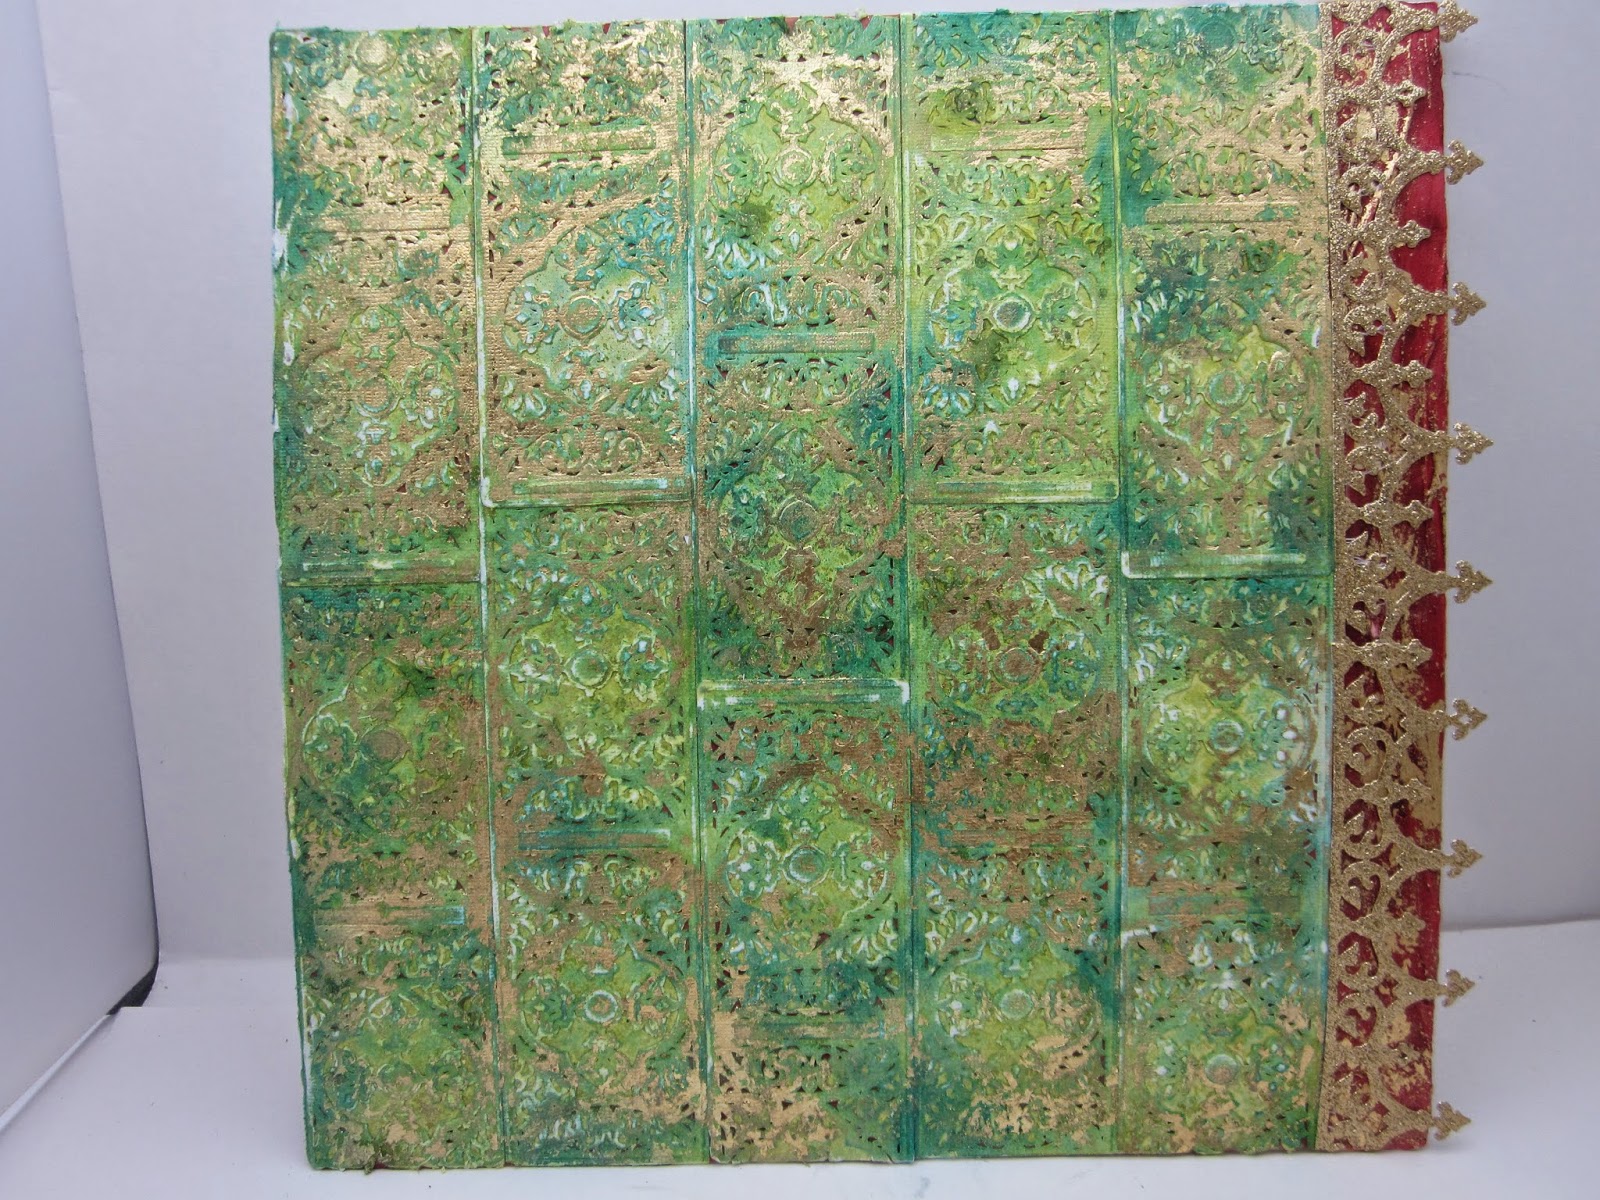
Antiqued Vintage Background for Mixed Media
Hi, today I'm going to be sharing how I created the background for this detailed mixed media canvas. As much texture as you see now it's hard to believe it started out as a wooden panel and plain cardstock - but it did!
I inked over the raised areas with Blue Lagoon ink.
I misted over the embossed area with Grass and Waimea Bay Colorations. I left a small border of red on the left side, and added Big Dip 'O Ruby and Red Velvet Sorbet paints to add more depth.
I came back in and sanded some of the high areas to add to the distressed look and put a die cut over the red border. Finally, I used a glue stick over some raised areas and added gold leaf. This produced a background that looked like it took centuries to gain this much patina and depth! Just the look I was going for!
First, I painted my board with Art Anthology Gesso and set it off to the side.
I began diecutting these panels using A Gilded Life's Vintage Brocade die.
Since my final design was going to have red poppies on it - I wanted to tie that color into the background. I sprayed Art Anthology Colorations over my gessoed surface using Heart. This way, the small openings in my embossed card stock would have red peeking through. It's not a blaring red background, but it really helped to tie it all together.
I began gluing the embossed paper to the substrate, making sure to arrange them off-set to each other.
I misted over the embossed area with Grass and Waimea Bay Colorations. I left a small border of red on the left side, and added Big Dip 'O Ruby and Red Velvet Sorbet paints to add more depth.
I came back in and sanded some of the high areas to add to the distressed look and put a die cut over the red border. Finally, I used a glue stick over some raised areas and added gold leaf. This produced a background that looked like it took centuries to gain this much patina and depth! Just the look I was going for!
I decorated my panel with handmade poppies, antique buttons, and an altered vintage book.
Thanks for stopping by!
Heartfelt Creations Inspiration
Heartfelt Creations Products and Products Carried by HC
HCDP1 246 Festive Christmas Paper Collection
HCDP1 Sunny Day Paper Collection
HCD 750 Cut Mat Create Die Set1B
HCD 734 Sun Kissed Fleur Die Set
HCD 735 Gift Ensemble Die Set
HCPC 3622 O Little Town PreCut Set
HCPC 3625 Festive Notes PreCut Set
HCPC 3557 Christmas Poinsettia PreCut Set
1259723 Art Institute Glue (Dries Clear)
Paper Blossoms Molding Mat
Paper Blossoms Tool Kit
Sparkletts
Other Products Used
May Arts Ribbon SN14
Memento Ink - Tuxedo Black; Delicata - Golden Glitz
Copic Markers
Xyron 9" Creative Station, Teresa Collins Foam Adhesives, Teresa Collins Adhesive Kit Box
WorldWin Cardstock
Die cut 4 panels from the Gift Ensemble die set to assemble into a box. Cut panels to fit on the box sides from green wood grain from the Sunny Day paper collection, and stamp the Festive Notes stamp on them with gold ink. Ink only the floral portion of the Christmas ornament from the O Little Town set, and stamp onto each panel. Color with Copic markers. Assemble the box. Stamp, cut and color the Poinsettia flowers, shape with the Paper Blossoms tools. Add a multi loop bow, and greenery cut from the Cut Mat Create 1B die set to finish.
Saturday, August 30, 2014
Sweet Hostess Gift with Hampton Art
It's always a good thing to have creative ideas for hostess gifts tucked away when you need one! Local honey is plentiful now, so I decided to create a tag to go with this sweet gift.
I used the Hampton Art honeycomb mask from SCO647 to create my background. For a quick project, I used a combination of alpha stickers from Jillibean Soup and Ki Memories. I added a couple of stamped flowers from Friends ( SC0164) and the darling bees
Supplies
Hampton Art Friends SC0164
Hampton Art/Vintologie Butterflies SC0647
Hampton Art/ Graphic 45 Botanical Tea Set 3 IC0298
Jillibean Soup Coordinating Shapes Stickers - Irish Farm House Soup jb0010
Ki Memories Alphas - Hot Date - Hottie Type 3582
May Arts Ribbon - JP1-
Wednesday, August 27, 2014
Heartfelt Creations Inspiration
Heartfelt Creations Products and Products Carried by HC
HCDP1 246 Festive Christmas Paper Collection
HCPC 3624 Festive Christmas Background PreCut Set
HCPC 3620 Festive Ornaments PreCut Set
1259723 Art Institute Glue (Dries Clear)
Other Products Used
May Arts Ribbon
Spellbinders Moroccan Accents Die
Smooch Ink
Memento Ink - Tuxedo Black
CTMH White Daisy Ink
Copic Markers
Xyron 9" Creative Station, Teresa Collins Foam Adhesives, Teresa Collins Adhesive Kit Box
WorldWin Cardstock
Cut a patterned panel to mount on a 5 x7" card base. Add a decorative paper down the center of the panel, and die cut 2 Spellbinders borders to glue on each side of the printed panel. Stamp the Festive Christmas background on black cardstock using white ink. Stamp the Festive Ornaments and cut out a single image. Color with Copics and add Smooch ink for accents. Finish with a small bow at the bottom of the card.
Monday, August 25, 2014
Zva Creative August DT Blog Hop!
Hello friends! Zva Creative and our talented Design Team
welcome you to our July blog hop! We are
very excited to kick off another blog hop and to have you join us today!
The hop begins at Zva Creative’s blog! Be sure head on over to
check it out! You will also find a complete list of all
the participating blogs there (in case there is a glitch along the way).
As you know, Zva offers many beautiful color groupings
for pearls, flowers and crystals. If you like what you see along the hop
you can find a list of stores and online retailers that sell Zva HERE.
For my project today, I wanted to show you our gems in the smoke or gray colorway. I really like using these for vintage projects where the clear crystals would just be too bright. They remind me of vintage rhinestone jewelry that has aged with a gorgeous patina.
Supplies
Zva Creative Smoke Crystal Flourishes CRW-05CB-148
Hampton Art/Graphic 45 Come Away With Me 1
Hampton Art/Graphic 45 Come Away With Me 2
Graphic 45 Typography Patterned Paper
May Arts Ribbon 397-14-35
If you would like to play along with our design team,
just follow along the blog path. I am linking to one of the Zva designers
and that designer is linking to the next and so on. Be prepared to be inspired
along the way!
The Blog Hop starts today, August 25th and runs through
midnight US Eastern Standard Time on Tuesday, August 26th.
***Prizes***
Hidden on FIVE of the blogs along the way is a Zva
Creative prize package! Winners will be randomly chosen after the hop is over.
All you need to do is leave a comment on one post... you do not need to leave a
comment on each and every designer's blog post to qualify. However, the
more times you comment along the blog hop path, the more chances you will have
to win.
The 5 winners will be announced on Wednesday, August 27th
on Zva Creative’s Facebook
page. We will do
our best to notify each winner, but it's best if you can pop in to Zva’s page
on Wednesday to see if you are a winner!
Thank you for joining us!
P.S. Mark your calendar to join us again on September 29th for
our next Zva blog hop!
________________________________________
Friday, August 22, 2014
Gilded Life - Vintage Layout
Well, I may have cut it close, but it looks like I managed to create a project for all six categories for the Gilded Life/Spellbinders contest. And, I've got almost 30 minutes to spare! I have really enjoyed creating with these products and want to thank Spellbinders and A Gilded Life for hosting such a generous contest and for creating lines that inspire me so much.
This last creation is a layout - and I have no idea who the pretty girl in the photo is! She was discovered at a thrift sale years ago and has been waiting for just the right project. I have a feeling she would love the Gilded Life as much as I do.
I wanted to emboss some May Arts Satin ribbon, so to make that happen, I backed the ribbons with a thick interfacing first, and it made the ribbons cushy enough to hold the embossed designs.
This last creation is a layout - and I have no idea who the pretty girl in the photo is! She was discovered at a thrift sale years ago and has been waiting for just the right project. I have a feeling she would love the Gilded Life as much as I do.
I wanted to emboss some May Arts Satin ribbon, so to make that happen, I backed the ribbons with a thick interfacing first, and it made the ribbons cushy enough to hold the embossed designs.
I used the Fleur de Flourish die to cut matching Core Couture paper for the inside of the bezel, and painted the metal for a shabby appearance. The crystal beads are another tag sale rescue.
Thanks for putting up with my frenzy of blog posts! I hope you've enjoyed my creations.
Gilded Life - Silk Ruffle Bracelet
Alright, so here is project #5 - my entry for A Gilded Life/Spellbinders contest in the jewelry category. I guess it pays to be a bit of a packrat, because I had the perfect metal bangle bracelet to use for the base of this piece. I altered the Love Wings Pendant by painting it with Looking Glass paint, and then highlighting the raised areas with black paint. I also add the cross from the relics pack to the center. I used two of May Arts Ribbons new colors of silk ribbon, and just gathered them, and added a row of May Arts rhinestones as well.
Gilded Life - Heavy Metal Bag
As promised, here is another project for the Spellbinder's/Gilded Life contest. I've always loved antique evening bags, and decided to create my own using a vintage purse frame and some rich, metallic fabrics that I've been hoarding for quite some time.
I used some free motion embroidery/quilting to create the base of the bag....and then the fun experiments started!
I had the idea to emboss silk velvet using the texture plates, but instead of running it through my machine, I used a steam iron to set the fibers. Then I inked over the raised areas to create a stronger pattern. I embellished the medallion with a Vintage Swarovski crystal - which was the perfect color and bling.
I used some free motion embroidery/quilting to create the base of the bag....and then the fun experiments started!
I had the idea to emboss silk velvet using the texture plates, but instead of running it through my machine, I used a steam iron to set the fibers. Then I inked over the raised areas to create a stronger pattern. I embellished the medallion with a Vintage Swarovski crystal - which was the perfect color and bling.
I die cut several metallic fabrics, which would normally fray, but I backed them with Vellum first, before running it through my Grand Caliber, and it did great! 

I'm off to work on my final two projects!
Subscribe to:
Posts (Atom)