Showing posts with label RRR. Show all posts

Monday, November 8, 2010

Warm and Cozy


The temperatures have been dropping like crazy, so now is the time to stay in and cuddle up (well maybe stay in and make a card!) The challenge at Belles n Whistles Challenge blog for the next two weeks is to use something cozy or fuzzy. I used a black felt mat by Prima on my card. It really looks much more elegant in person. The stamp, Hearty Thanksgiving, is one that was released last year, but is now available in our wonderful clear stamps.

Challenges:
Fussy and Fancy: Sketch
Copic Creations: Brown/ make a scene

Monday, September 27, 2010

Lucky Number 7!


Good morning! It's Monday, so that must mean that there is a new challenge at Karen's Doodles! Today, we would like to see 7 of something on your card. Since 7 is such a lucky number, perhaps if you play along with us, you will be the lucky winner of some of Karen's images!

I used Pumpkin Mailbox for my card. And, in case you didn't figure it out - I used 7 different papers (pretty sneaky, huh?) Hope you will play along with us!

Recipe:
Image: Pumpkin Mailbox / Karen's Doodles
Papers: Close to my Heart
Punch: Kreaxions 4-in-1 Cross punch
Ribbon: Really Reasonable Ribbon


Challenges:
Friday Sketchers - Sketch

Wednesday, September 1, 2010

It's a Floral Challenge at Really Reasonable Ribbons!


How about an easy challenge? You know you love flowers, and that's the challenge that we are giving you at Really Reasonable Ribbons. We are being sponsored by AIFactory - who just happens to carry the Doodle Pantry images that I love! I used the Mini Rose Pot. Not only was my image floral, but I used this great new sheer woven rosettes in pink. It comes in several different colors that you will love! I also added some of the pink velvet ribbon on either side.

To punch my circle, I used the Kreaxions 4-in-1 punch #915 and the positioning guide, which lets you punch the inside of your circle - very cool! To see a video on how to use this, check this out.

We hope that you will play along with us!

Thursday, August 19, 2010

Those Flowers have been Framed!


I know I shared this card on my blog earlier this week, but I thought I would tell you a little about my ribbon frame. Sometimes I get a ribbon that I think is so beautiful, I'm not sure how to use it! I loved this scalloped green trim, from Really Reasonable Ribbon the moment I saw it, but I wasn't sure what I should do with it. Then, I was working on a card and it just needed something to visually define my borders. This was the perfect place to highlight this gorgeous trim! To me, it almost makes a postage stamp type frame. I just loved the results - and the good news is - we have this trim in 6 colors - Woo Hoo! The stamps I used are from Heartfelt Creations.

hugs,

Thursday, August 12, 2010

Falling for You with Really Reasonable Ribbon

I really love fall, so you will have to forgive me if I am rushing into using my autumn colors! But, I have to admit, that is my favorite palette ! This easel card features Hansel - a digital stamp from the Stamping Bazaar. I folded paper pleats and machine stitched Cranberry Grosgrain ribbon down on top of it. This made a really cool texture. I also used, I think my last piece of Brown crochet lace on the bottom portion of the card. Bonnie, you know I will be ordering more of that one! Doesn't this card just make you think of crisp, fall days? I can't wait!

Challenges:
Scrap Girl Angie - Red and Brown Easel card

Friday, July 30, 2010

Fun in the Sun


OK, I'll admit it - I am addicted to making cards! I'm at the beach, without my computer, without most of my crafting supplies, without photo editing software, and yet - I really had to make a card! I saw this great challenge at Magnolia-licious Highlites to make a Free-standing pop-up card - and I've never made one! So I had to do it, right? Luckily for me, there is a great local scrapbook store, Carolina Stamper, here in Beaufort, so I was able to add a few neccessities.
Luckily, I did have my Magnoia stamps and some of this gorgeous copper patina hand-dyed silk ribbon and sequin flower from Really Reasonable Ribbon.
I've got a couple of other ideas that I want to work on while I'm down here - so you may see a few more goodies pop up. (Besides it's 100 degrees today, so I might want it to cool down a little before I venture out to the pool!)
Challenges:
Magnolia-licious Highlites monthy sketch - Free-standing pop-up card
C.R.A.F.T. - hot and spicy colors
Charisma Cardz - something with a tail
Crafty Ann's - Lazy, hazy days of summer
Crafty Creations - Summer Lovin'
Stamping Scrapping Challenge Cental - water ( copic markers, Magnolia stamps, and Score-tape)
Magnolia Stamp Lovers- paper piecing
Creative Inspirations - anything goes
Alota - glitter and pearls
Lexi's Creations - paper piecing
Shabby Tea Room - 1 ribbon, 2 buttons, 3 diecuts
Bunny Zoe's - summer days

Sunday, July 25, 2010

Flower Soft Sponsoring CPS!


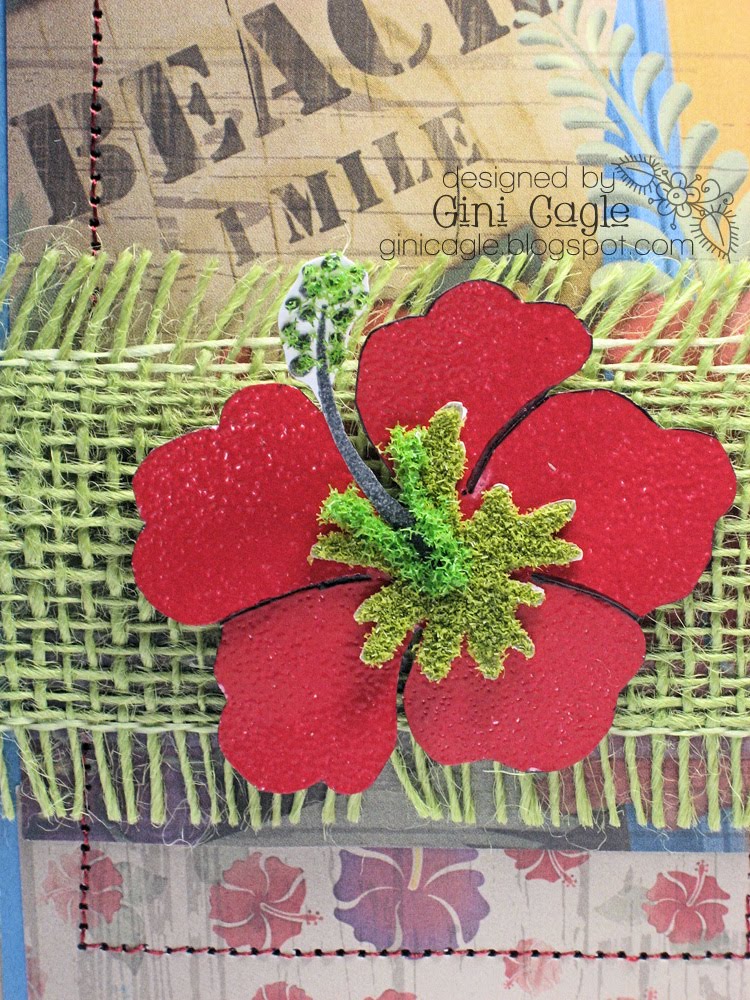
This week, Flower Soft is pleased to be sponsoring the CPS sketch challenge! This was a really neat sketch to work from. I used papers and stamps from CTMH - Moondoggie line. For the center of the hibiscus, I used my very favorite Ultra Fine Sage Flower Soft. The flower was embossed with red powder, so it's very glossy, and offers a great contrast to the Flower Soft. That fabulous jute ribbon is from Really Reasonable Ribbon.

I hope you get a chance to play along with this challenge. You could win a great prize from the great folks at Flower Soft!

Challenges:
Stamp Something: Something Flowery

Monday, July 19, 2010

Can you tell I chose the challenge at Belles N Whistles?


Ok, anyone who knows me or follows my work, knows that I love to distress everything that is not moving! So, of course, when it came time for me to choose a challenge at Belles n Whistles, I picked distressing! Yay! So get out your inks, your distressing tools or scissors - and use any type of distressing that you would like. Remember, you are playing for a BnW stamp of your choice!

I used the adorable Clowning Around from the Forever Young collection. I cut my circles (which by the way are also distressed!) using the Kreaxions Circle Cutter - my new favorite tool! That bodacious bow was made using some fantastic 1 1/2 inch wide Rose Satin from Really Reasonable Ribbons.

I hope you will get a chance to play along!

Challenges:
Crafty Creations - sketch
Crafty Pad - picture inspiration
Stamptacular Sunday - Ice Cream colors (cherry)
C.R.A.F.T. - babies and children
Artful Inkables - stitching

Thursday, July 15, 2010

Surf's Up Dude!


Alright, after putting you in the Christmas spirit for the past few days, let's snap back to reality! It's still hot, still summer, and I will be going to the beach in a couple of weeks.

We have a new challenge at Delightful Challenges - It's a beach theme using the colors in this picture for inspiration.We would love to have you play along!

Challenges:
Sketch Saturday - sketch
Stamp, Scrap, Doodle - Make a Scene
By the Cute and Girly - Warm summer days
Sir Stampalot - Lazy Hazy Days of Summer

New Challenge at Really Reasonable Ribbon

Hi! I am really excited about today's challenge at Really Reasonable Ribbon, because I chose it! When I was a little girl, I had a collection of antique Ribbon Doll pictures in my room, and I thought how fun it would be to use some of these as the inspiration for today's challenge. Here you can see some examples.


My card is more modern, but with a vintage flair.


I used an image from Karen's Doodles, Beautiful Queen, and printed her twice, and colored her. Then I added my Old Gold Satin ribbon to the bottom layer and "ruched" it using Scor-tape. I added some Lemon Kaiser Craft pearls on my ruffles, to give it more interest. Then I attached my top image (with the center portion cut out) over the other layer using dimensional tape. This was such a fun card to make! I really hope you will be inspired by this challenge. You don't have to make a ribbon doll, just take some inspiration from the pictures.

Challenges:
Pile It On - Holiday colors (but not holiday)
Totally Papercrafts - Swirls and Pearls
Stamp Something - 1 DP, 1 Ribbon, 1 image

Tuesday, July 13, 2010

Monthly Blog Hop Really Reasonable Ribbon


It's the 13th of the month, so it is time for the Design Team from Really Reasonable Ribbon to host a blog hop. We will be highlighting different ribbons from the store - and every month, you will have the chance to win our Ribbon of the Month kit! How awesome is that? If you have been following the ribbon path to get here, you should have arrived from Kym's blog. If you just stumbled upon this hop, then you will want to go back to the Really Reasonable Ribbon Ramblings to start. Be sure to leave a little love at each team member's post to be eligible to win this month's kit.


So, I guess I am continuing with the Christmas theme on my blog! We've got to break up this heat somehow. My wreath image is a new downloadable topper from Flower Soft that coordinates with Spellbinders dies. I added bits of Christmas Green, Russet Red and Ultra Fine Sage to add dimension to the image. It's really quick and fun!

For my ribbon, I realized that this awesome Ivory Crocheted lace is perfect for weaving a thinner ribbon through it. So I can have customized crocheted ribbon in a matter of seconds. How cool is that? Plus, just pull it a little tighter like I did, and you've got instant ruffles. For my accent ribbon, I used 3/8" Red Satin Edged ribbon.

So, I guess it's time to get hopping to the next eye candy at Amber's Blog. I know she will have something fantastic to share with you.

Thursday, July 8, 2010

Going Rustic with Really Reasonable Ribbons!


I have a lovely project to share with you today using a really cool ribbon from Really Reasonable Ribbons. Often times, I think of ribbons as being formal or cute - but not usually rustic. This new jute ribbon comes in different widths and colors, and is just perfect to use with a country type image such as this one from Stampavie.

To keep the ribbon from unraveling, I wrapped Scor-tape to the back of my cardstock, and placed the ribbon down before cutting it. It works perfectly!

I colored my cutie girl with copics, but then used some ultra fine Flower Soft in toffee to ground the image. The edges were highly distressed with distress inks in Frayed Burlap.

Did you notice that gorgeous corner punch that I used to frame my stamp? It is a 4-in-1 punch from Kreaxions. You will hear me talking about these punches alot! Not just because I am on their DT, but because these are very versatile punches that have plates that you slide in to change the punch. They are so cool! If you want to see them in action, check out this video.

Speaking of videos, last week I posted a video on Really Reasonable Ribbon Ramblings on how to use the Bow Easy. I never ended up posting it on my blog (duh!), so here it is now!


Challenges:

Create4Fun - sketch
Crafty Pad - Animal Fun
Quirky Crafts - ribbon
Design Dollies Color Challenge - orange, green, yellow, white
Design Dollies Element challenge - inspired by song - Wide Open Spaces by the Dixie Chicks
Incy Wincy - punches
Think Ink - Sewing
Wild Flower Wednesday - grunge

Thursday, June 17, 2010

Summer Celebration!


It's Thursday, so that must mean that it's my day to share a little inspiration for Really Reasonable Ribbons. School is now out here, and summer is getting into full swing. To me, nothing says summer more than getting ready for the 4th of July! My Mom's birthday is on the 4th , so we always have a big family celebration. One of my best memories of this celebration was a couple of years ago at our beach house, (it's on a very small island in South Carolina). Every year, they hold a golf cart parade - and everyone on the island goes ALL OUT to decorate. It just reminded me of a simpler day and time, which was great!
For my card, I used some of the Wired Woven Check Red and manipulated the wires to scrunch the ribbon. I added some bows of America Stripe Grosgrain. The image is one of the newest from Karen's Doodles.

I hope that you will join us for our 2nd ribbon challenge, which is to use ribbon as a border - easy peasy!

Challenges:
Friday Sketchers - sketch
One Stitch at a Time - celebrations
Quirky Crafts- summer
Crazy Challenge - You're a Star
Pollycraft Monday - Inspired by a song - American Pie
Flourishes - embossing
Crafty Ann's - Fly the Flag
Clearly I Stamp - Birthday (for my mom - see above)

Sunday, June 13, 2010

Monthly Blog Hop Really Reasonable Ribbon


On the 13th of each month, the Design Team for Really Reasonable Ribbon will host a blog hop. We will be highlighting different ribbons from the store - and every month, you will have the chance to win our Ribbon of the Month kit! How awesome is that? If you have been following the ribbon path to get here, you should have arrived from Kym's blog. If you just stumbled upon this hop, then you will want to go back to the Really Reasonable Ribbon Ramblings to start. Be sure to leave a little love at each team member's post to be eligible to win this month's kit.

I had so much fun making this card! I found a birdhouse card template from the Dutch Dare Challenge blog. I cut it out using my Cricut and MTC - it worked like a charm, but you could also print it out and cut it by hand.

I used the Light blue organza ribbon with satin center and gold accents at the top and bottom of the card. This is such an elegant ribbon. My bow at the top is obvious, but did you notice what I did along the bottom? I used scraps of this ribbon, cut down the center, and pleated it, using scor-tape. So, see... you don't want to throw those little pieces away.

I cut flowers out using my Cricut, and colored them with distess inks, and then really distressed them for a nice shabby look. I added buttons and other die cut shapes to frame my opening. The bird is a fantastic vintage image that I printed from the Graphics Fairy. I printed it out twice, and cut out the wings and popped them up. I added stickles all over the bird and just spread the glue thin with my finger.

Finally, the sentiment is from Flourishes.

So, I guess it's time to get hopping, or perhaps my little birdie will help you fly away to the next eye candy at Amber's Blog. I know she will have something fantastic to share with you.

Challenges:
Crazy Challenge: Distress
Pollycraft - Ribbon and bling
Shabby Tea Room -Dad (We always get my dad a new birdhouse or birdfeeder for Father's Day)
ThinkInk - Use a new technique (I have not made this kind of flower before)
Spoon Full of Sugar - Floral Delights
Your Next Stamp - buttons
Charisma Cardz - Spots and Stripes
Cute Card Thursday - Anything but square
Dutch Dare - Birdhouse card
Paperplay - home
The Crafting Pot - Birdhouses

Thursday, June 10, 2010

Paper and Ribbon Flower


Good morning! I recently saw a tutorial for making pleated paper flowers, and I thought, wow, wouldn't it be gorgeous to add some ribbon to the edge of the paper and combine the two? So, I tried it out and came up with this beauty. I added Old Gold satin edged ribbon from Really Reasonable Ribbon. I love the texture this added! The button in the center is an antique needle woven button from my stash. I thought it was just perfect with my Graphic 45 Papers.

Challenges:
CPS- sketch
Alota - lots of folds (flower has a ton of folds!)
Cupcake Craft Challenges - dazzle
Pollycraft Monday Challenge - ribbon and bling
Charisma Cardz - flowers
Crafty Calendar - bugs and beasties
Crazy 4 Challenges - pleats
Stamp Scrap Doodle - Handmade embellishments
Spoon Full of Sugar - Floral Delights

Thursday, June 3, 2010

Ribbon Weaving


I promised I would be back to share with you how I made my ribbon woven panel - so here it is, my Really Reasonable Ribbons Tutorial. When you have beautiful ribbons, even if it is just a short piece, you want to be able to use them - and this is a great way to use lots of ribbons that you like at one time.

You will first want to gather ribbons with different widths, textures and finishes - but make sure you like the way they look together. I used some of the ribbons from last month's ribbon club and then added a few more. ( Pink velvet, Light pink gingham, Brown with pink stitches, dark brown grosgrain, sheer square print)
I knew I was going to make a panel to fit a card sketch that I was working on - and that I wanted it to be 3 x 5.5. I cut my vertical ribbons at about 7 inches, and pinned them onto my Bazzill Piercing mat. This made it really easy to line things up and keep them straight, since this board has inch markings on it. When you pin your ribbons down, lay them so the right side is facing down. On some ribbons, this won't matter, but like for the velvet, it would make a big difference.
For my horizontal ribbons, I cut them at about 5 inches long. Then I started weaving each ribbon over and under the vertical ribbons and then, would pin each ribbon down to keep it straight and taut. As I pinned the ribbons, I angled the pins away from the center.
I had a piece of cardstock cut to my 3 x 5.5 size. I covered the entire back with a large piece of scor-pal tape, and carefully laid it on the weaving. Then I added more tape around the edges, so I could fold the ends of ribbon over and attach them.
You can then treat this how you would any paper panel - add a mat to it, add embellishments ( I put a clear sticker on mine) or whatever your heart desires! You can try this method with different shapes, etc! I would love to see what you come up with.

Monday, May 24, 2010

Belles N Whistles Flower Fun!


I am so excited today! To begin with, I get to share with you my first card as a DT member for Belles N Whistles! I love these stamps designed by Elisabeth Bell and am just tickled pink to have been named as a member of their awesome team! The other excited news is that we are now holding a Belles N Whistles Challenge every other week - and it starts today. Our inaugural challenge is DIY flowers. Don't you just love it?


For my card, I used the Watering image. This cute stamp is from the spring collection. I made my flowers using a Spellbinders flower die and grungeboard. I was really going for a polka-dotted yellow, but they turned out more like wild leopard flowers, but hey, they're fun! If you would like to play along, just make sure to use a BnW stamp and make any kind of flower for your project. Then be sure to upload your picture to the challenge folder in our gallery. If you need some inspiration, be sure to check out all of the wonderful creations from my team members - These ladies really know how to rock a challenge!

Details:
Stamp: Belles N Whistles - Watering
Medium: copics,Glimmer Mist, stickles, Distress Inks, CTMH ink pads
Papers: CTMH, Bazzill
Accessories: Organza ribbon (Really Reasonable Ribbon), Chipboard - CTMH,
Pearl Flourish - BG
Tools: Spellbinders, MS branch punch

Challenges:
Creative Card Crew: Sketch
Sir Stampalot - Blooms and Butterflies
Flourishes - Chipboard
Stamptacular Sunday - Pearls and Swirls
Crafty Pad - Over the Edge
Totally Gojuss- Bling it on