
I can't even begin to tell you how excited I was when I saw that I had made it to the finalist round for the May Arts Ribbon Design Team. So next came the fun part - designing my project for the final round - which is what I am sharing with you today.

You know I love making my own flowers - and making my own flowers with yummy May Arts Ribbons?!! Ah, it just doesn't get any better. I wanted a way to showcase a wide variety of flowers, and teach you how to make them all. My project is a mini album, which includes tags with the Reader's Digest version of the tutorials. (Don't worry, the full tutorials, with lots of pictures are all in this post).
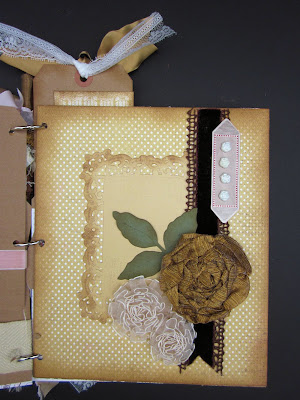
But for now, I'll show you the book pages, with their how-to tags.


Are you ready to explore a little further? Then come on, and visit my Ribbon Garden!
Front Cover

Flowers
Velvet Cockscomb Flower
Gathered Lace Flower
Tea-dyed Sheer Frayed Flowers
Ribbon Embellished Die-cut Leaves
Ribbons
Gathered Lace Flower

Cut a length of lace about 18" long. Thread a needle and tie off around the center end of the lace.

Make running stitches down the center of the lace.
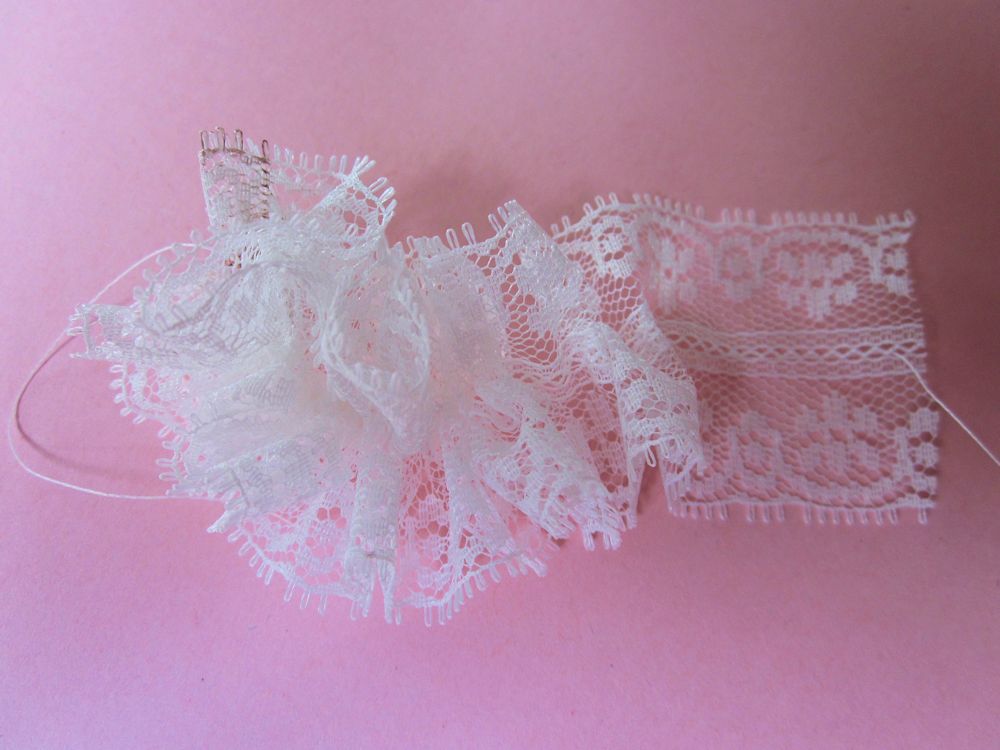
Gather tightly and tie the two ends together to form your rosette.

Add buttons or paper flowers for the center.
**The flowers on the front cover just seemed too white, so I soaked them in a strong bath of tea for a minute or so....
I also used the Sheer Frayed Flowers on the cover, and gave them the same tea treatment. Various ribbons will respond to the tea or any other dye differently.
Ribbon Embellished Die-Cut Leaves

Glue your ribbon onto cardstock and let dry completely. Run through your die-cut machine as normal.

Velvet Cockscomb Flower

Take an 18" piece of 3/4" wide velvet ribbon.
Fold the ribbon in half, length-wise. Sew a running stitch along the raw edges, forming a tube. Gather the ribbon, and tie-off. Form a small circle, for the center of the flower, at one end of the gathered ribbon, and stitch into place. Reverse the direction of the ribbon, and wind around the center, and stitch into place. Continue wrapping the ribbon in a serpentine fashion, and stitching in a pleasing formation.
Page One


Flowers
Tattered Twill Flower
Ribbons
Tattered Twill Flower


Cut a 24" piece of 1 1/2"Twill Ribbon, and cut tabs along one edge. Cut tabs on the opposite edge, but make sure they are off-set from the first side.

Fold the ribbon, a little less than half, so that the edges are off-set. Sew a running stitch along the folded bottom.

Gather the ribbon, coil the ribbon into a flower and stitch into place.
Page Two

Flowers
Spider Web Rose
Rolled Rosette Flower
Ribbons
Rolled Rosette Flower

Cut a 1 1/2" circle from a sheet of Scor-Tape. Remove one side of the backing.

Remove the other side of the backing and attach to your project.

Spider Web Rose


Cut a 2" circle from cardboard, and find the center, and poke a hole. Take a length of twine, knot one end, and thread a needle on the other. Come up from the back of the circle, and go around the edge and back up through the hole - forming a spoke. Form a total of 9 spokes (or any odd number). Tie the twine off in the back.

Tie a knot in the end of your ribbon, thread the other end through a large needle, and bring the ribbon up through the center hole.

Start weaving the ribbon over and under the spokes. (I find this much easier to do if the ribbon is threaded through a needle). Continue until the entire circle is covered, and glue the end of your ribbon to the underside of the circle.
Page Three

Flowers
Lollipop Flowers
Ribbons
Lollipop Flowers
For each flower, cut 5 concentric circles - freehand, from wide satin ribbon.
Hold each circle carefully, beside a candle flame. This will melt and seal the satin ribbon, as well as cause the circle to cup.

Stack the circles and glue them together. Add a decorative button to the center to finish the flower.
Page Four


Flowers
Rolled Rosette Flower (also on p.2)
Gathered Lace Flower (also on cover)
Ribbons

Page Five
Flowers
Five Petal Posy
Ribbons

Each flower will require 5 small, 5 medium and 5 large circles, cut from a wide satin ribbon.

Melt the edges of each of the circles, as you did for the Lollipop flowers above.
Take one of each sized circles, for each petal, and line them up with bottoms even. Pinch the grouping together and stitch to hold. When all five petals are completed, sew them together to form your flower. Add a knot of Net for the center of the flower.
Page Six


Flowers
Bias Cut Satin Carnations
Ribbons
Bias Cut Satin Carnations


Take 24" of bias cut satin ribbon, and cut fringe along the edge. Vary the width and the depth of each cut. Put a small section of the ribbon between your thumb and foreginger, and gently "pluck" to remove some of the fibers.

I hope you have enjoyed visiting my Ribbon Garden, and hope that you will be "planting" your own ribbon flowers on many projects. And thanks for sticking with me on the longest blog post I've ever written! If you are inspired to make any ribbon flowers, I would love to see them!

May Art Ribbons
Oval Doily Stacker One
Fanciful Flourish
Judy's Blooms
Ribbon Eyelet Border
Mega Fanciful Flourish
Fiona's Magic Mirror
Dutch Scallop Square
French Lattice Large
Anastasia Border
Pair of Ferns
English Tea Party
Build a Flower One
Carta Bella
Beautiful Moments Patterned Paper
Worldwin Papers
Cardstock - ColorMates
Jolee's
French General tags, buttons
Epiphany Crafts
Epoxies - Bubble Caps Round 14
Want2Scrap
Paradise Chipboard Album
Creative Inspirations Paint
Ranger
Distress Ink, Distress Paint
Glue Arts
GlueGlider Pro
UK 1.5" Silky Crush (UK02
Cheery Lynn Designs DiesOval Doily Stacker One
Fanciful Flourish
Judy's Blooms
Ribbon Eyelet Border
Mega Fanciful Flourish
Fiona's Magic Mirror
Dutch Scallop Square
French Lattice Large
Anastasia Border
Pair of Ferns
English Tea Party
Build a Flower One
Carta Bella
Beautiful Moments Patterned Paper
Worldwin Papers
Cardstock - ColorMates
Jolee's
French General tags, buttons
Epiphany Crafts
Epoxies - Bubble Caps Round 14
Want2Scrap
Paradise Chipboard Album
Creative Inspirations Paint
Ranger
Distress Ink, Distress Paint
Glue Arts
GlueGlider Pro
15 comments:
OH MY WORD!!!
Girl you are the queen of projects!
This is stunning- you didn't miss a detail, love,love all the ribbons,lace and cheery lynn dies you used sweetie.
GOOD LUCK
My goodness, this is just fabulous, Gini. What wonderful step by step tutorials for the flowers and leaves and such an amazing album. A true work of art. Good luck with the DT call. You rocked this!
Awesome project!!! LOVE all those bloom tutorials! Thanks for sharing!
Woooowowowowow! Gini, your mini album is amazing and what a great tutorial for all your flowers. No doubt you're going to enter the May Arts DT! I wish you good luck and let me tell you just one more time that your project is absolutely fantastic!!!
Lots of love from France, Kianel.
Wow! I am lost for words, this is just gobsmacking! :) What an amazing, impressive, creative and gorgeous creation Gini, it looks fabulous!
Beautiful hand-made embellies, so many wonderful things to look at its outstanding!
hugs
xxalisonxx
wow, you are so talented! these are amazing!
incredible project!!!! I love all your flowers, and fantastic tutorials!!! I definately want to try some of these!!! Good Luck!!!
Gorgeous!!! You are so talented!
Wow!!!This book is awesome!!! And all those flowers!!! Wonderful!!
Wow - you've used so many great techniques with ribbon. I'm in love with the organza bloom! Beautiful work, Gini!
Beautiful work and great tutorial! Good luck Gini!
Serioulsy in love with all of your various flowers! I took notes as I read the post! You rock!
Wow...you did an outstanding job on this project. So many tutorials, pictures and inspiration. You Rock!!!!!
This is like 1000 tutorials in one -wow! Great job - good luck in the DT competition!!
What a wonderful garden! Thank you! The tutorials all seem so easy to do, and the flowers are gorgeous. THANKS!
Post a Comment