Showing posts with label Art Institute Glitter. Show all posts

Sunday, May 17, 2015

Thank You - Another Create A Card Die From Crafter's Companion

Last week, Crafter's Companion released the latest Create-a-Card Dies, with sentiments that make card making elegant and easy.  After I die cut my image, I applied adhesive with my Xyron Creative Station, and glittered the surface.  I made a presentation envelope to house the card - and it fits just perfectly!
May Arts Ribbon 
Want2Scrap Pearls
Art Institute Glitter
Xyron Adhesive

Wednesday, October 2, 2013

Warmest Wishes - Heartfelt Creations Layout


I've got a layout to share with you today that wraps up Heartfelt Creations' Season of Joy release.  I've had so much fun creating projects using this collection, but I have to say this one is my favorite! I added loads of details, which I will share with you today.

Also please remember:
 
It's that time of the year to vote for your favorite designers from Heartfelt Creations to see who will stay on the team!  I really hope that I have inspired you, and that you will take a minute to cast your votes.  Here are all of the details:

Vote for your favorite Designers: When we announce a new design team call that also means that we have a tough time deciding which of the current designers continue on the HC design team. We are giving you the opportunity to get involved and vote for 5 or more of your current favorite design team members. You can CLICK HERE and submit your vote. When you vote, you will also be entered into a drawing to be eligible to win a $50 HC Gift Certificate. You can only vote one time and you have to select 5 or more to be eligible to participate. Voting ends on October18th, 2013.

Also, HC always adds new designers to the mix - and my very talented sister, Lori Williams is in the running - so if you would vote for your favorite new designers as well (there are two separate polls and each one has a prize to be won!)

 Vote for your favorite Semifinalists: We would love to have you participate and vote your 5 favorite semi-finalists. Review each one of their blogs and then CLICK HERE to submit your vote. When you vote, you will also be entered into a drawing to be eligible to win a $50 HC Gift Certificate. You can only vote one time and you have to select 5 or more to be eligible to participate. Voting ends on October 18th, 2013

Chipboard circle, painted with 3D Metallic Stamp paint, then stamped with holly branches. Also check out the die-cut doily that was created using the Decorative corner dies.


Poinsettias were colored gold with mists and shaped while wet.


Pine cones add texture to the flower clusters. They were stamped, fussy cut and glittered.

The sentiment stamp serves as a title for the layout. 


Heartfelt Creations Products
Other:
Spellbinders Cherry Blossoms
May Arts Ribbon
Clearsnap Ink
Various Mists in yellow, gold
Xyron Mega Runner, Creatopia 
Chipboard

12 x 12 Layout:
Ink all of the edges of the patterned papers with brown ink, and distress the edges.  Layer the papers as shown, using foam adhesives. Cut a large open circle from chipboard.  Paint with 3D Stamp paint.  Ink the edges.  Stamp the Holly Swirls randomly on the circle. Layer the other panels as shown.  Cut the doily using the Decorative Blossom Corner die (after each cut, line up the edges, until you have made four cuts and have completed the doily). Place the photo over the doily. Tuck a small portion of the Banner and Trees die (the lace tree) under the left edge of the photo. Stamp the sentiment and cut using a circle die. Stamp and cut the flowers using the Christmas Poinsettia stamp and the Sun Kissed Fleur die.  Spritz with mists and shape while wet.  Assemble the flowers. Add a little glitter and a dew drop to the center of each. Stamp the pinecones and hand cut.  Trace the design using the metal tip on the dries clear adhesive and add ultrafine glitter.  Arrange the floral spray along the bottom of the chipboard circle.  Add branches from the Cherry Blossoms die set, and place the pinecones at each end.
 

Monday, September 3, 2012

Bring on the Glitter!

 
Happy Labor Day, to my USA friends!  I hope you have gotten to enjoy a nice, long holiday weekend - and perhaps had a little time for crafting.  This weekend also marks the end of summer, and the welcome to fall...so I thought it would be appropriate to share a pumpkin card with you.
 
As you might suspect, I am now completely covered in glitter (as well as my studio floor!). But, I'm going to tell you how I created this sparkly goodness.
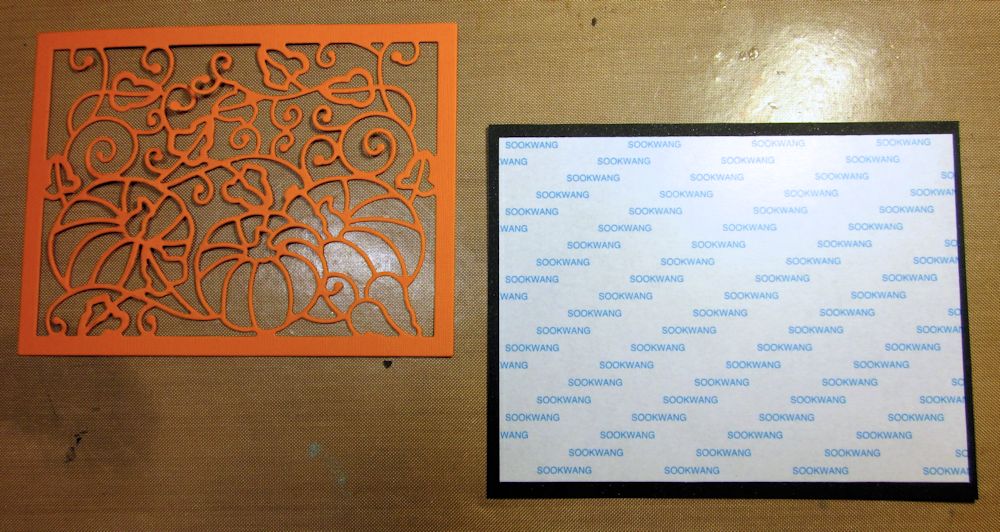
 
I used the Fall Harvest One die from Cheery Lynn Designs, as the focal point of this card.  I cut it from orange cardstock.  Now, for the magical part....I cut a piece of black cardstock, large enough for a border and I cut a piece of Scor-Pal tape(sheet size), the same size as my pumpkins.
 
 
I removed one side of the backing from the Scor-tape and centered it on the black paper.  Then remove the top layer and apply the pumpkins. I started coloring the pumpkins by sprinkling ultra-fine glitter in those areas.I would burnish the glitter to the Scor-Tape with my finger, and then flip the card straight over to remove the excess glitter.  Next. I colored the leaves in the same manner, and finally the background.  If you find that you have the wrong color in an area, you can put a thin area of Art Glitter Dries Clear adhesive (using the fine metal tip), and reapply the correct glitter color.

 
I finished the card with a border from the Celtic Whimsey.
 
We really appreciated all of the fabulous entries we had last week, and hope that you will join us again  at Cheery Lynn Designs Challenge. This week we want you to stitch it up (real or faux). Looking forward to seeing what you come up with!


Tuesday, June 5, 2012

Me at 45


The challenge this month at Once Upon a Sketch has to do with birthdays, and many of their DT chose to highlight their current age - and I thought that was a great idea.  I wrote about who I am at 45 on a tag, that slides into a pocket underneath my Horizon Coved Rectangle die cut.  You can see the journaling card pulled out in the picture below.


Creative Inspirations Paint – Beige

Art Institute Glitter – Ruddy Red
Art Institute Dries Clear Adhesive and Ultrafine Metal Tip Applicator

Kaisercraft Rhinestones
Ranger Distress Ink: Barn Door, Vintage Photo, Black Soot

Bo Bunny Patterned Paper, stickers:  Serenity
Worldwin Cardstock:  Kraft

Madeira Metallic Thread

Tools: Grand Callibur, X-acto Tool, Sewing Machine

1/8 Scor-Tape
GlueArts Glue Glider Pro – Perma Tac; U Cut It Dimensional Adhesive; Extreme Tac Adhesive Squares

Challenges:
Once Upon a Sketch: Birthday Sketch
Simon Says: Anything Goes
Stamp and Show: Show Some Texture