Showing posts with label Lifestyle Crafts. Show all posts

Sunday, February 17, 2013

Visit Splitcoast Stampers Love Fest and Play Along!

The Design Team for Scor-pal is taking part in the  Splitcoast Stampers Love Fest. Today is day 4 and we are sponsoring a challenge. Visit the Scor-pal Member Company Forum for all the details on this Flips, Flaps and Oodles of Fold challenge and to see what we are up to!


This is a hybrid fancy fold card that combines a gate-fold and easel card into one. The buttons along the flat bottom layer really help to keep the gate from opening as well.


 Be sure to head over to SCS to see what the rest of the design team has come up with, as well as to get your entry in.  If you enjoy using your Scor-pal to create all kinds of fancy fold cards, boxes and home decor projects, then be sure to follow us at the Scor-Pal blog. 

Magnolia Stamps
Bo Bunny - Little Miss paper collection
Core'Dinations cardstock
Lifestyle Crafts Dies
Want2Scrap Bling
Fiskars Punch
Copic Markers

Saturday, July 21, 2012

Tag! You're It!


Tags are such a fun way to try new ideas - so I hope you will enjoy this vintage treasure I have to share with you today!


I startred off with a plain white tag, and stamped/embossed the background using JustRite Elegant Fronds background stamp and Wow Embossing Powder (Pepper).  Next, I cut scalloped circles from cardstock using Quickutz/Lifestyle Crafts Scallop Circles Die, and glued these down to my background, to add dimension.  I used an off-white acrylic paint over the entire tag, and then spritzed the it using Tattered Angels Glimmer Mist in Fully Purple and Olive Vine.   Next, I used the JustRite Shabby Music Background, and stamped that onto the raised areas of the tag. I added a little more Glimmer Mist to blend the background.


My focal piece was stamped from the JustRite Violette Vintage Lables and embossed with Wow Presidio Purple. It was spritzed with the same colors of Glimmer Mist.  Want2Scrap Pearls were added to the flower centers.  A Dusty Attic Chipboard flourish was added to help frame the label.  It was stamped using the Elegant Fronds stamp, and embossed with Wow Angel Wings.  I nestled paper flowers, Bazzill Bling, and some Tim Holtz metal embellishments around my flourish.  The gold netting under my label is from Webster's Pages.  The lace at the bottom was dyed with the Glimmer Mist.  The bow at the top of the tag is May Arts Ribbon.


Challenges:
JustRite: Tags

Saturday, April 7, 2012

Spring Table Decor


Happy Easter Weekend! I thought you might be trying to add the finishing touches to your holiday tablescape, and wanted to share a quick and easy party favor.  You know I love flowers, so I decided to embellish the Lifestyle Crafts Pinwheel into a pretty spring flower.  I cut the base from Kanban Crafts papers and inked the edges of the "petals" with Dusty Concord Distress Ink.  I also brushed some Stickles on each leaf to add a little sparkle.  The center of the flower is a Prima net flower with a Webster's Pages Sparkler in the center. I used a skewer from my kitchen drawer (colored with Distress Stain) for the stem.  A little net and ribbon, and you have a pretty trinket for each plate.  I hope you have a very blessed Easter!

Sunday, February 5, 2012

From Paris With Love


I'm sliding in with less than an hour to go for the challenge at sweet Debbie's Shabby Tea Room! The challenge was a picture inspiration with lots of fun red and white - and to also use a postal element. Not only did I use the JustRite Stamps (Greetings From Paris) with my postcard theme, but I used the Postage Stamp Spellbinders, and even used a peel-n-stick gold sticker with a stamp edge around my heart. My fancy heart was cut using the Quickutz Nesting Doily hearts, and the card base was cut with their Nesting Hearts die set. I embossed my stamped images with Wow! Embossing Powder in Cable Car Red, which is a really clear, bright red that I love!

Challenges:
The Shabby Tea Room: Picture Inspiration + mail theme
JustRite: For the Love Of...

Wednesday, February 1, 2012

Love Cast in Clay Blog Hop with Creative Paperclay and Amazing Mold Putty

Welcome to the Love Cast in Clay blog hop with Creative Paperclay® and Amazing Mold Putty! You should have arrived here from Barbara Moore's blog, if not, you may want to start back at the beginning with the Creative Paperclay® blog so you don't miss anything! We have great inspiration for you as well as awesome prizes! A winner will be choosen from both Amazing Mold Putty blog and Creative Paperclay® Blog to receive a 16oz package of Creative Paperclay® and package of Amazing Mold Putty. In order to win you must leave a comment on all blogs as well as become a follower of each blog.


I love making embellishments for my cards and layouts, and when I noticed a pea-pod ornament on my Christmas tree, I set it aside to make a mold that I could use year round.


Amazing Mold Putty is so easy to use! It is a two-part putty, that you mix equal parts together and press your object to be molded into it. You can then use the mold over and over again.


Since this embellishment was kind of large, I didn't want it to weight my layout down too much, so I used the Delight ™ Air Dry Modeling Compound, which is lighter in weight than the Paperclay. I just pressed the Delight into the mold, and let it dry.

After my pea-pod was dry, I painted it with a base of Creative Inspirations Paint. Next, I used the new Terri Sproul Mixers and Sakura Crystal Lacquer to make my pod look almost like porcelain.


Now that I've shared my project with you, it's time to hop on to Brenda's blog!

Full Hop List

Sunday, January 29, 2012

Paris in the Springtime


I'm determined to get through this winter by making loads of springy projects! Do you think if I make enough, spring will actually get here sooner? These papers from the ScrapCake certainly are the perfect palate to bring some sunshine!

Challenges:
Prickley Pear: Sketch
Sisterhood Sundays: Photo Inspiration -SS8
Stamp and Show: Song Title

Friday, January 27, 2012

Friends With Flair Friday Hop

There is so much excitement going on right now over CHA - and I really wish I were going to be there! At least my work will be there in several booths -including the Sakura Hobby Craft Booth. Sakura will be introducing the new Terri Sproul Mixers - a fantastic way to add color into the Sakura Crystal Lacquer. I've used some of these on my card today - the Red Satin and Gold Dust. I was able to paint this onto my paper and stamp right over it. It gives a really cool, almost metallic look. I know you are going to love it!


Speaking of love...did you notice the stamp set that I used? Kokeshi Cuties from Unity? This is such a fun set, and I loved combining the set with these gorgeous origami papers.

Have a great weekend!

Challenges:
Unity: Friends With Flair
Simon Says: Anything Goes

Golden Cameo


The design team from Creative Paperclay® Modeling Material, was lucky to get to choose a mold from Articus Studio Design to play with! They have so many cool molds, I had a hard time making up my mind, but finally decided on the Cameos Flexible Rubber Art Mold.

I used the Delight™ air dry modeling compound, and pushed it into the mold and let it dry before I removed it. I used the new Terri Sproul Mixers/Sakura Crystal Lacquer to color the cameo, with an elegant, Old World feel.


I can see so many possibilities for these molds - jewelry, home decor, any kind of paper craft....

I hope you will check them out and give them a try. You will love how they work with the Creative Paperclay!


Delight™ Air Dry Modeling Compound
Sakura Crystal Lacquer
Terri Sproul Mixers - Gold
Lifestyle Crafts die
Kanban Crafts Metallic Glaze Salerno - Beige CRD9754
Kanban Crafts Crystal Glittered Acetate
Link

Challenges:
Love My Tapes: sketch
Simon Says: Anything Goes
Link

Thursday, January 26, 2012

With Love


Link

Do you love making paper flowers? I really do - and there are so many wonderful tools to help you make gorgeous flowers at Scrap-Mart! I began with some Heartfelt Creations stamps - which coordinate with Spellbinders dies - so you don't have to spend tons of time fussy cutting your petals. To help shape my flowers, I always use the McGill mat and tools. You simply lay your flower down on the mat, take a ball tool, and start at the outer edge of the petal and pull towards the center. This instantly gives your flowers beautiful and natural shaping. Since we are still stuck with winter, I think it's great to bring spring early with some paper blossoms!

Tuesday, January 24, 2012

MFT and Scor-Pal Hop

LinkWelcome to the Scor-Pal and My Favorite Things hop! I hope you are ready for a ton of inspiration! You can find the entire list of designers that are participating, along with the prize details, on the Scor-Pal Blog.


For my project, I decided to change the tea-light card holder up a little bit, to make it the perfect way to present some Kisses for Valentine's Day. So here's a peak at the inside of my project.


To begin, cut a cardstock base 10 1/4" x 8"(I used WorldWin Papers - Kraft). With the long side placed on the upper fence of the Scor-Pal, score at 1/2", 1 1/4", 2 3/4", 3 1/2", 5", 9 1/2"

Next turn the paper a quarter turn, so that the short side is now along the upper fence. Score at 3/4" and 7 1/4"

Trim as shown below.
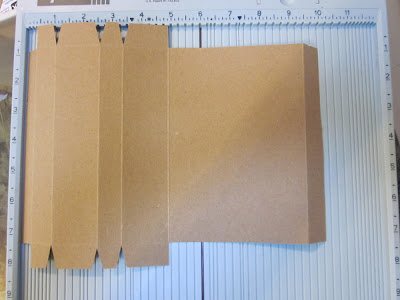
Cut a window on the third panel in, leaving a quarter of an inch margin around the edges. Use Scor-tape around the opening, and attach a piece of clear acrylic for the window.

Fold the box portion of the card inwards, and use Scor-Tape on the outer flap to anchor the box to the card base. **I added patterned paper, and my candy kisses to the inside of the box before closing the box up.

For the front of the card, cut a base of 6 3/4" x 6 1/2 ". With the longer side at the top of the Scor-Pal, score at 3/4". Put Score-tape on the under side of the tab, and attach to the base of the card. Decorate the front and inside as you wish.

For my project, I used MFT's Ladybug from the Pure Innocence line (which I completely love every stamp in this collection!). I colored her with Copics, but she was a little too bright for the vintage look I wanted, so I swiped the entire image with Tea Dye Distress ink. I love how this looked with the Kraft paper. MFTs also has a wonderful line of dies - the Die-Namics! I used the Dizzy Border. Look how delicate those cuts are! Just fabulous!


Monday, January 23, 2012

Peacock Proud


It's cold and dreary here - so I thought a bright card might be just the bit of cheerfulness that we could use! I'll admit, it's much brighter than I normally design with, but isn't that what Peacocks are all about?
Kanban Birds of Paradise stamp
Kanban -The Cavendish Ladies Pin Stripe - Chiffon Pink CRD9848
Kanban - Guilded Cage - Blush PCT9950
Kanban -A4PRL240FU
Wow! Embossing Powers: Copper Regular, Suzy West Collection - Presidio Purple
Want2Scrap Pearls

Challenges:
Card Patterns: Sketch

Saturday, January 14, 2012

Inspired By Stamping - January Release is Here!


I hope you have enjoyed all of the beautiful peeks that the Inspired by Stamping design team has shared with you the past two days! Finally, you get to see each of the new releases in their full glory - and the best part, you can buy them today!


This is the set I've been designing with - Be My Valentine.


There are so many cute elements there to enjoy! I'm sure you will have tons of ideas for ways to use this versatile set.


Now, here's the rest of the team - go check out what lovelies they have to share with you!

Amber Goble
Deb Hickman
Debbie Marcinkiewicz
Gini Cagle (me)
Irit Shalom
Jennie Garcia
Joanna Munster
Kassi Hulet
Kendra Sand
Kim Score
Susie Moore

Friday, January 13, 2012

My Wow Team Day!

The Design Team for Wow! Embossing Powders is rather large, so we were divided into teams. My team, the Powder Puff Girls, is lead by the very talented Gina Lideros. Today my team mates have posted some gorgeous layouts on the Wow! blog, that I'm sure you won't want to miss.

Here's the layout that I created. It will be in the CHA booth in just a couple of weeks :)

The stamp set is one that Suzy West designed that is called Build a Butterfly - and you get to do just that - you can mix and match the layers to create variations in your butterflies - and then all of the different colors of embossing powders - and they are stunning!

I used Tsukeniko's Goosebumps spray to mist my background and then sprinkled with the powders. I really love this effect!


Wow! Embossing Powders: Suzy West Earthtone Olive, Earthtone Honey, Bay Area Blue, Metallic Copper Regular
Wow! Build a Butterfly Stamp
Pion Designs Patterned Papers
Worldwin Papers Cardstock
Versamark Ink
Versamark Ink pen
Tsukineko Goose Bumps
Lifestyle Crafts Die
Epiphany Crafts Round 14 bubble cap, Round 25 bubble cap, vintage setting
Pink Paislee letters
Want2Scrap Pearls

Monday, January 2, 2012

You Are So Beautiful

I hope your 2012 is starting off great! I think this is going to be such a wonderful year, and I hope it is for you as well! Today marks the beginning of my weekly posts for Scrap-Mart. I've loved shopping from Scrap-mart for years, and am beyond thrilled to be designing for them!

When I was deciding what I would make for my project today, I noticed we had gotten in a large shipment of stamps from Heartfelt Creations - Now, what I didn't know was that we would put them on sale for 40% off - and that so many of them would sell out! Lucky for you, this stamp, the Bella Rose Vintage Background stamp is still in stock. I love all of the Heartfelt Creations stamps, but I have to say I think this one is a favorite of mine!

The Design Team for Scrap-Mart will be posting on their own personal blogs and on the Scrap-Mart Facebook page - so make sure to friend us on Facebook, and watch for lots of great inspiration, special deals for friends only and maybe a contest or two!


Link