Tuesday, July 10, 2012

May Arts Ribbon - DT Round Two


I can't even begin to tell you how excited I was when I saw that I had made it to the finalist round for the May Arts Ribbon Design Team.  So next came the fun part - designing my project for the final round - which is what I am sharing with you today.


You know I love making my own flowers - and making my own flowers with yummy May Arts Ribbons?!!  Ah, it just doesn't get any better.  I wanted a way to showcase a wide variety of flowers, and teach you how to make them all.  My project is a mini album, which includes tags with the Reader's Digest version of the tutorials.  (Don't worry, the full tutorials, with lots of pictures are all in this post).

But for now, I'll show you the book pages, with their how-to tags.


Are you ready to explore a little further? Then come on, and visit my Ribbon Garden!


Front Cover


 Flowers
 Velvet Cockscomb Flower
 Gathered Lace Flower
 Tea-dyed Sheer Frayed Flowers
Ribbon Embellished Die-cut Leaves

Ribbons

Gathered Lace Flower

Cut a length of lace about 18" long.  Thread a needle and tie off around the center end of the lace.


Make running stitches down the center of the lace.
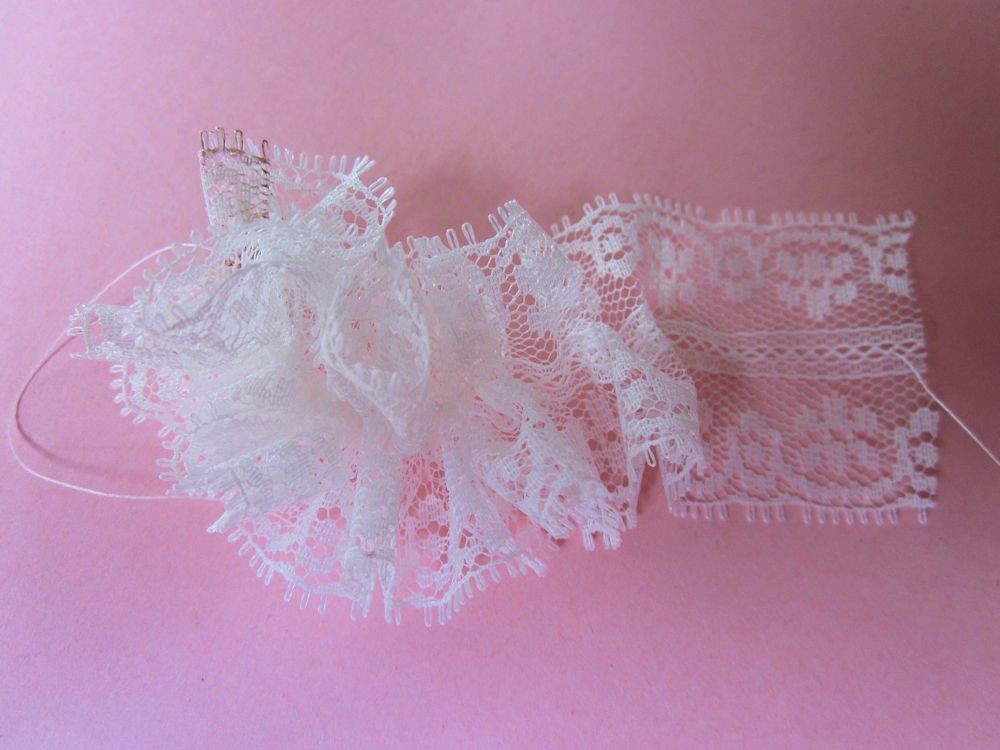

Gather tightly and tie the two ends together to form your rosette.


Add buttons or paper flowers for the center. 

**The flowers on the front cover just seemed too white, so I soaked them in a strong bath of tea for a minute or so....

I also used the Sheer Frayed Flowers on the cover, and gave them the same tea treatment.  Various ribbons will respond to the tea or any other dye differently.


Ribbon Embellished Die-Cut Leaves

I used this technique throughout the book, with various ribbons.  Here I am showing you the burlap, but the 2.5" net did a fantastic job of adding texture to more intricate dies. 

Glue your ribbon onto cardstock and let dry completely.  Run through your die-cut machine as normal.


Velvet Cockscomb Flower


Take an 18" piece of 3/4" wide velvet ribbon.
Fold the ribbon in half, length-wise.  Sew a running stitch along the raw edges, forming a tube.  Gather the ribbon, and tie-off.  Form a small circle, for the center of the flower, at one end of the gathered ribbon, and stitch into place.  Reverse the direction of the ribbon, and wind around the center, and stitch into place. Continue wrapping the ribbon in a serpentine fashion, and stitching in a pleasing formation. 


Page One


Flowers
Tattered Twill Flower

Ribbons


Tattered Twill Flower


Cut a 24" piece of 1 1/2"Twill Ribbon, and cut tabs along one edge.  Cut tabs on the opposite edge, but make sure they are off-set from the first side.


Fold the ribbon, a little less than half, so that the edges are off-set.  Sew a running stitch along the folded bottom.

Gather the ribbon, coil the ribbon into a flower and stitch into place.


Page Two
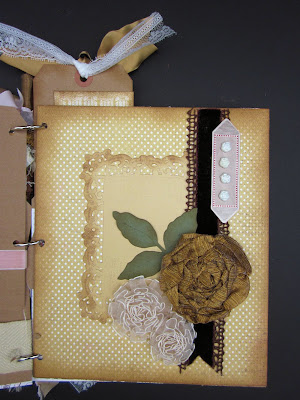

Flowers
Spider Web Rose
Rolled Rosette Flower

Ribbons


Rolled Rosette Flower


Cut a 1 1/2" circle from a sheet of Scor-Tape.  Remove one side of the backing.


Starting in the center, roll the ribbon in a rosette pattern, until all of the tape is covered.
Remove the other side of the backing and attach to your project.


Spider Web Rose


Cut a 2" circle from cardboard, and find the center, and poke a hole.  Take a length of twine, knot one end, and thread a needle on the other.  Come up from the back of the circle, and go around the edge and back up through the hole - forming a spoke. Form a total of 9 spokes (or any odd number).  Tie the twine off in the back. 
Tie a knot in the end of your ribbon, thread the other end through a large needle, and bring the ribbon up through the center hole.

Start weaving the ribbon over and under the spokes. (I find this much easier to do if the ribbon is threaded through a needle). Continue until the entire circle is covered, and glue the end of your ribbon to the underside of the circle.


Page Three

Flowers
Lollipop Flowers

Ribbons


Lollipop Flowers

For each flower, cut 5 concentric circles - freehand, from wide satin ribbon.

Hold each circle carefully, beside a candle flame.  This will melt and seal the satin ribbon, as well as cause the circle to cup.

Stack the circles and glue them together.  Add a decorative button to the center to finish the flower.

Page Four


Flowers
Rolled Rosette Flower (also on p.2)
Gathered Lace Flower (also on cover)

Ribbons

Page Five

Flowers
Five Petal Posy

Ribbons

Each flower will require 5 small, 5 medium and 5 large circles, cut from a wide satin ribbon.


Melt the edges of each of the circles, as you did for the Lollipop flowers above.
Take one of each sized circles, for each petal, and line them up with bottoms even.  Pinch the grouping together and stitch to hold.  When all five petals are completed, sew them together to form your flower.  Add a knot of Net for the center of the flower.
Page Six


Flowers
Bias Cut Satin Carnations

Ribbons

Bias Cut Satin Carnations

Take 24" of bias cut satin ribbon, and cut fringe along the edge.  Vary the width and the depth of each cut.  Put a small section of the ribbon between your thumb and foreginger, and gently "pluck"  to remove some of the fibers.

Do this for the entire length of ribbon.  Start winding the ribbon into a rosette, and stitch into place.


I hope you have enjoyed visiting my Ribbon Garden, and hope that you will be "planting" your own ribbon flowers on many projects. And thanks for sticking with me on the longest blog post I've ever written!  If you are inspired to make any ribbon flowers, I would love to see them!


May Art Ribbons
Cheery Lynn Designs Dies
Oval Doily Stacker One
Fanciful Flourish
Judy's Blooms
Ribbon Eyelet Border
Mega Fanciful Flourish
Fiona's Magic Mirror
Dutch Scallop Square
French Lattice Large
Anastasia Border
Pair of Ferns
English Tea Party
Build a Flower One

Carta Bella
Beautiful Moments Patterned Paper

Worldwin Papers
Cardstock - ColorMates

Jolee's
French General tags, buttons

Epiphany Crafts
Epoxies - Bubble Caps Round 14

Want2Scrap
Paradise Chipboard Album

Creative Inspirations Paint

Ranger
Distress Ink, Distress Paint

Glue Arts
 GlueGlider Pro

Monday, July 9, 2012

Build-A-Box with Scor-Pal and Really Reasonable Ribbon

Today I will be sharing my project that was featured on the Scor-pal blog as part of this week's Scor-pal and Really Reasonable Ribbon blog week. Of course, if you missed this project or any of the other great projects from the Scor-pal team you'll want to hop on over there and see what's been going on this week. Be sure to leave comments on each post from this week for a chance to win some great prizes. Entry deadline in 8am Monday, July 16, so there's still time.


This week Scor-pal has teamed up with the DT from Really Reasonable Ribbons - so I hope you will enjoy all of the inspiration we have to share! I love all of the Printer's Tray type boxes that are so popular right now, and thought I would show you how to build your own using your Scor-pal and Scor-tape.


The trick that I found for creating my Build-A-Box is to use an existing box as your template.  As you make each mini box, you will line it up using the template as your guide to keep everything squared.  This box had an inside measurement of 12.5" x 12.5" x 2".  I decided to keep the 2" depth for my boxes.


Just like working a puzzle, I planned how big I wanted each of my boxes, and arranged them in a pleasing manner.  In the example shown above, my patterned paper was 8" x 5".  I added 2" to each side of the cardstock - so it was 12" x 9".  I scored the cardstock with a 2" border all around (In other words, with the long side along the top gate, score at 2" and 10".  Turn a quarter turn and score at 2" and 7").  Cut tabs by cutting each of the horizontal folds, just even with the vertical fold.

Add patterned paper for the inside of each box, then use Score-Tape to glue the tabs and form your box.

Continue building boxes, and lining them up in the template box.  As you build the puzzle, secure the pieces together with Scor-tape. After all sections are built and connected, remove from the base box.  You are now ready to embellish.


I bought a child's flip flop and covered it with patterned paper.  I cut a circle from a Scor-Tape sheet and used that to form a rosette using May Arts Ribbon - Sheer Box Pleats (Parrot Green). I removed the paper backing and attached the ribbon in a circular pattern to form my flower.


I used the Sheer Organza Satin Center (Turquoise) to add some little banners to my Relax square.


To cover the seams of my boxes, I lined them with ribbons.  The Satin/Grosgrain Double Band Coral worked very well. because it was easy to tell where to fold the ribbon in half. The Scor-tape made it super easy to attach.


I hope you will give this a try - and have fun collecting all of your trinkets!

Summer Days


I just got back from a wonderful beach vacation, so I thought today would be the perfect time to share this very summery layout of my sweet nephew.  This picture seems like it was just taken yesterday, but this adorable little boy is getting ready to start first grade. Where does the time go?!!

I wanted to keep this layout pretty clean to accentuate the bright colors - and the hot feel of a summer day. I used the Mega Tea Party Doily to mat my pictures.  I don't know if you noticed, but I cut the doily twice, using two different papers. Then I layered it, so that it looked like the orange polka dot paper contiuned from the rectangular layer, up and over the doily.


I created flowers for the jar using Judy's Blooms and the Pair of Ferns.

What are you doing for fun this summer? How are you staying cool? You might want to stay inside and create a project for this week's challenge at Cheery Lynn Designs. Our theme is Silver and/or Gold.  Remember, you could win a $20 gift certificate!

Sunday, July 8, 2012

Coming this week.... Scor-Pal and Really Reasonble Ribbon

Scor-pal and their designers are excited to announce that they are teaming up with Really Reasonable Ribbon for a fun and inspiring week on both the Scor-pal blog and the Really Reasonable Ribbon Blog. The other Scor-pal designers and I have some exciting projects to share. Here's just a peek at what I have created for the event.


Be sure and check out both company blogs starting today, July 8th, and continuing throughout the week to not only find out how to make this project and many more. Don't forget to check back each day and leave comments for a chance to win some great prizes.

Thursday, July 5, 2012

Popcorn! Popcorn!


I saw the cutest popcorn popper on Pinterest, and was inspired to make this gift container.  This popcorn cart turned out pretty big ( 11" h x 8"w x 7"d) - so, I was popping corn all afternoon!


I made paper rosettes for my wheels as well as my central decoration.  I used JustRite Stampers Cling Classic Lace Edges Two to stamp and emboss my scalloped border.


There are so many fun things arriving at Scrap-Mart everyday, so get your shopping list ready!


DCWV - Carnival Stack
WorldWin Papers  Cardstock
May Arts Ribbon
Wow Embossing Powder - Suzy West Bubblegum
Scor-pal
Scor-tape

Challenges;
JustRite Friday Challenges: Stars and Stripes


Tuesday, July 3, 2012

Wishing Well


I am so blessed to have the best sister in the world! I found this picture of us sitting on a Wishing Well, when we were little, and decided it was time to be scrapped!

I added the Houndstooth embossing using  a Crafter's Workshop Stencil.  I sprinkled Wow Suzy West Earthtone Paprika over most of the circle, and finished up the rest with the Earthtone Honey.  Then I added just a little Sierra Sunrise across the whole thing to give it a little glimmer.


I made a dimensional Wishing Well to embellish my page.  I stamped the bricks and embossed them with Wow Opaque Bright White.  I further embellished it with die cut flowers and vines.  The bottom of the well is open to accomodate an envelope, that stores my hidden journaling.


DCWV Playtime Stack

Cheery Lynn Designs Dies

May Arts Ribbon: Satin/Grosgrain Double Band
Crafter's Workshop Template
Penny Black Stamp: Brick Wall
American Crafts Thickers
Want2Scrap Pearls

Challenges:
Once Upon a Sketch: Sketch/Friends

Monday, July 2, 2012

It's a Party!

This weekend was my sister's birthday, and I just wanted to invite you to join me for a little peek into the party decor I created.


This is a collage photo to give you a better feel for the whole party atmosphere. I used DCWV's Lemon Flower Stack, and repeating elements (Judy's Blooms) to create continuity throughout my decor.


Every party has to start with an invitation.  I used flowers created with Cheery Lynn Designs Judy's Blooms. My sentiment layer is framed with the French Lattice Large. Behind that layer is the Oval Doliy Stacker One.  A scalloped border was added along the bottom patterned paper panel using the Tiffany Border.


For my cupcake tower, I created pennant flags for the toppers, and one showy rosette for the top cupcake.  I bought  lollipop sticks from the baking section of a craft store, and used those to glue the toppers.  On the pennants, I used the Cheery Lynn Designs Pennant Die and cut it apart, leaving pairs of triangles.  Then, I folded the pair in half, over the lollipop stick, and glued the two sides together.  This made my decoration cute from either side.  I used the Miniature rose and a pearl to finish each one off. The top rosette was embellished with a flower and greenery from Judy's Blooms and the Mini Fanciful Flourish.

My chalkboard was so easy to make! I took a wooden frame, and covered it with my patterned paper, and then used the DCWV All Chalked Up paper, and just glued it into the opening.  I added more Judy's Blooms flowers, and the Pair of Ferns for my greenery.


A couple of years ago, I bought a party centerpiece from Target, that coordinated with their current line of paper plates.  It was so easy to transform this "vase" to match my new decor, by just covering the pieces with my patterned paper, adding some May Arts ribbon, and more Judy's Blooms flowers and leaves.


My placesetting was finished off with a placemat from the Mega Tea Party Die and napkin rings made with the Judy's Blooms.


I hope I have given you some inspiration on new ways to use some of your favorite dies! If you throw a party, don't forget to invite me!

The new challenge this week in Christmas in July - be sure to play along for your chance to win a $20 gift certificate to Cheery Lynn Designs!

Here's a Give-Away For You!


***Winner is Donna Coughlin! Congratulations! Email me to claim your prize!

Hi, I'm so excited to share that I have a give-away for one of my lucky readers! Susan, from Design Team Calls, is graciously letting me give a 6 month subscription to her website!  Now if you are not famliar with Design Team Calls, let me just tell you....you want to get to know them!  Not only is there a very inclusive list of current calls, but there is so much more.  There are interviews from Designers, Manufacturers and Leaders in this Industry.  It is such an easy site to navigate, you will soon become an addict like me!  Several of the teams that I now serve on, I learned about from Design Team Calls.

Sound like fun? I thought so! If you would like a chance to win, just leave a comment on this post, and we will pick a winner on July 16th (the opening day of the Summer CHA)

Saturday, June 30, 2012

Momenta Shaped Wing-Fold Card with Scor-Pal

Today I will be sharing my project that was featured on the Scor-pal blog as part of this week's Scor-pal and Momenta blog week. Of course, if you missed this project or any of the other great projects from the Scor-pal team you'll want to hop on over there and see what's been going on this week. Be sure to leave comments on each post from this week for a chance to win some great prizes. Entry deadline in 8am Monday, July 2, so there's still time.
I recently saw a tutorial for a very cool Shaped/ Folded card and have been waiting for just the right moment to try it out.  The tutorial that I used was from Marianne Skjelstad’s blog. She didn’t have a name for this fold, but I thought that a wing-fold shaped card was a good description. The Scor-pal Design Team got to play with products from Momenta this week – and I used the BFG Pyramid Pad.

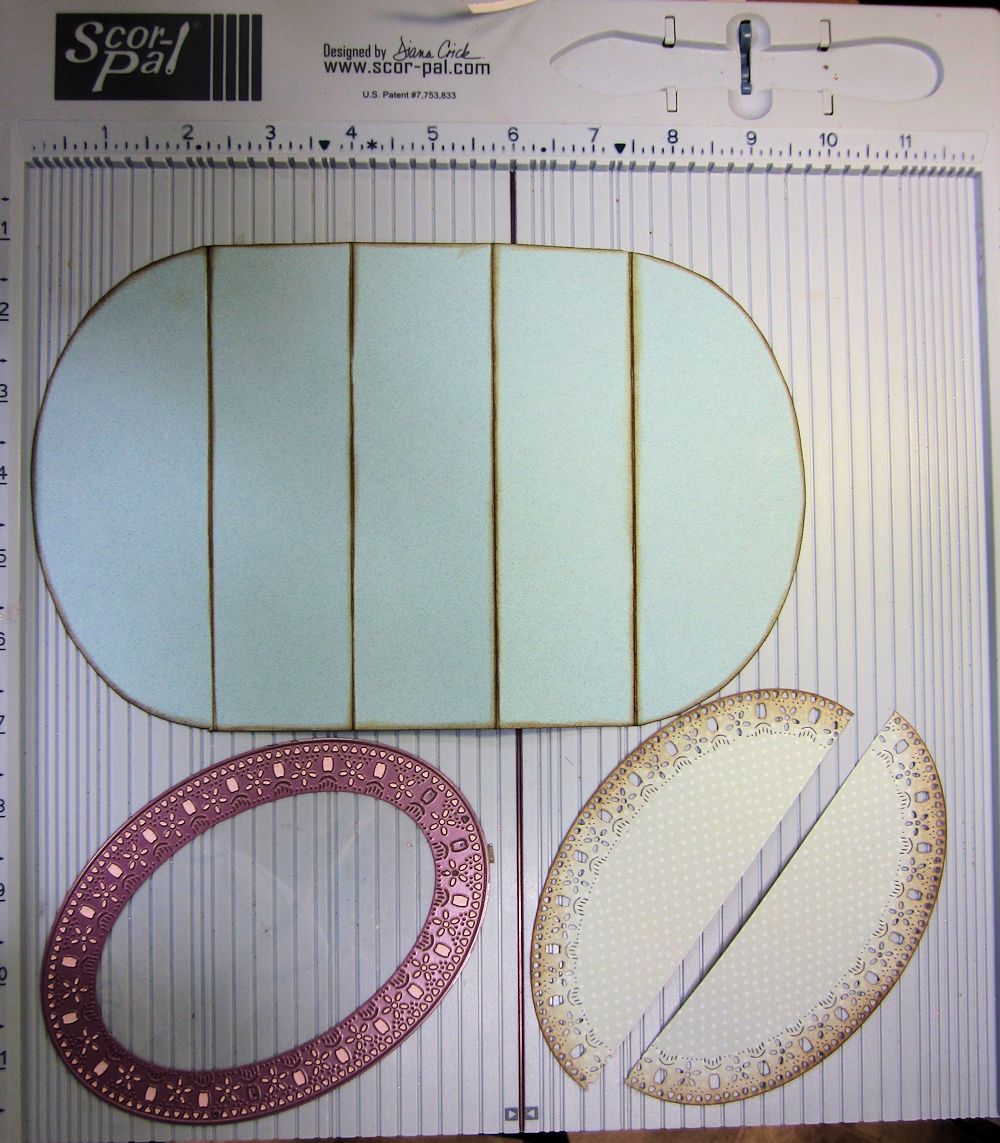
First, cut your paper 6” x 11 ¾”. Using your Scor-pal, score at 3 ¼”, 5”, 6 ¾”, and 8 ½”.  Fold as shown.


Trace the shape that you want to use for your wing on the two outer panels of the card, and cut to shape.  For my card, I traced the outside of my Cheery Lynn Designs Oval Doily Stacker One die, so that it would be slightly larger than my die cut.  Ink the edges and add decorative die cuts, and patterned paper panels.


I used a smaller die from the same set for my front panel and decorated it with matching stickers from Momenta. This is the card folded into closed position.
Side View


Closed View