Wednesday, October 31, 2012

Fantastic News!


Woo hoo! I am so excited!  I made the Heartfelt Creations Design Team! I absolutely adore their line of stamps,dies and paper and can't  wait to share with you my creations.  I've been on their team for one term before, and now I am blessed to be back.  Congratulations to all of the other new and returning designers.  Huge thank-you's to all of my friends that took the time to vote for me!  You can check out the rest of the team here.


Monday, October 29, 2012

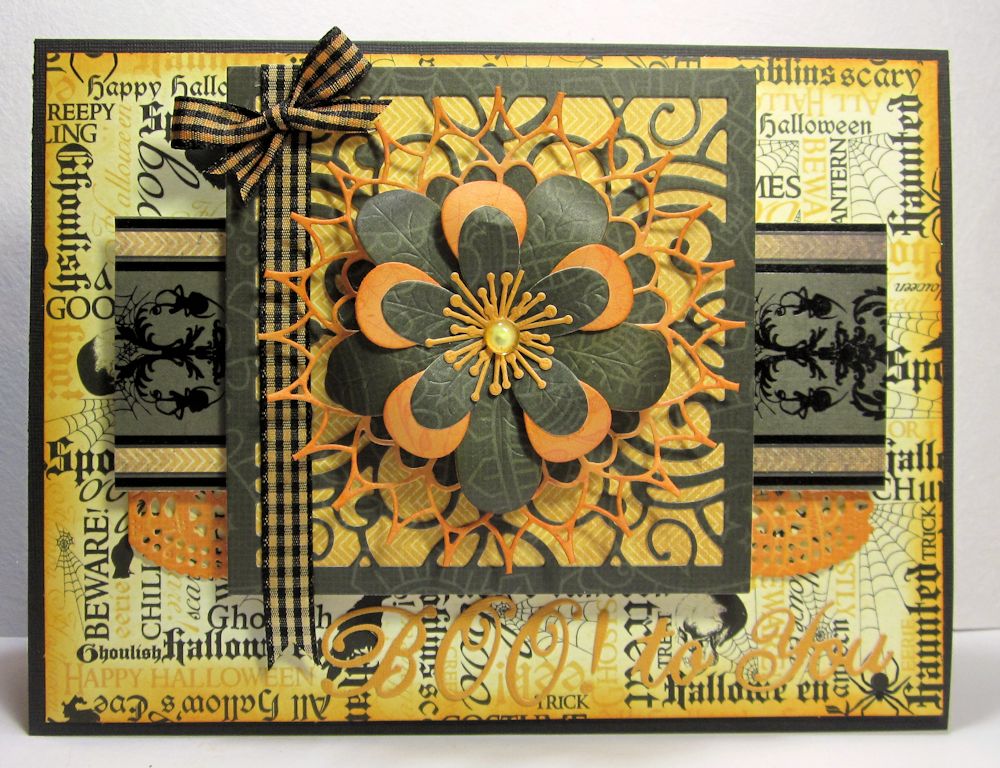
Boo To You!


I realized I really haven't made too many Halloween projects this year, so I thought I better sneak one in while I still can.  My flower was created using the leaves and petals from the Franipani set, built on a calyx from the Embellishment 2 set.  My sentiment was created using a mix of fonts and words (you).  The new Delicate Lace Script is my favorite font set ever! Such a perfect size.
 
The new challenge is up at the Cheery Lynn Designs Challenge blog, and it's one of my favorites! Vintage!  So be sure to play along for your chance to win a $20 gift certificate.
 
 
Patterned Paper - DCWV: Witches Brew
May Arts Ribbon
Robin's Nest Dew Drops


Sunday, October 28, 2012

Scor-Pal and DCWV Week

The design team from Scor-pal has been having a great time playing with the Autumn Melody stacks from DCWV this week. If you haven't seen all of the fabulous projects, be sure to go back to the  Scor-Pal blog and check them out so you don't miss a thing. The papers from DCWV's Autumn Melody stacks are wonderful to create any type of fall project and when paired with the  Scor-Pal, the ideas are endless.  This book card opens to reveal a shadow box feature as well as a handy pocket.


To get started, cut the following from a very heavy paper:
(2)  8" x 4.5"
(2)  8" x 6"

For each panel of paper, align  the long side against the top fence of the Scor-Pal.  Score at every inch.  Do this for all 4 panels of paper and accordian pleat them.


Ink the edges of all the folds.Interlock the folds, with the two longer panels running vertically and the shorter panels horizontally.  Glue each section together, in the corner intersections,  to form a rectangle.


Cut a sheet of brown cardstock from the Autumn Melody Cardstock pad - 6 3/4" x 10 3/4 ".  With the long side along the top of the Scor-Pal, score at 5" and 5 3/4".  Add patterned paper to the back of the frame using Scor-tape.
 
 
Cut 4 strips of paper from the wood grained patterned paper -
(2) 4 1/2 x 1 1/4
(2)  6 x 1 1/4

Arrange these panels on top of the accordian book frame, to form a frame with mitered corners. (See how to use your Scor-pal to easily align this in the photo below.)


Decorate the inside and outside panels as you desire.


Supply List
American Crafts Button
Helmar Zapdots

Thursday, October 25, 2012

Heartfelt Prayers


I really love the homespun feel of these papers from Farmhouse Paper company! I created the flowers using Spellbinders Rose Creations and Glimmer Mist.  The sentiment and the flourish at the bottom are from the JustRite Vintage Filagree Fancies (designed by Becca Feeken).  I also used the rose stamp from that set to make a watermarked image underneath the embossed sentiment.  It doesn't jump out at you, but adds another layer of interest.


May Arts Ribbon
Wow Embossing Powder
Xyron Mega Runner

Challenges:
JustRite: Flower Power


Monday, October 22, 2012

Friends Love You Forever

 
Last week, Cheery Lynn Designs introduced their October release - and today I am sharing with you a 12 x 12 layout that features more of the new dies, as well as some older ones.  If you have'nt checked out all of the new release, be sure to take a look. They are really fabulous!


My flowers were created using the center cuts from the Heartland America XL Doily as the base, and then layering that with two different cuts from the Snowflowers Set 1.  Who would of thought that you could create flowers using a heart doily and snowflakes? Just goes to show you how versatile these dies are!  I loved how Kianel made curly-ques last week using the Expandable Quilling strip die - and had to try my hand at it this week.  Thanks for a great idea, Kianel!
 
My flowers were created using the center cuts from
 
New Release dies:
Previously Released Dies:
Patterened Paper: DCWV - Autumn Melody
Cardstock: DCWV - Autumn Melody
 
This week's challenge is all about texture.  How easy is that? Be sure to play along for a chance to win a $20 gift certificate.
 
Challenges:
DCWV: Stack-a-Holic October Sketch
Simon Says: Photo Inspiration
 

Scor-Pal and DCWV Week

Good Monday Morning! I just wanted to let you know that this week the design teams for Scor-Pal and DCWV have teamed up to bring you a week of inspiration.  My post is up today on the Scor-Pal blog. I'd love for you to stop by and leave a comment for your chance to win a Scor-Buddy.


Thursday, October 18, 2012

Garden Time


This weekend I had a chance to sit down an play along with the Kaisercraft sketch challenge - which I always love participating.  Let me tell you though - my hands are still inky!

 
I combined Kaisercraft papers and flowers with Dusty Attic chipboard - and was thrilled with the finished layout. I painted each and every brick, and added a little Flowersoft moss - which really looks like the wall in my parent's garden.
 
 
I embossed this urn using Wow Ultra High Silver powder and Distress Embossing Powder combined.  I love the tarnished, weathered look.

My frame has so many layers of mists and crackle paint - but it has so much depth.
 
Thanks for stopping by!
 
Kaisercraft: Just Believe Collection - patterned papers, Dusty Pink Blooms,
 Sweet Nothings Rub-ons, Bling, Lace
Dusty Attic Chipboard
Tattered Angels: Glimmermist, GlimmerGlam
Wow Embossing Powder
 
Challenges:

Wednesday, October 17, 2012

Autumn Breeze


Well, today is the final day to vote for your favorite semi-finalists at the Heartfelt Creations blog - so if you haven't done so, could you take a moment and check it out?  Just by voting you will be entered to win a $50 gift certificate (and you would be helping this girl out!)


I've got the details on how I created this layout, and all of my supplies listed below.  Thanks for stopping by!


1.        Take base page ( Corner blackberry) and water distress the edges.  After the page is completely dry, randomly swipe the edges using watermark ink, and sprinkle with ultra high gold embossing powder and heat set. Tuck gold crocheted lace  behind any tears along the edge.  Glue this entire sheet to a plain piece of cardstock.

2.       Cut patterned papers for each of the panels as shown.  Ink the edges using Leather ink, and then use a distress tool along the edges. Tuck a piece of crocheted lace under the long panel on the left side before gluing to the base.  Use dimensional foam to attach the other panels.

3.       Stamp the flower trio from the Tattered Blossoms Swirl set onto white cardstock, and fussy cut the image.  Color using Copic markers.

4.       Stamp 5 of the smallest Tattered Floral flowers, and 2 of the second smallest – using brown archival ink. Heatset the ink.  Using the matching die set, cut the flowers. Paint using Creative Inspirations Paint and allow to dry. Shape the flowers using the McGill tools and mat. Layer the flowers on the stamped base and add pearls to the centers.  Tuck chipboard swirls behind the flower cluster.  Attach above the photograph.

5.       Die cut words from the Spellbinders Girly Grunge Labels and attach directly to the photograph.

6.       Stamp, cut and color multiples of all 5 sizes of the Tattered Blossoms as above.  Shape and layer the petals as shown to create varying blossoms.

7.       Build the flower cluster on the page, starting with a die cut flourish from the Decorative Dutch Iris set.  Center your largest flowers in the center of the cluster, adjacent to the photograph.  Make sure some of the cluster touches the photo to help maintain a nice balance.  Build the cluster up by  adding the smaller flowers to the outer edges. Add glass glitter to some of the flower centers, pearls to others.

8.       Stamp the Maple leaf from the Open Falling Leaves set using watermark ink. Heat emboss using the Ultra High Gold embossing powder and cut using the matching die.  Shape the leaves and nestle the around the flowers.  Add a small bow made with the gold crocheted ribbon amongst the flower cluster.

9.         Color the chipboard letters using embossing powders and add to the upper right corner of the layout.
Supplies


Dusty Attic Chipboard

WorldWin Papers Cardstock

Wow Embossing Powder – Ultra High Gold; Presidio Purple

Creative Inspirations Paint


Stampendous Glass Glitter


Versamark Ink


Tuesday, October 16, 2012

Art Washes Away - Wall Art


I've got a project to share with you today that I used tons of my new Hampton Art/ 7 Gypsies stamps on. This was one of those projects that I just kept layering stamps and mists and paints to come up with a really cool surface.


Hampton Art Stamps:  7 Gypsies Distressed Words PS0680, Best of Times IC0150;  Art Soul DF2193
Clearsnap:
Donna Salazar Mixd Media Inkz:  Patina, Pewter, Leather
Archival Dye: Mudslide
Top Boss Watermark Ink
Smooch Spritz: River Mossy, Log Cabin
Smooch Ink: Ocean Soul

 Twiddleybitz Chipboard: Fantasy Shadow Box Frame, Cast Iron Gates, Lamp Post
WorldWin Papers Cardstock
Cheery Lynn Designs Dies: Miniature Rose; Flourish Leaf Strip
Wow Embossing Powder: Metaline Green; Ultra High Copper; Tea Garden Green; Black Glint; Metallic Platinum Sparkle; Clear
Tools: Fiskars Fuse Die Cutting Machine
Adhesives: GlueArts Glue Glider Pro – Perma Tac; U Cut It Dimensional Adhesive


Designer Notes:


1.       Ink and stamp all pieces of the Shadow Box Frame prior to assembling.

2.      On the main piece of the frame, stamp the Distressed Words using the Mudslide Archival ink.  Heat set.

3.      Using an open flourish stamp from Best of Times, stamp over the top of the words with the watermark ink. Heat set.

4.      Ink over the entire surface with Pewter ink.  Randomly apply Patina, and apply Leather around the edges.  Take a paper towel and rub to remove excess ink from the embossed areas.

5.      Fill in areas of the flourish stamp with Smooch ink.  Blot immediately with a paper towel to soften.

6.      Randomly stamp a few areas with the Distressed Words and the Mudslide ink.

7.      For the inside of the shadow box, mist with Smooch spritz.  Allow to dry, and stamp the sentiment with watermark ink, and sprinkle with black embossing powder. Heat set.

8.      Ink the fence with the same Mixd Media Inkz as above, adding more of the brown.  Randomly sprinkle with the Copper and Green embossing powders and heat set.

9.      Emboss the lamppost with the Platinum powder and heat set.  Add handmade flowers and die cut leaves to embellish.

10.  Ink all remaining pieces of the frame (fronts and backs) with the Patina ink.  Assemble as shown.  
 
Thanks for stopping by!

Challenges:
Simon Says - Dies/Punches
Stamp and Show - Favorites (Using Mists to build layers)

Monday, October 15, 2012

October New Release at Cheery Lynn Designs!

 
It's our new release day at Cheery Lynn Designs and I know you are going to be thrilled with the new dies we have to show you today.  Be sure to visit the inspiration blog today and see the great creations the rest of the design team came up with.
 
I've got a 10 x 10 canvas to share with you today.  I think my favorite die set for this release is the Delicate Lace Script.  This one set has upper and lower case as well as numbers and punctuaction. This is the perfect size to add words to your projects - and look how awesome it looks adding the Forever die.
 
I've experimented a little bit with quilling in the past, so the new Expandable Quilling Strip die is going to have me adding rolled paper to my projects.  But that's not the only use for this die - it cuts such thin strips of paper, that have slight embossed lines (making it easy to shape the paper), that I was able to tie a bow for the top of the birdcage, using one of the strips.
 
The flower was made using the Build A Flower 2, and Embellishment 2.  Leaves and greenery were created with dies from the new release.
 
So, I hope you are inspired by what we have to show you today - and I'll look forward to seeing what Cheery Lynn fans come up with using the new dies!
 
New Release Dies used:
Other Cheery Lynn Designs Dies
 
Patterned Paper: Graphic 45 BirdSong
 
Challenges:
Simon Says:Dies or Punches